


LESSON OVERVIEW
Ever wondered how developers turn a basic grid into a breath-taking mountain range or an expansive landscape? What tricks do artists and developers use to make terrain feel alive? Building on the last lesson, this time we’re heading into Unreal Engine 5 to build our own automatic landscape material, breaking down the industry-standard tools and methods used to create realistic and immersive terrain materials.
Before we jump into the hands-on work, let’s cover some key theory and terminology!
WHAT IS A LANDSCAPE SHADER?
A landscape shader is a material system that combines multiple textures to define the look of a terrain! These textures control lighting, color, and surface details, helping to create a realistic or stylized environment.
In simple terms, textures are layered to form materials, and materials are blended together to build the final landscape shader. This process is essential for achieving believable and dynamic terrain in Unreal Engine.
WHY DO SHADERS USE TILING AND SO MUCH LAYERING?
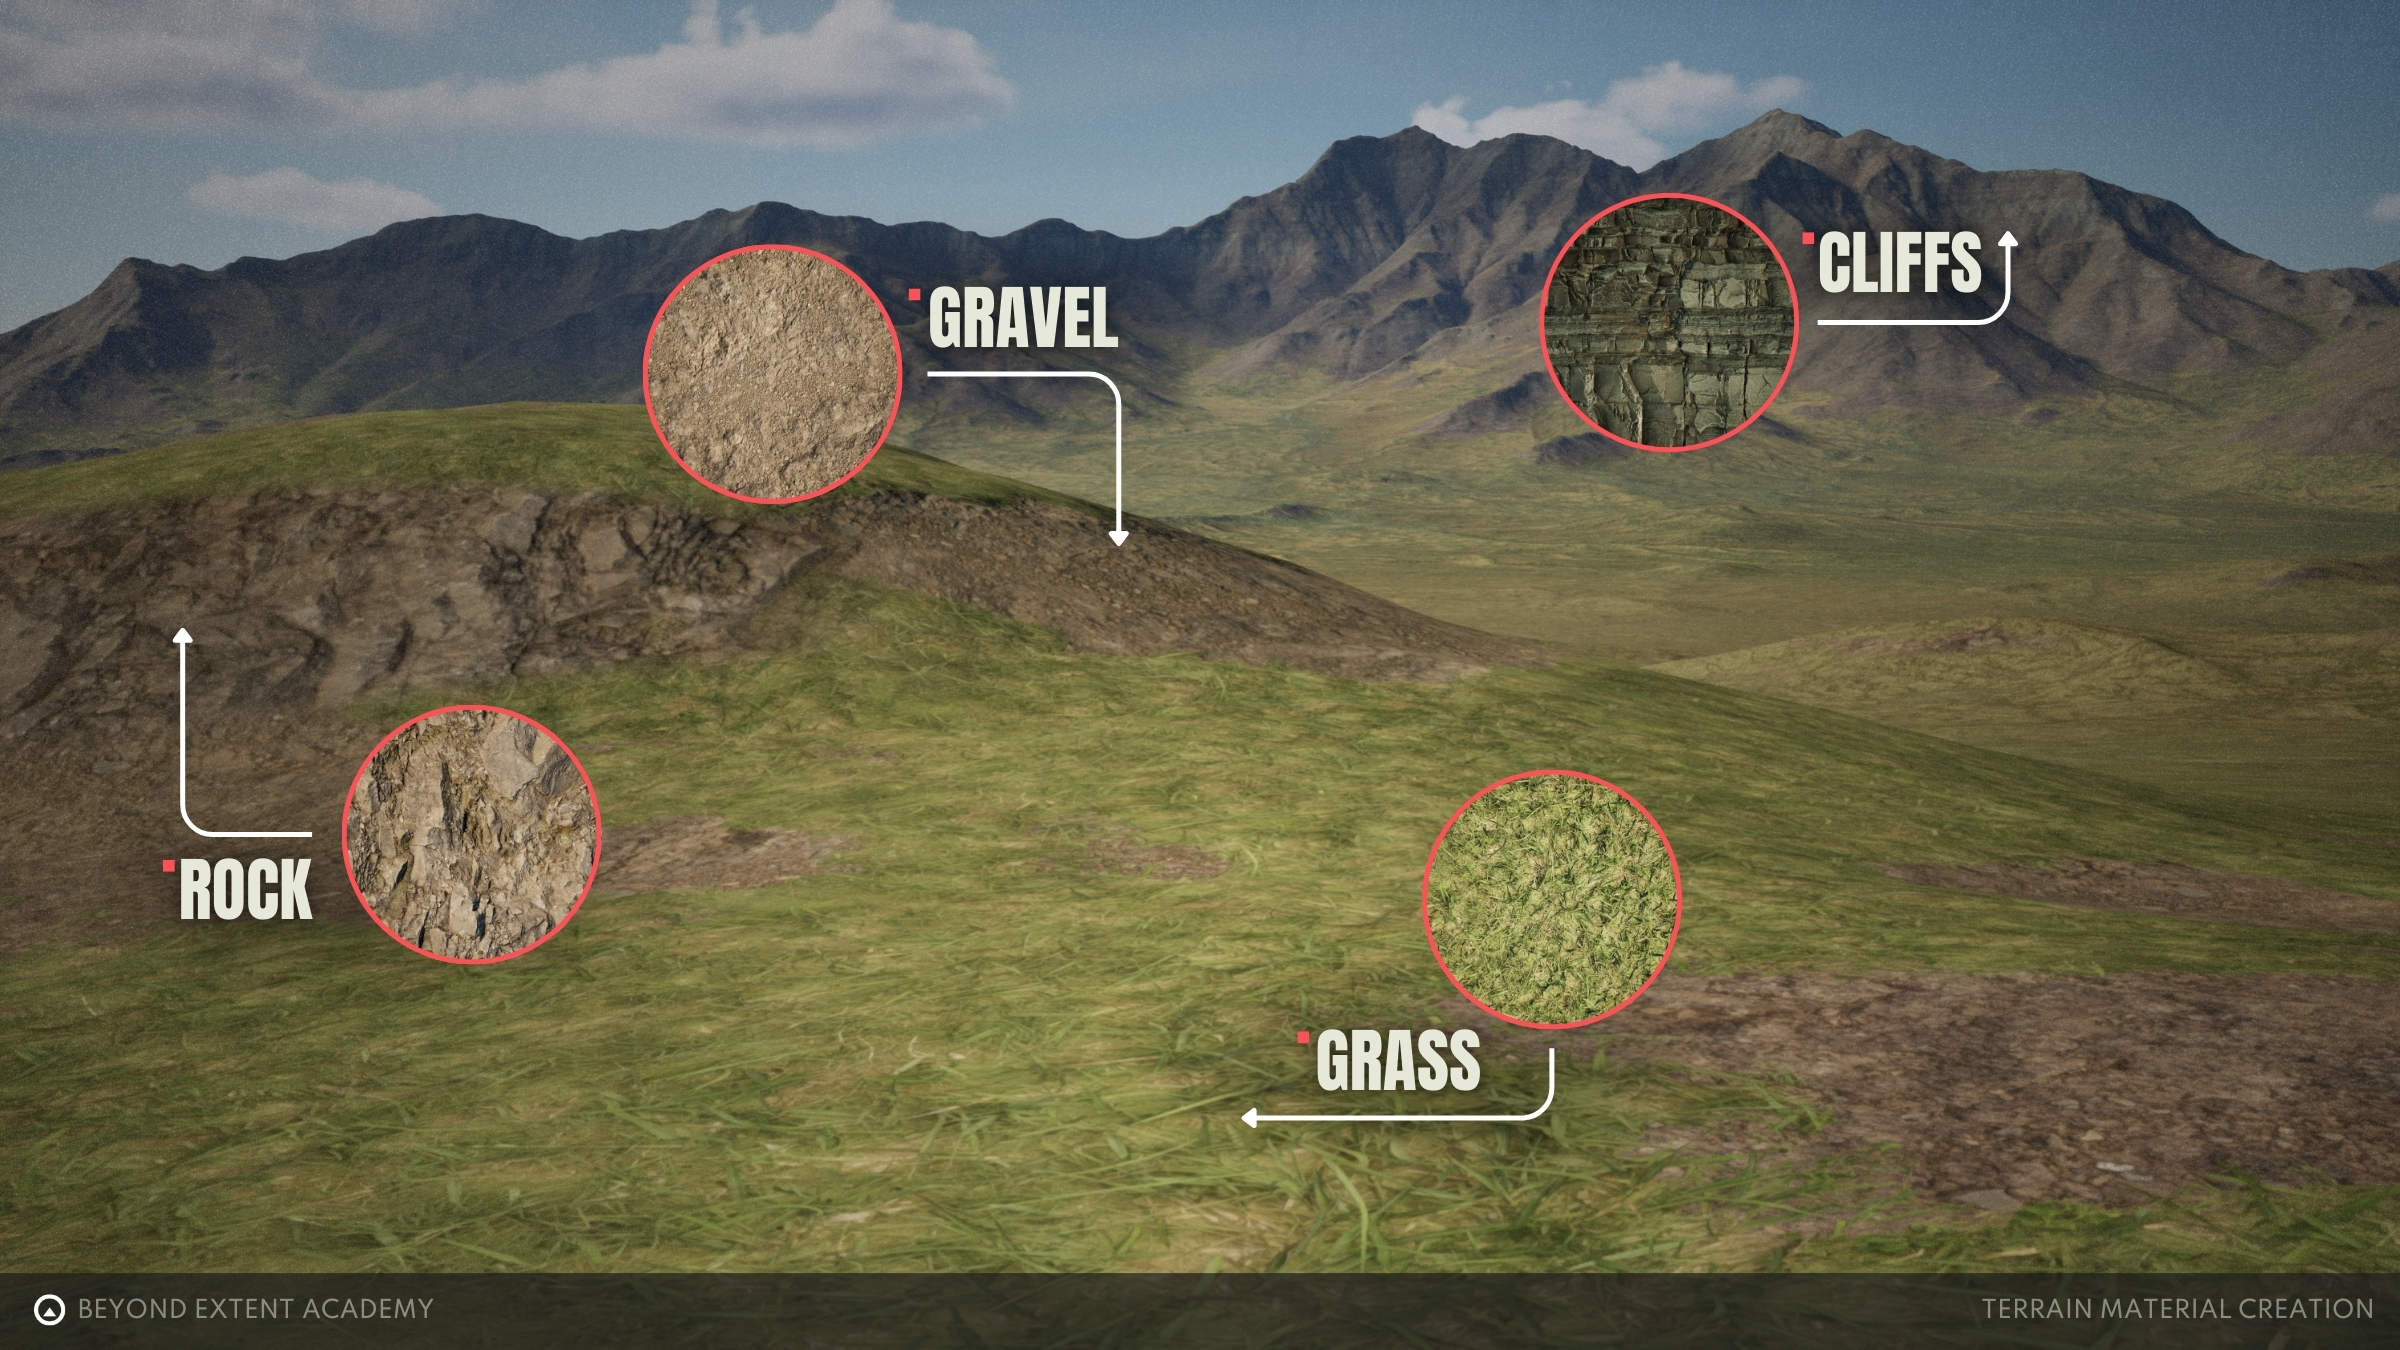
The unfortunate limitation with landscape shaders is texture resolution, and unless you have a NASA supercomputer, the best way to cover such large areas is by repeating those textures across your terrain.

Texture Tiling

The consequence of repeating textures is that it creates a predictable and unnatural pattern. Natural landscapes are never completely uniform, so how do we fix this?
Let’s cover the tricks that artists use to make terrains look natural!
DIFFERENT MATERIAL TECHNIQUES
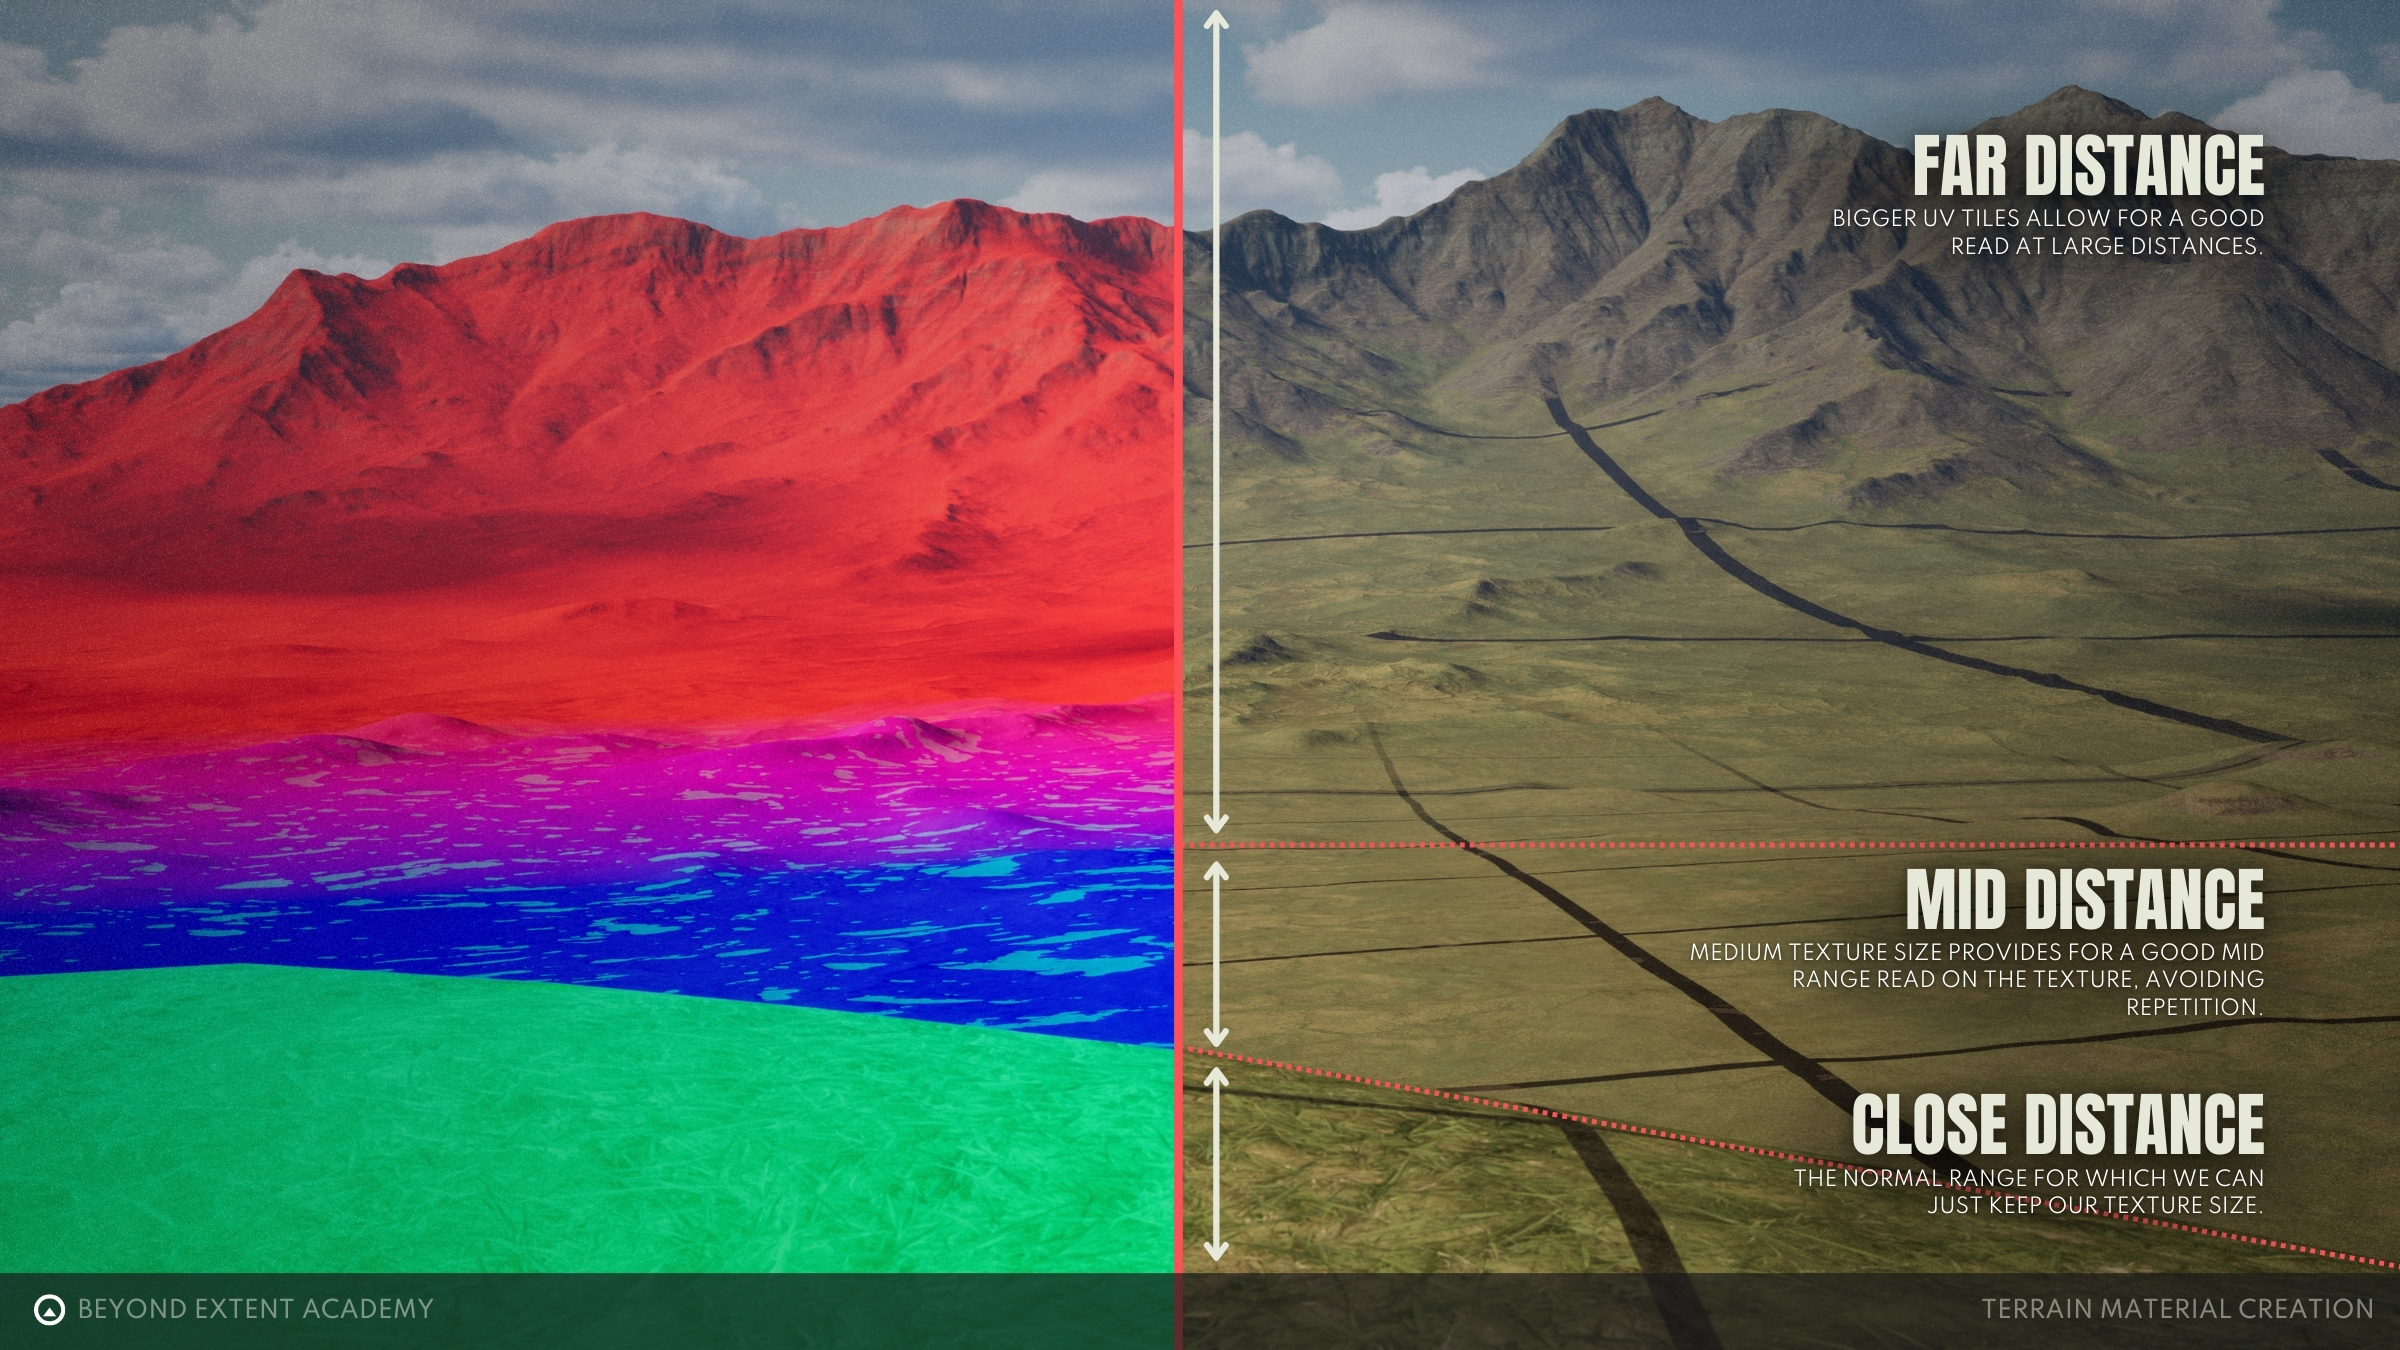
Camera Distance Blending
Camera Distance Blending is a method in which a larger, lower resolution material is used at a distance, blending into a foreground material, to reduce tiling. In fact, if you have a very large area to cover, it may be worth using a third layer for very far distances.
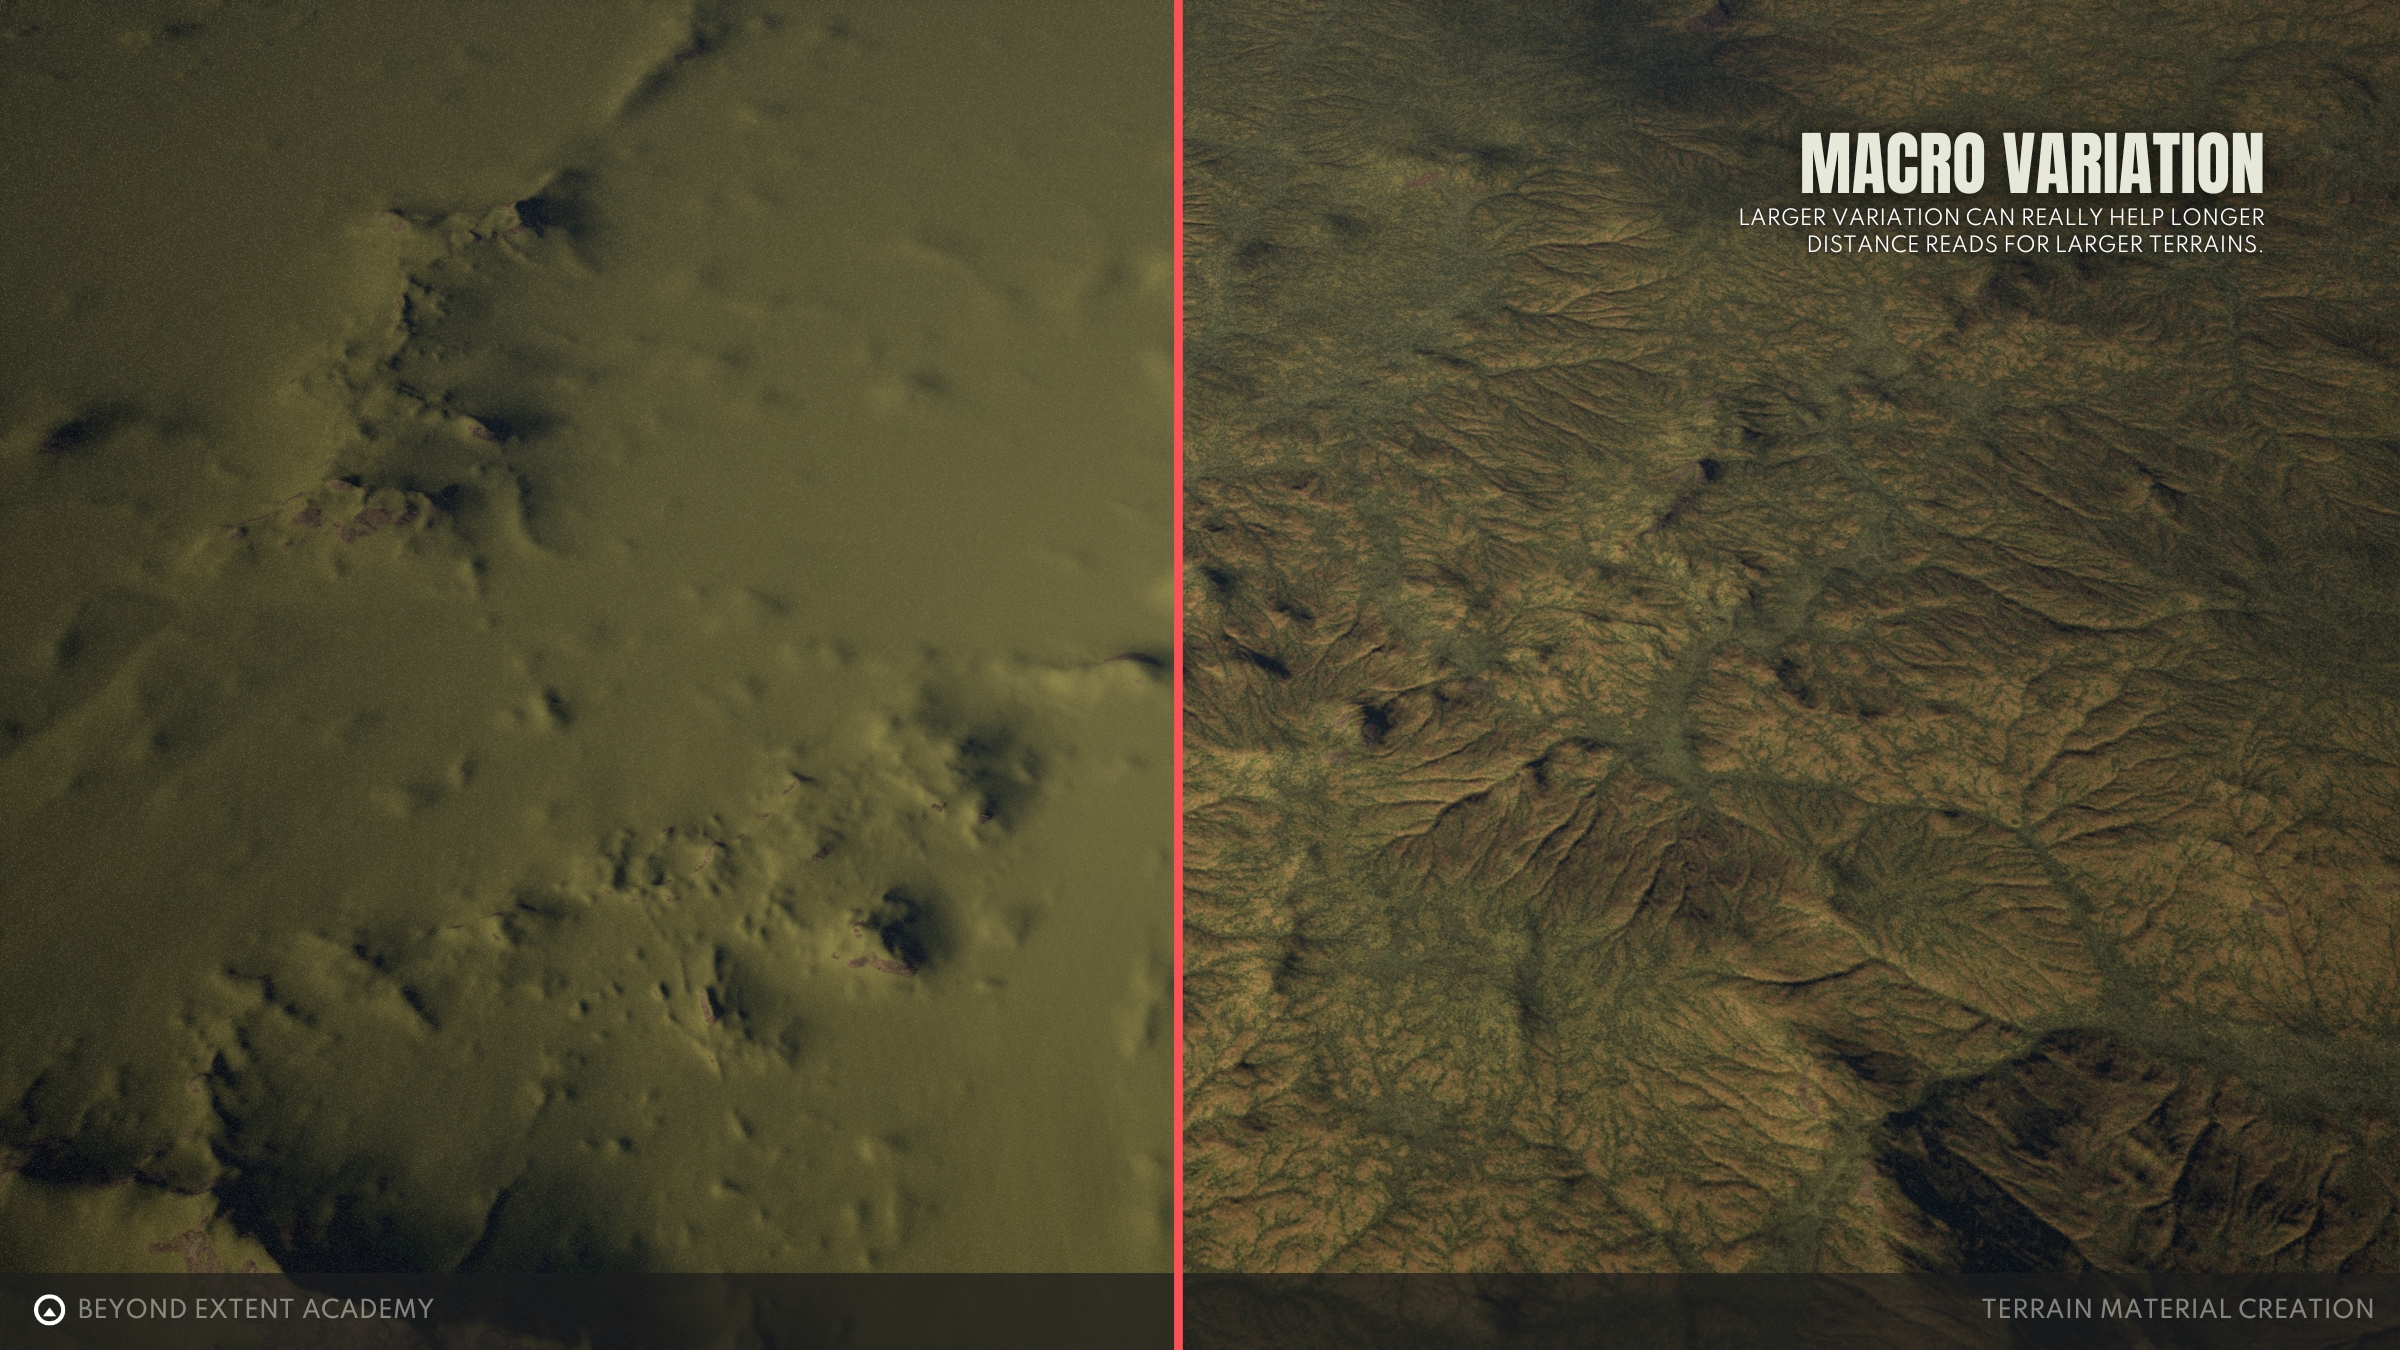
Macro Variation Textures
Large-scale or "Macro" Variations are used for a variety of purposes. While they’re often used for color blending, noise textures can be leveraged to embed a whole new material into a landscape, adding detail to a landscape!
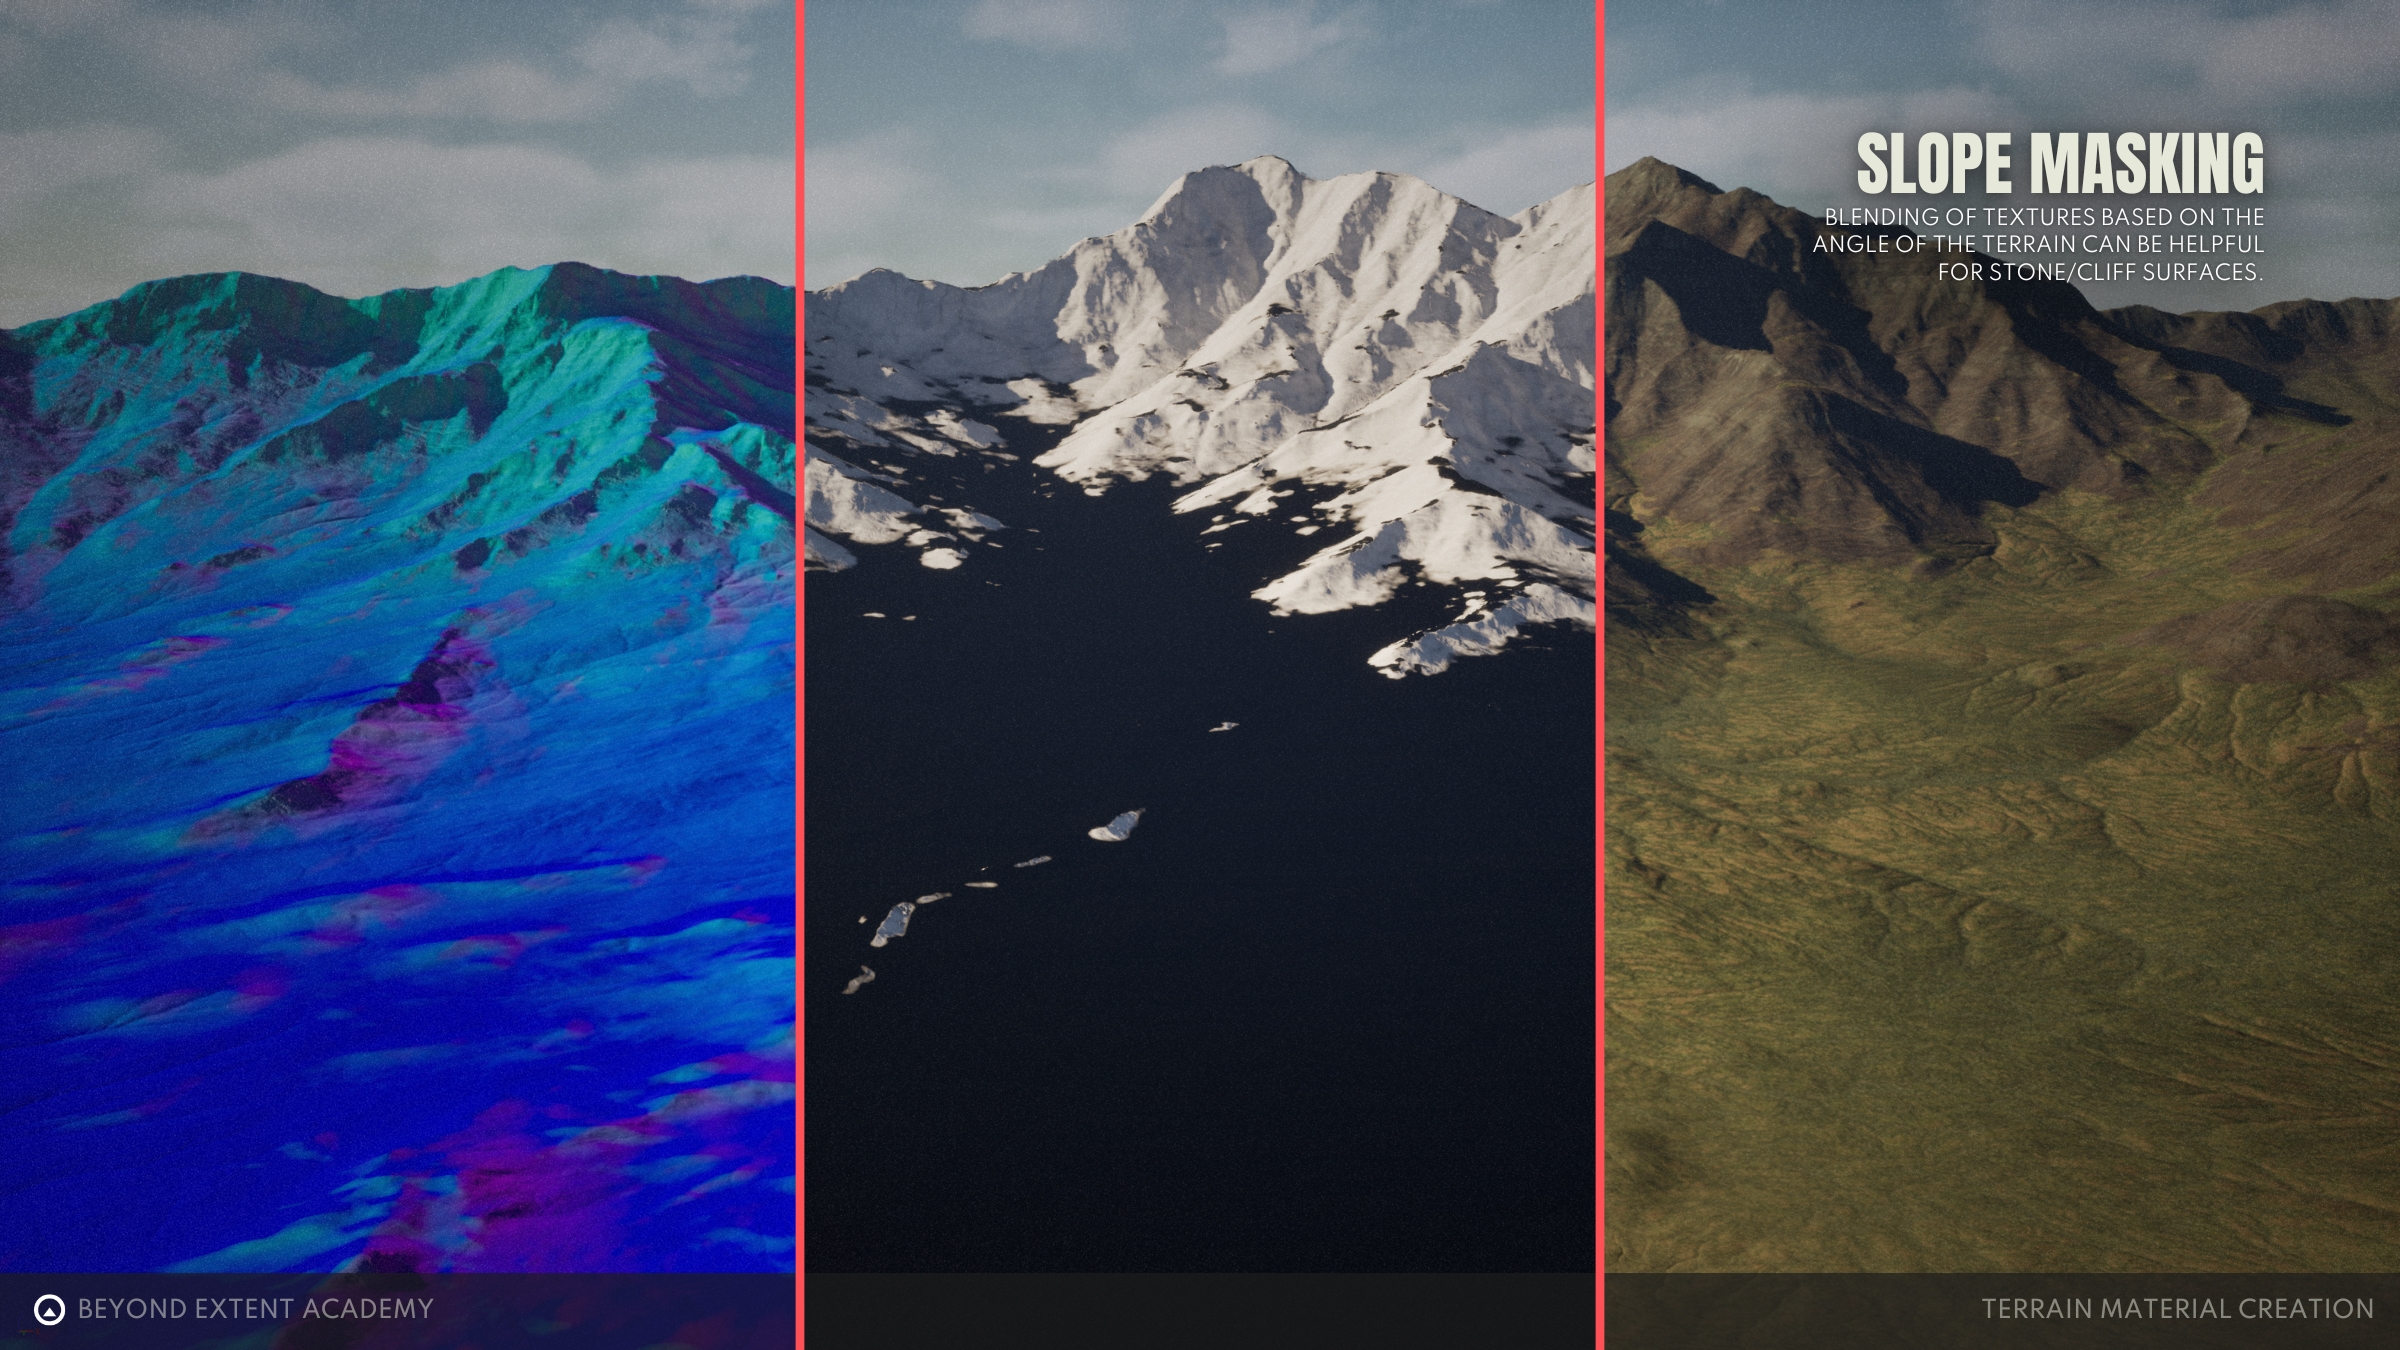
Slope Masking
Slope masking adds extra dimension to your terrain -- think cliffs! The normal direction of a landscape can be used to isolate areas of high slope angle, and blend in a cliff or foothill material to break things up.
Axis (Tri-Planar) Projection
Here comes a cool one: material projection, aka tri-planar (or bi-planar) magic. It won’t solve your tiling issues, but it’s a great way to get clean results on cliffs and steep surfaces! Here, we’re projecting the same material on the global x and y axis and blending those projections to wrap our cliff material around our mountain.

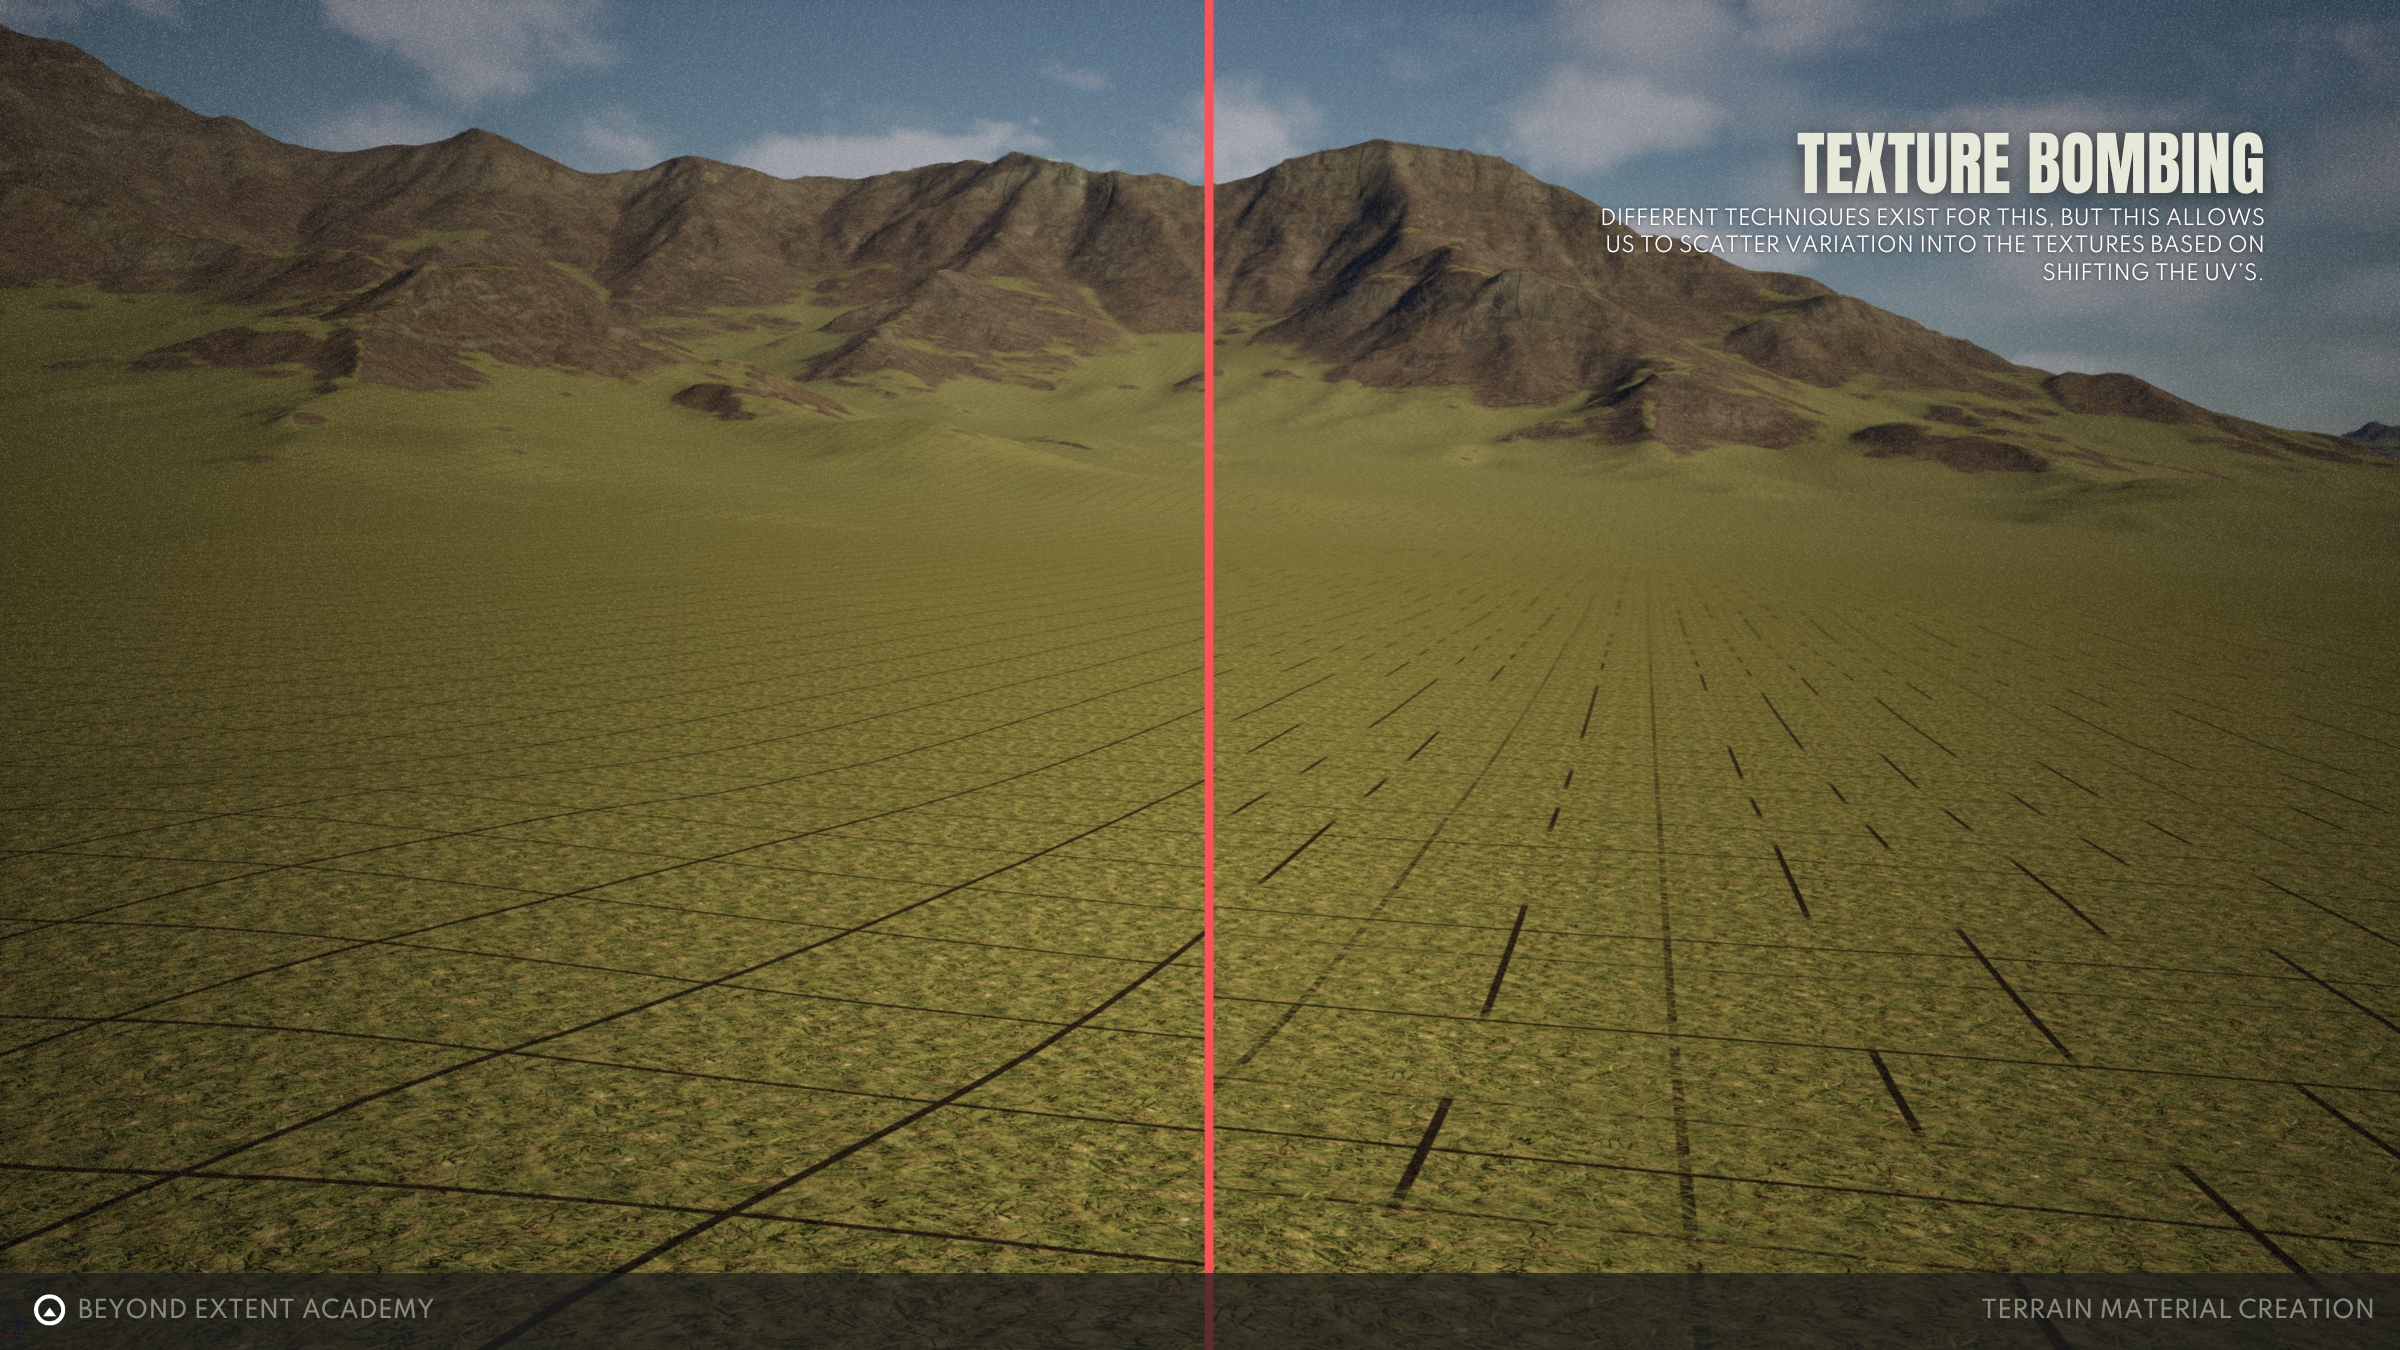
Texture Bombing
The final piece of the puzzle: texture bombing. By randomizing UV coordinates, we can eliminate obvious tiling and create a more believable environment. There are many ways to randomise textures to avoid repetition, but in this lesson we’ll avoid texture bombing because of it’s heavy performance costs, and because we’re using other methods to achieve similar results. Nonetheless, it’s important to know about the concept, as it is commonly used.
HOW DO WE PUT IT ALL TOGETHER?
A step-by-step of how to assemble the landscape material.
exercise
Creating a Master Material

Creating a Master Material
overview
In this applied exercise, follow along as we create the first layer in our Terrain Material “Cake”: the Master Material! A Master Material is necessary in order to allow the provided lesson content to function. In this lesson we will be assembling pre-made material functions to better understand how terrain is created and give you hands-on experience with important terrain techniques.
lesson example content
Get into it instantly by downloading the starter content for this lesson
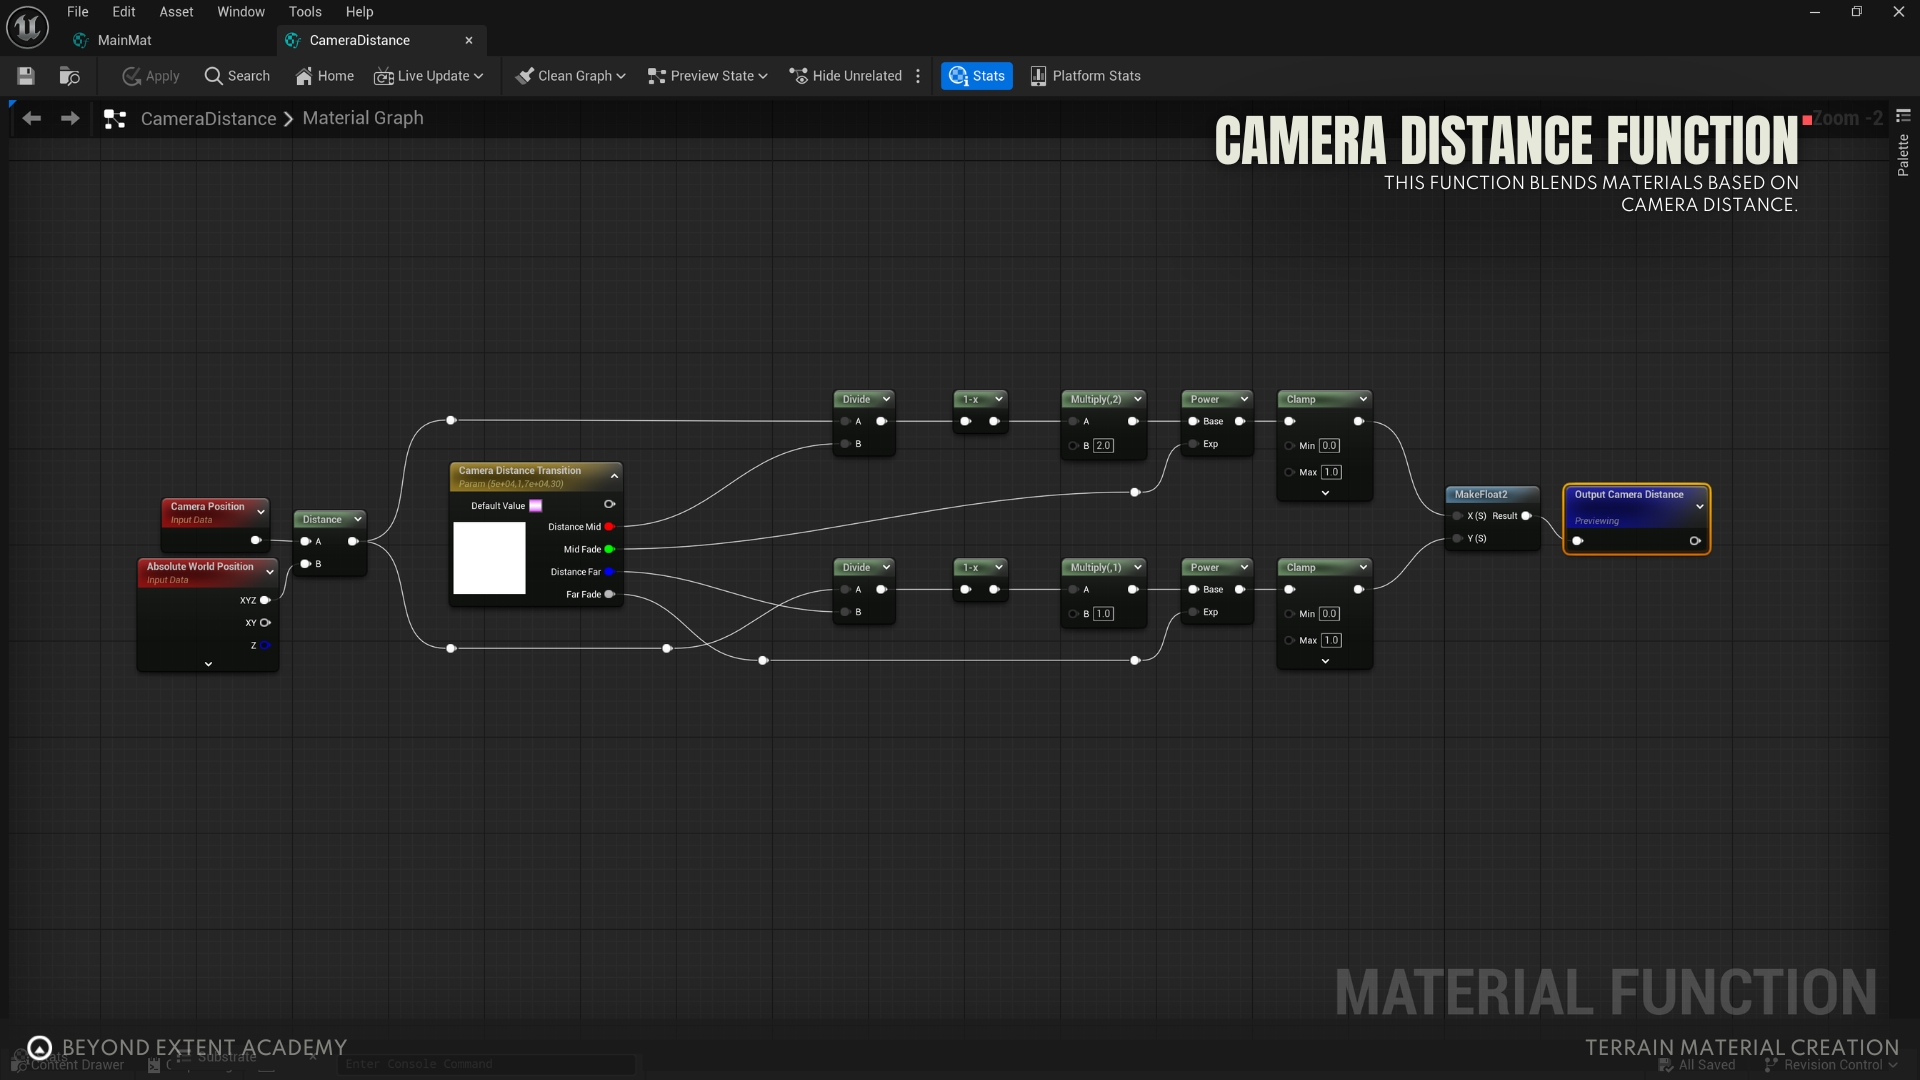
download lesson contentIn this exercise we’re setting things up so that our provided Material Functions (pictured here) can operate! Our own textures and parameters will be plugged into this Material Function to make our terrain nice and pretty.
You can also view our Material Function here!

First things first, we need a Master Material and a Material Instance.
Right-click in the content drawer to create a new material (here named M_Landscape). Then, right-click on that material to create an instance — let’s call it either M_Landscape_Inst or MI_Landscape, something to signify that it is an instance. Whichever way you go, just make sure to keep your naming nice and consistent!
Once we have our Master Material and instance in place, let’s open up the Master Material and check ‘Use Material Attributes’ in our material output. Next, create a landscape layer blend node with a layer called ‘Auto’ and assemble the master material using the material functions provided with the lesson.

Apply the Material Instance to the landscape by selecting the landscape in the outliner, and navigating to the landscape material in the details panel, dropping our instance in the appropriate slot.

After applying the Material Instance, we still need to apply our landscape layer which can be done in two steps. Navigate to Landscape Mode (alternatively by pressing Shift + 2) and enter the ‘Paint’ tab. Near the bottom of this tab we can press a small button called ‘Create Layers from Assigned Materials’ which will import our ‘Auto’ layer.

Once we’ve imported our Auto layer, we want to create a new Weight-Blended layer and save it in our content drawer. After that, make sure to right-click on the imported Auto layer again and hit ‘Fill Layer’ — that step’s important!
Now that we have the layer set up, we’re finally at the fun part! We can open our Material Instance and start assigning our textures and fiddling with the parameters to get the results we’re looking for!

Here in the Material Instance, we can also enable a camera distance blending visualizer to help us adjust the distance blending between materials.

exercise
Dirt, Painting & Splines
Dirt, Painting & Splines
overview
In this applied exercise, we’re adding the second layer to our “Terrain Material Cake” — the dirt layer — and diving into painting and splines for footpaths!
lesson example content
Get into it instantly by downloading the starter content for this lesson
download lesson contentIn this exercise we’ll be adding another layer to our landscape, starting with the master material which we set up with the same material functions and layout as the image below. We also need to set our landscape layer blend to use height blending for both layers ‘Auto’ and ‘Dirt’.

We also want to create a new weight blended layer for our ‘Dirt’ layer in landscape mode, however this time we won’t be choosing to ‘Fill Layer’ like before as this is meant to provide us a way to paint dirt on the landscape.

With our paint layer set up, we can use the noise textures provided and apply them to the material instance to give us some procedural patches on the landscape to apply our dirt.

Finally, we can apply our dirt textures and tweak the settings until we’re happy with the result. We now have a way to produce procedural gravel or dirt patches as well as a method for hand painting on the landscape.

Landscape Layer Painting
Switching to ‘Landscape’ mode in Unreal engine will allow you to paint on your landscape using the materials you have assigned to your Landscape Layer node in your landscape material.

Landscape Splines
To create a spline material we will be assigning the Secondary Material to a new landscape layer in our master material. This new layer will use an ‘Alpha Blend’ as opposed to our two previous layers. We will also need to go into our landscape paint mode and create a layer named Spline and give it Non-Weight Blended layer info.

To start placing splines we go to the ‘Manage’ tab in landscape mode, select ‘Splines’, and create a new editable layer with the class ‘Landscape Edit Layer Splines’.

With our spline layers set up, holding CTRL and left clicking in the viewport will place spline control points. Creating multiple connected control points will give us a landscape spline which we can control the shape of using the details panel on the right.

Selecting ‘Control Points’ in the bottom right details panel allows us to manipulate the various width parameters assigned to the spline, and selecting ‘Segments’ allows us to assign our material to the segments of the spline and thus the landscape.

If we assign a material layer - in this case ‘Spline’ - to the Segments ‘Layer Name’ we can see that our material layer is now applied to the terrain underneath our spline.

exercise
Cliffs, Slope Detection & Axis Projection
Cliffs, Slope Detection & Axis Projection
overview
Let’s wrap things up in this final applied exercise by building the final layer of our “Terrain Material Cake” using slope detection and axis projection to apply our cliff and foothills materials!
lesson example content
Get into it instantly by downloading the starter content for this lesson
download lesson content