


to do list (Admin only)
Add a section on https://artsandculture.google.com/ for finding references per material
LESSON OVERVIEW
Ever looked at someone’s amazing work and wonder how they we’re able to translate something from reality to 3D and make it look so realistic and believable?
Well, skill and effort definitely, but one really important part of the process is the gathering of references to be able to deconstruct and recreate them from what you see in life.
To help you to get there we’re going to figure out how to use references, why we need them and how to use them in our projects effectively. At the end of this lesson we will end up with a full mood and reference board we can use in any of our projects.
⚠️
Missing LESSON OVERVIEW
WHY DO WE USE REFERENCES?
As environment artists we have the special opportunity to work on a large variation of subjects, going from smaller individual objects to larger places or even worlds. Gathering references is this first step in understanding a concept or an idea and then taking that and directing a piece where it needs to go. There’s no way that we can retain all the visuals and just pull them from memory, so to make sure we replicate something accurately we need to validate what we make with references!
If we think about creating visuals we want people to understand them, and for that we need to find a way that we can speak a common visual language with other people, use using real life references can help us get closer to making our visual communication clear, not only to us but other people as well.
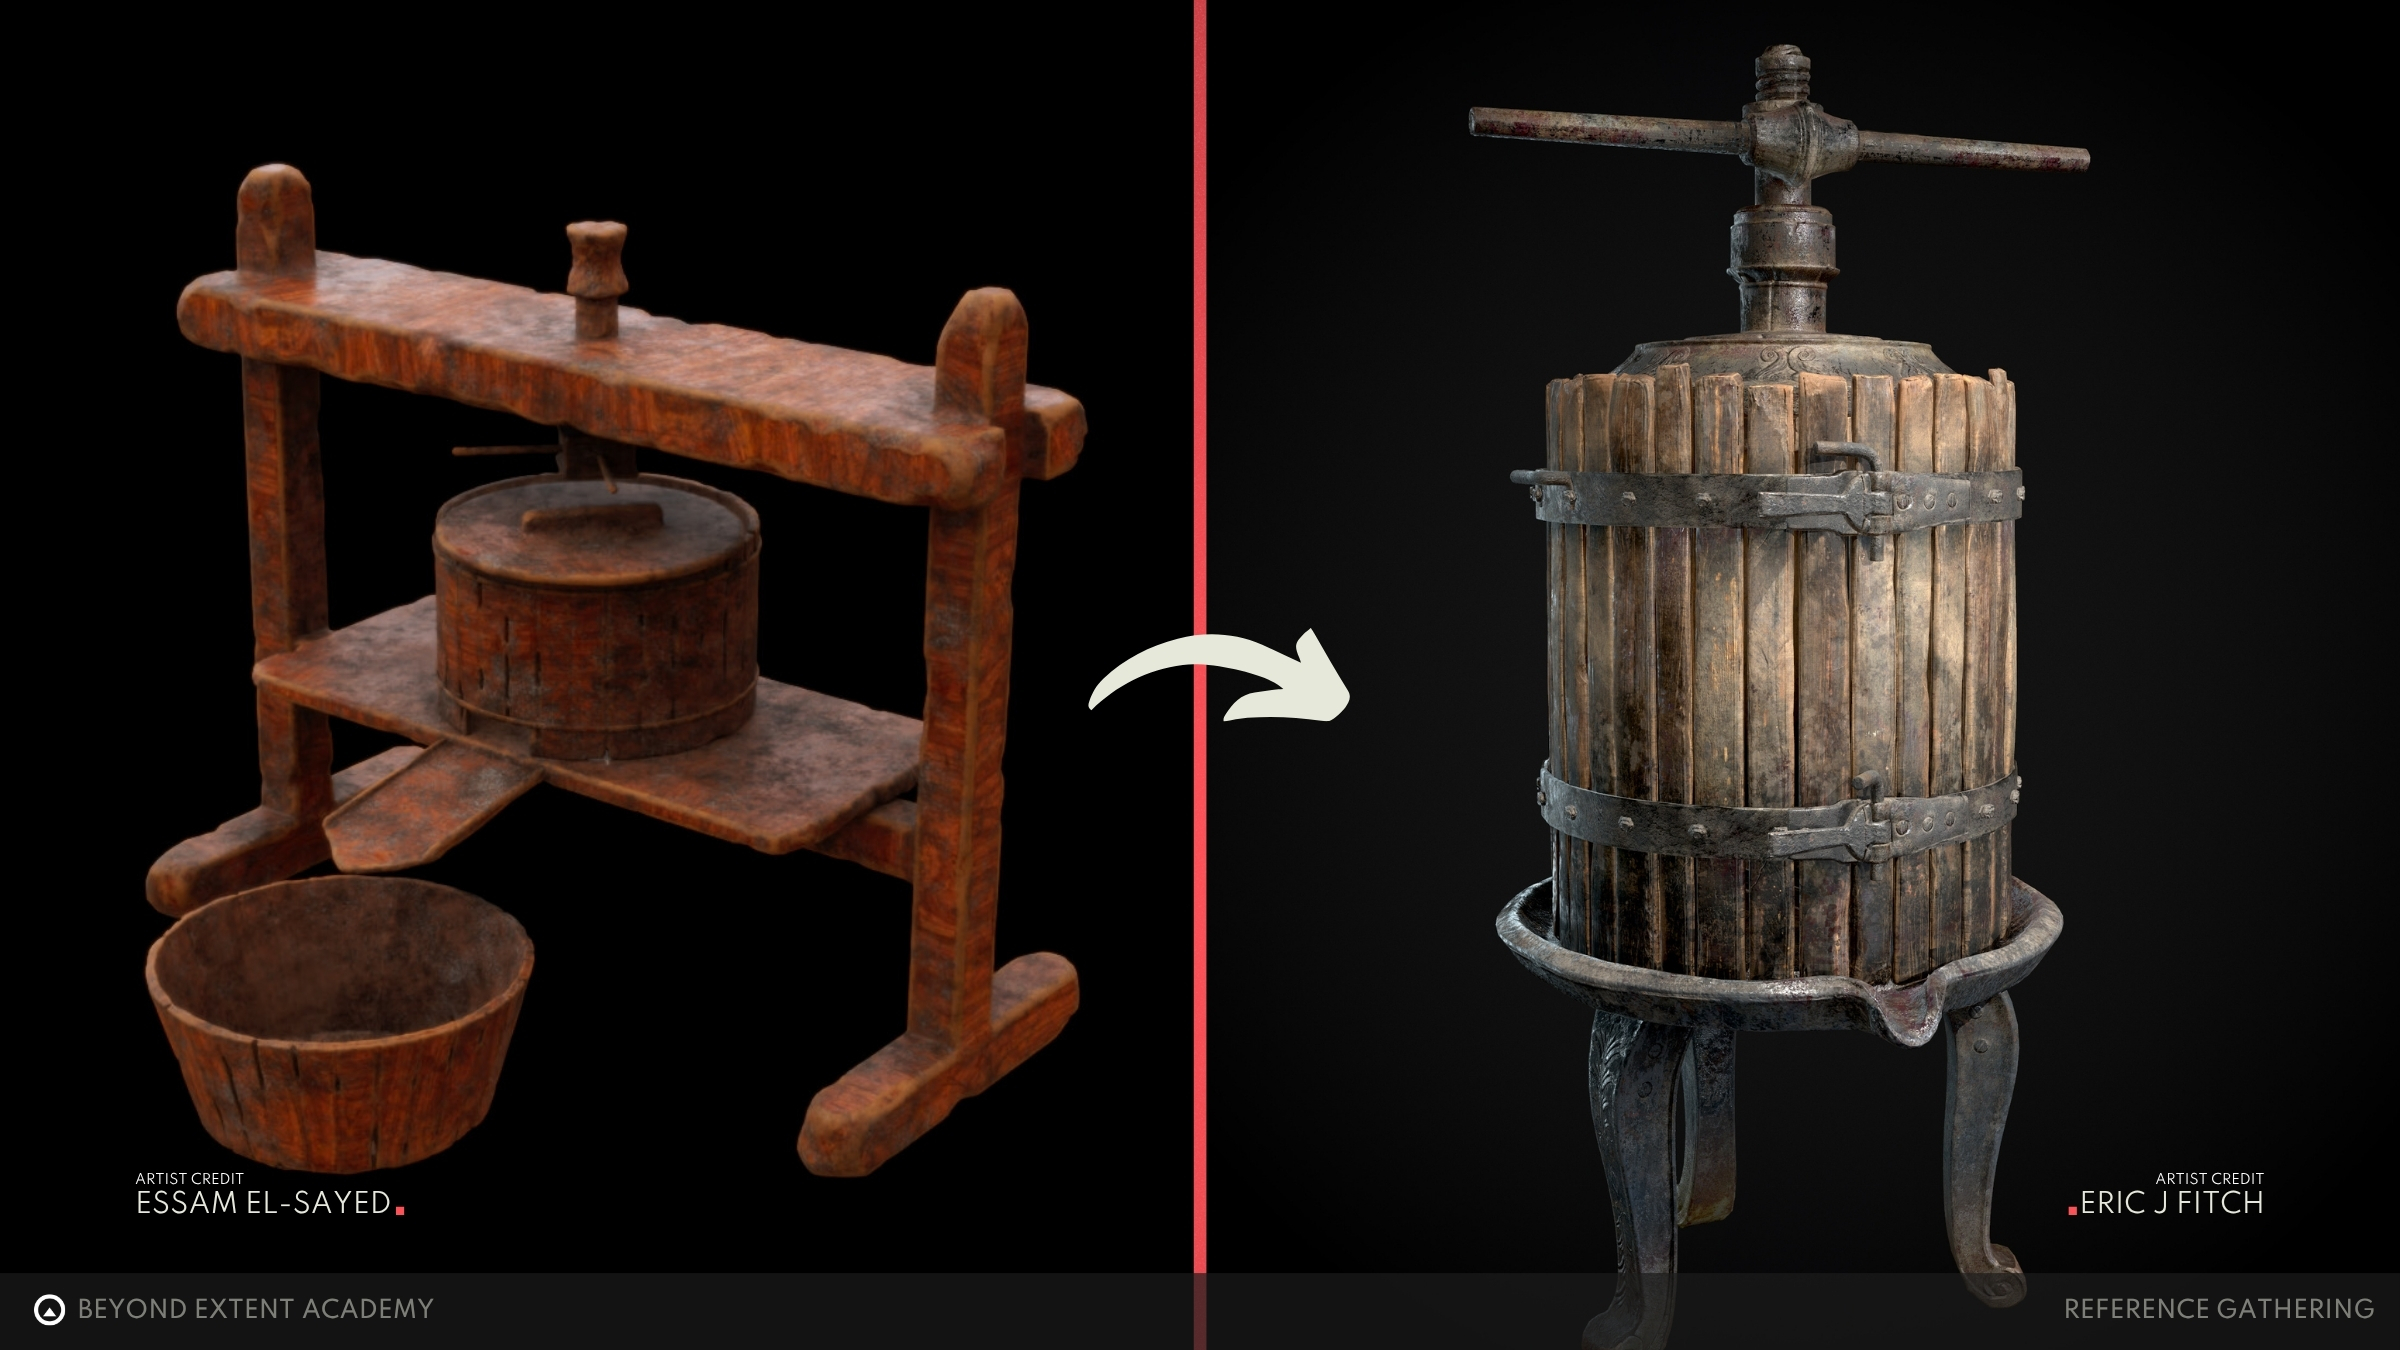
Compare how the asset on the right does a poor job of visually communicating exactly what it is, compared to the asset on the right, which feel detailed, balanced and nicely readable. You can tell that the artist did a good job referencing and then using that reference in his work.
Then once we have build up our visual library by taking more visual in and analyzing them we can then rely more on our internal library rather than external references. Getting to a place where you can do this takes time, so be patient and more importantly, explore and take in more of the world.
VISUAL LIBRARY:
This is made up of all the visual reference you take in over time, the more you pay attention and consciously take in your surrounding the quicker this grows.
Allowing you to reference things from memory with more consistency and require less time spent reference hunting, apart from details.
WHAT MAKES GOOD REFERENCES?
So we know what references allow us to do, however, what makes for a good reference compared to a bad one?
Good references are the ones that fill in the visual gaps we’re missing, allowing us to study and analyse objects more. This then allows us to get a better understanding of the subject being made so that it’s unique features can emphasized.
Since references are all about learning and analyzing the objects or spaces we’re in, getting as close to the real life source of an object, area or place will give you a better understanding and make your creations more believable.
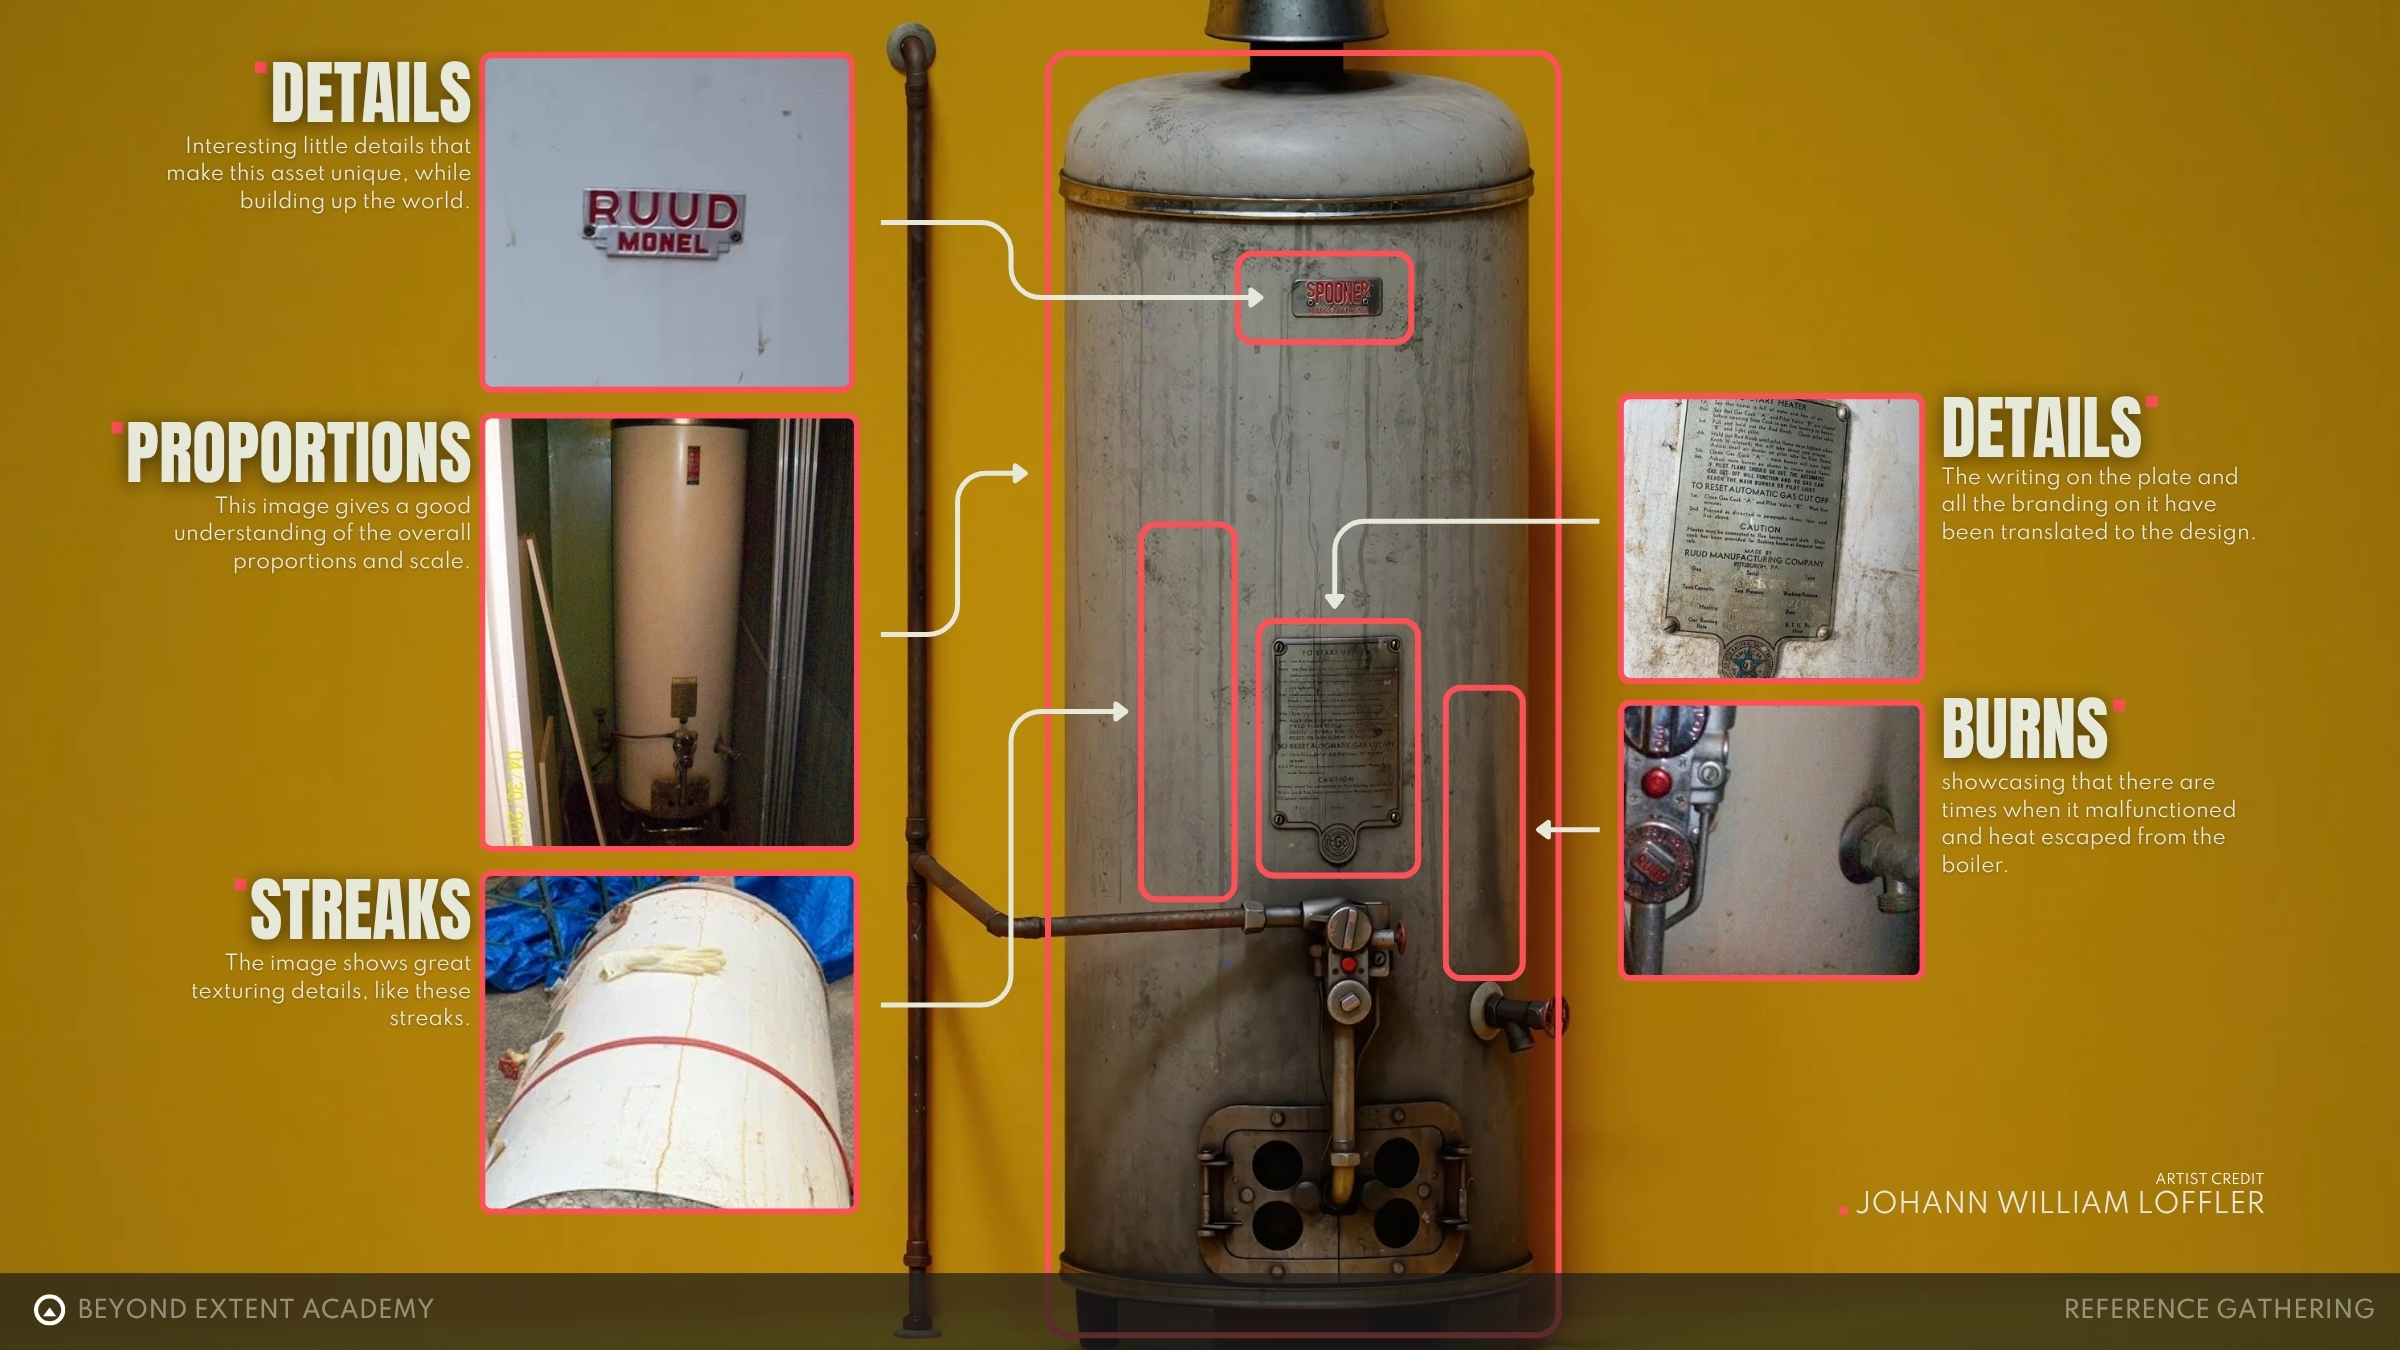
For example, when creation a this water boiler, you might not know how it functions, what the surface looks like or what details make it feel real. Whenever you have questions like these, that’s where references come in to help you.
REFERENCE SOURCES
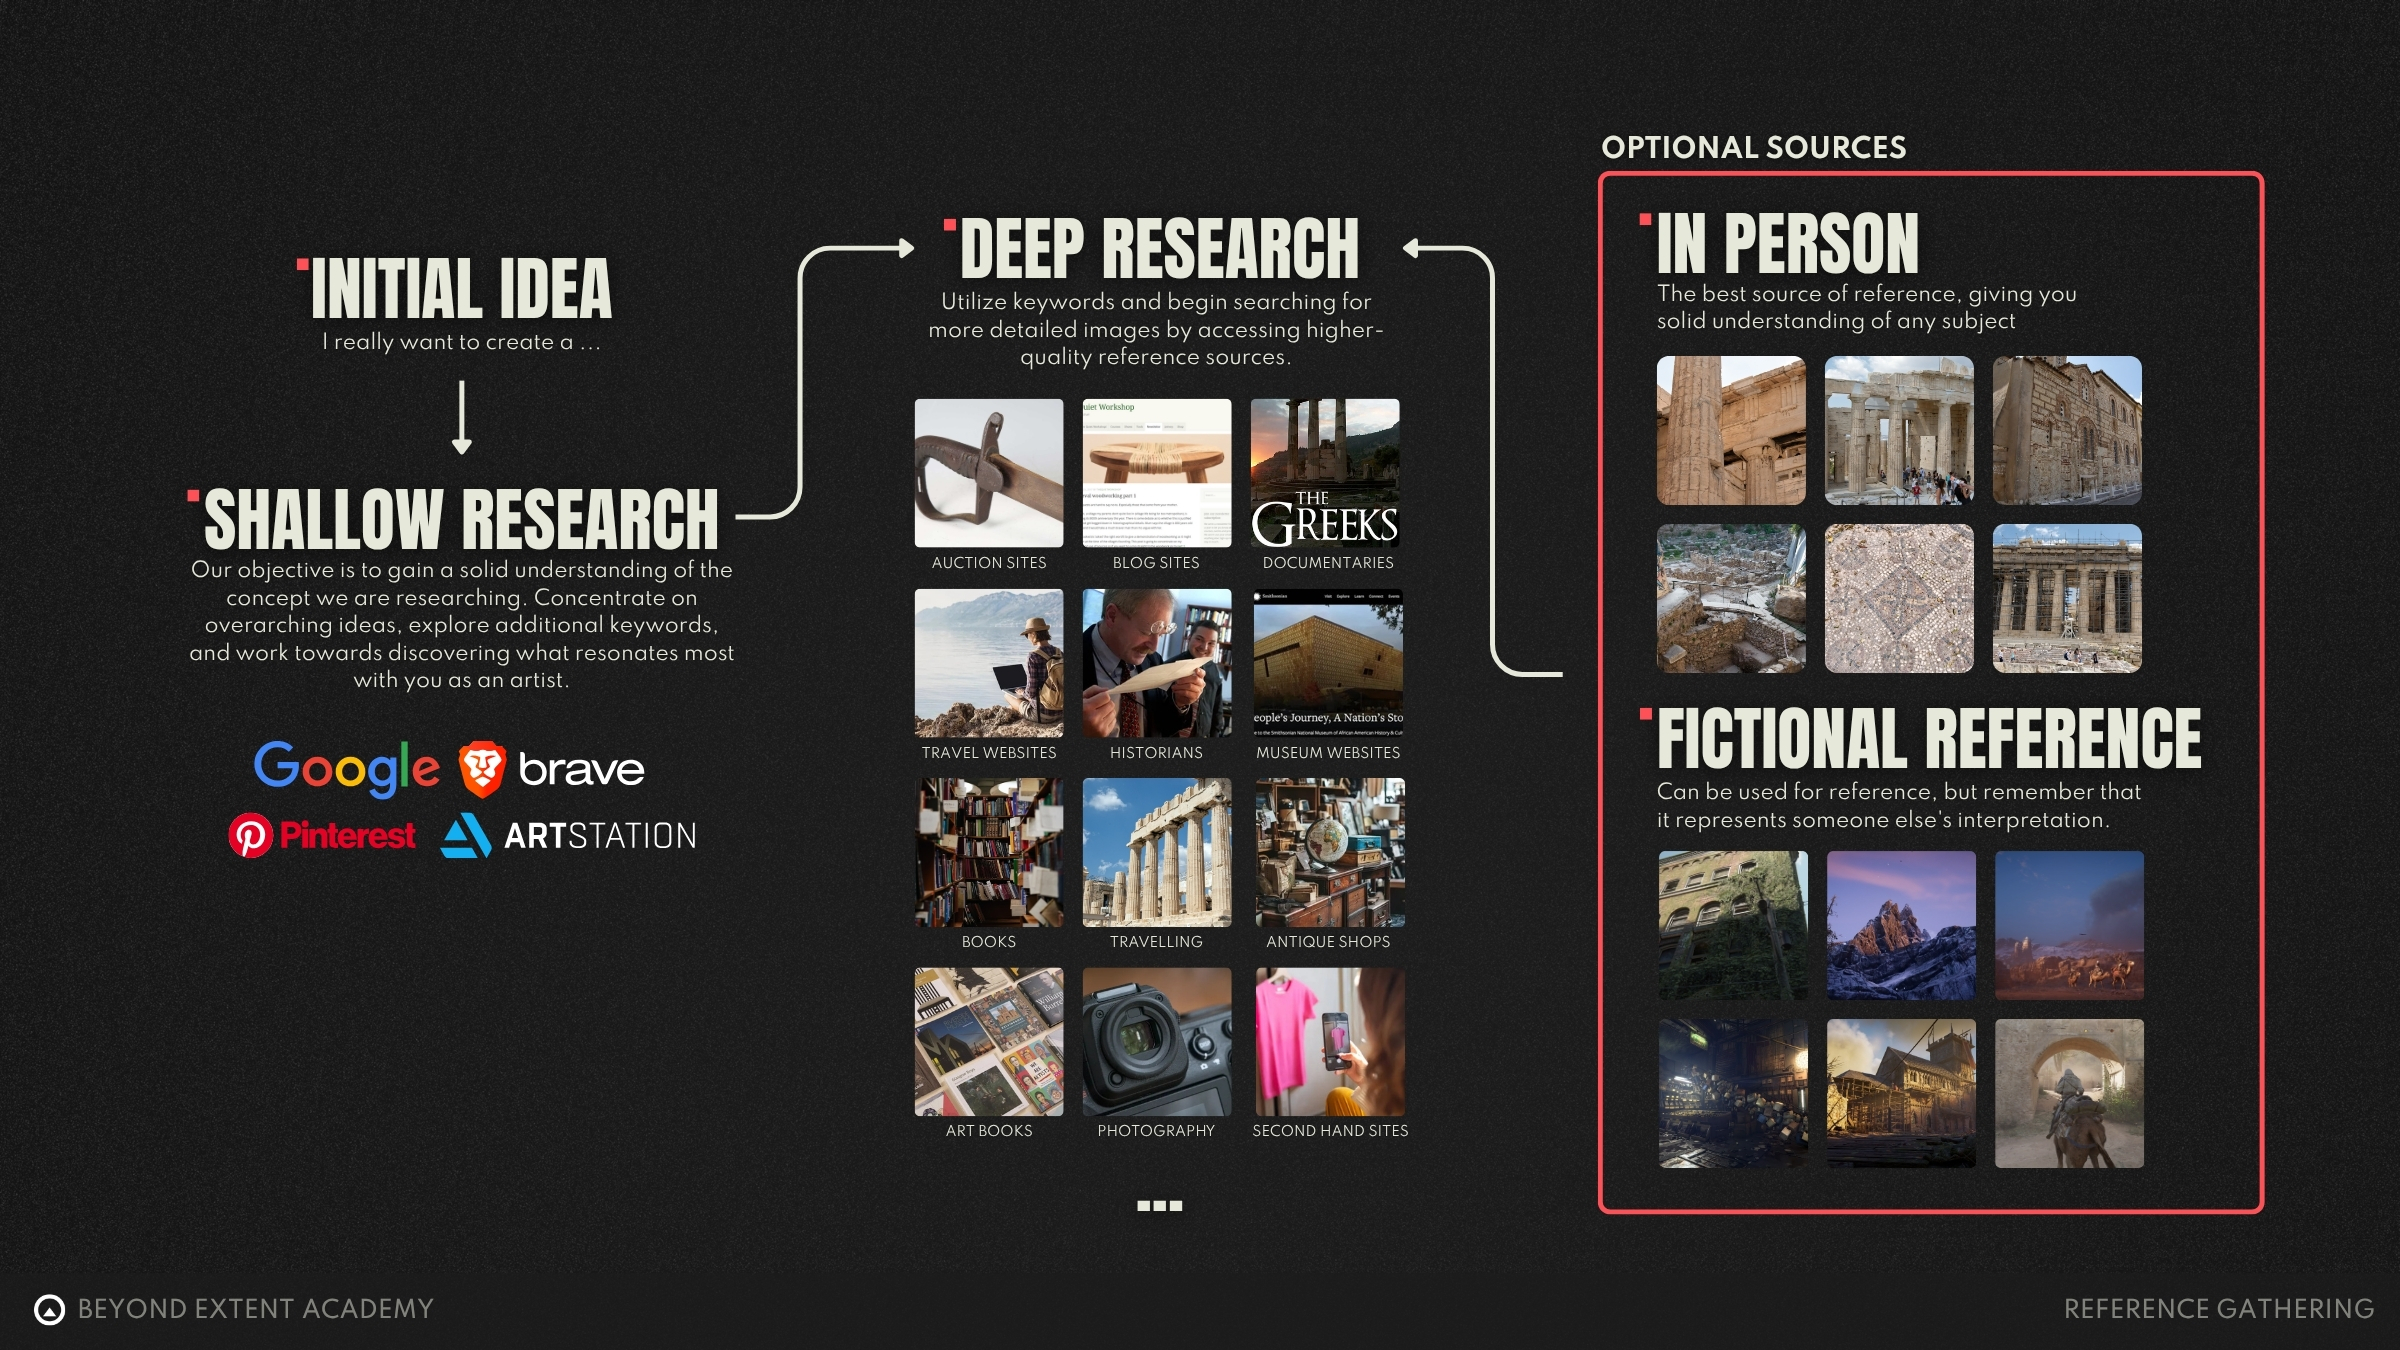
Let’s look at references from a wide perspective. Search engines give you a good broad understanding of topics you are researching, however, often times we need to get as close to the topic we are researching to get a thorough understanding of what we are trying to recreate. Before we dive into that, let’s start with a broad overview of different reference sources ourself.
- IN PERSON
Best for understanding how it relates to the bigger context, gives you a great sense of scale and proportions. - DEEP RESEARCH
For example, blogs, Auction sites, Historians, Professors, Books, etc… These give you a highly accurate and specific understanding of the topic, but it makes it harder to understanding the actual proportions/details unless they specifically mention or reference them. - SHALLOW RESEARCH
Can help you greatly buy exploring the topic from a broader perspective and allows you to explore the wider context more effectively before diving into things. - FICTIONAL RESEARCH
Could prove useful to give you examples of how other artists have approached things or just to give you initial exposure to a topic before researching it yourself.
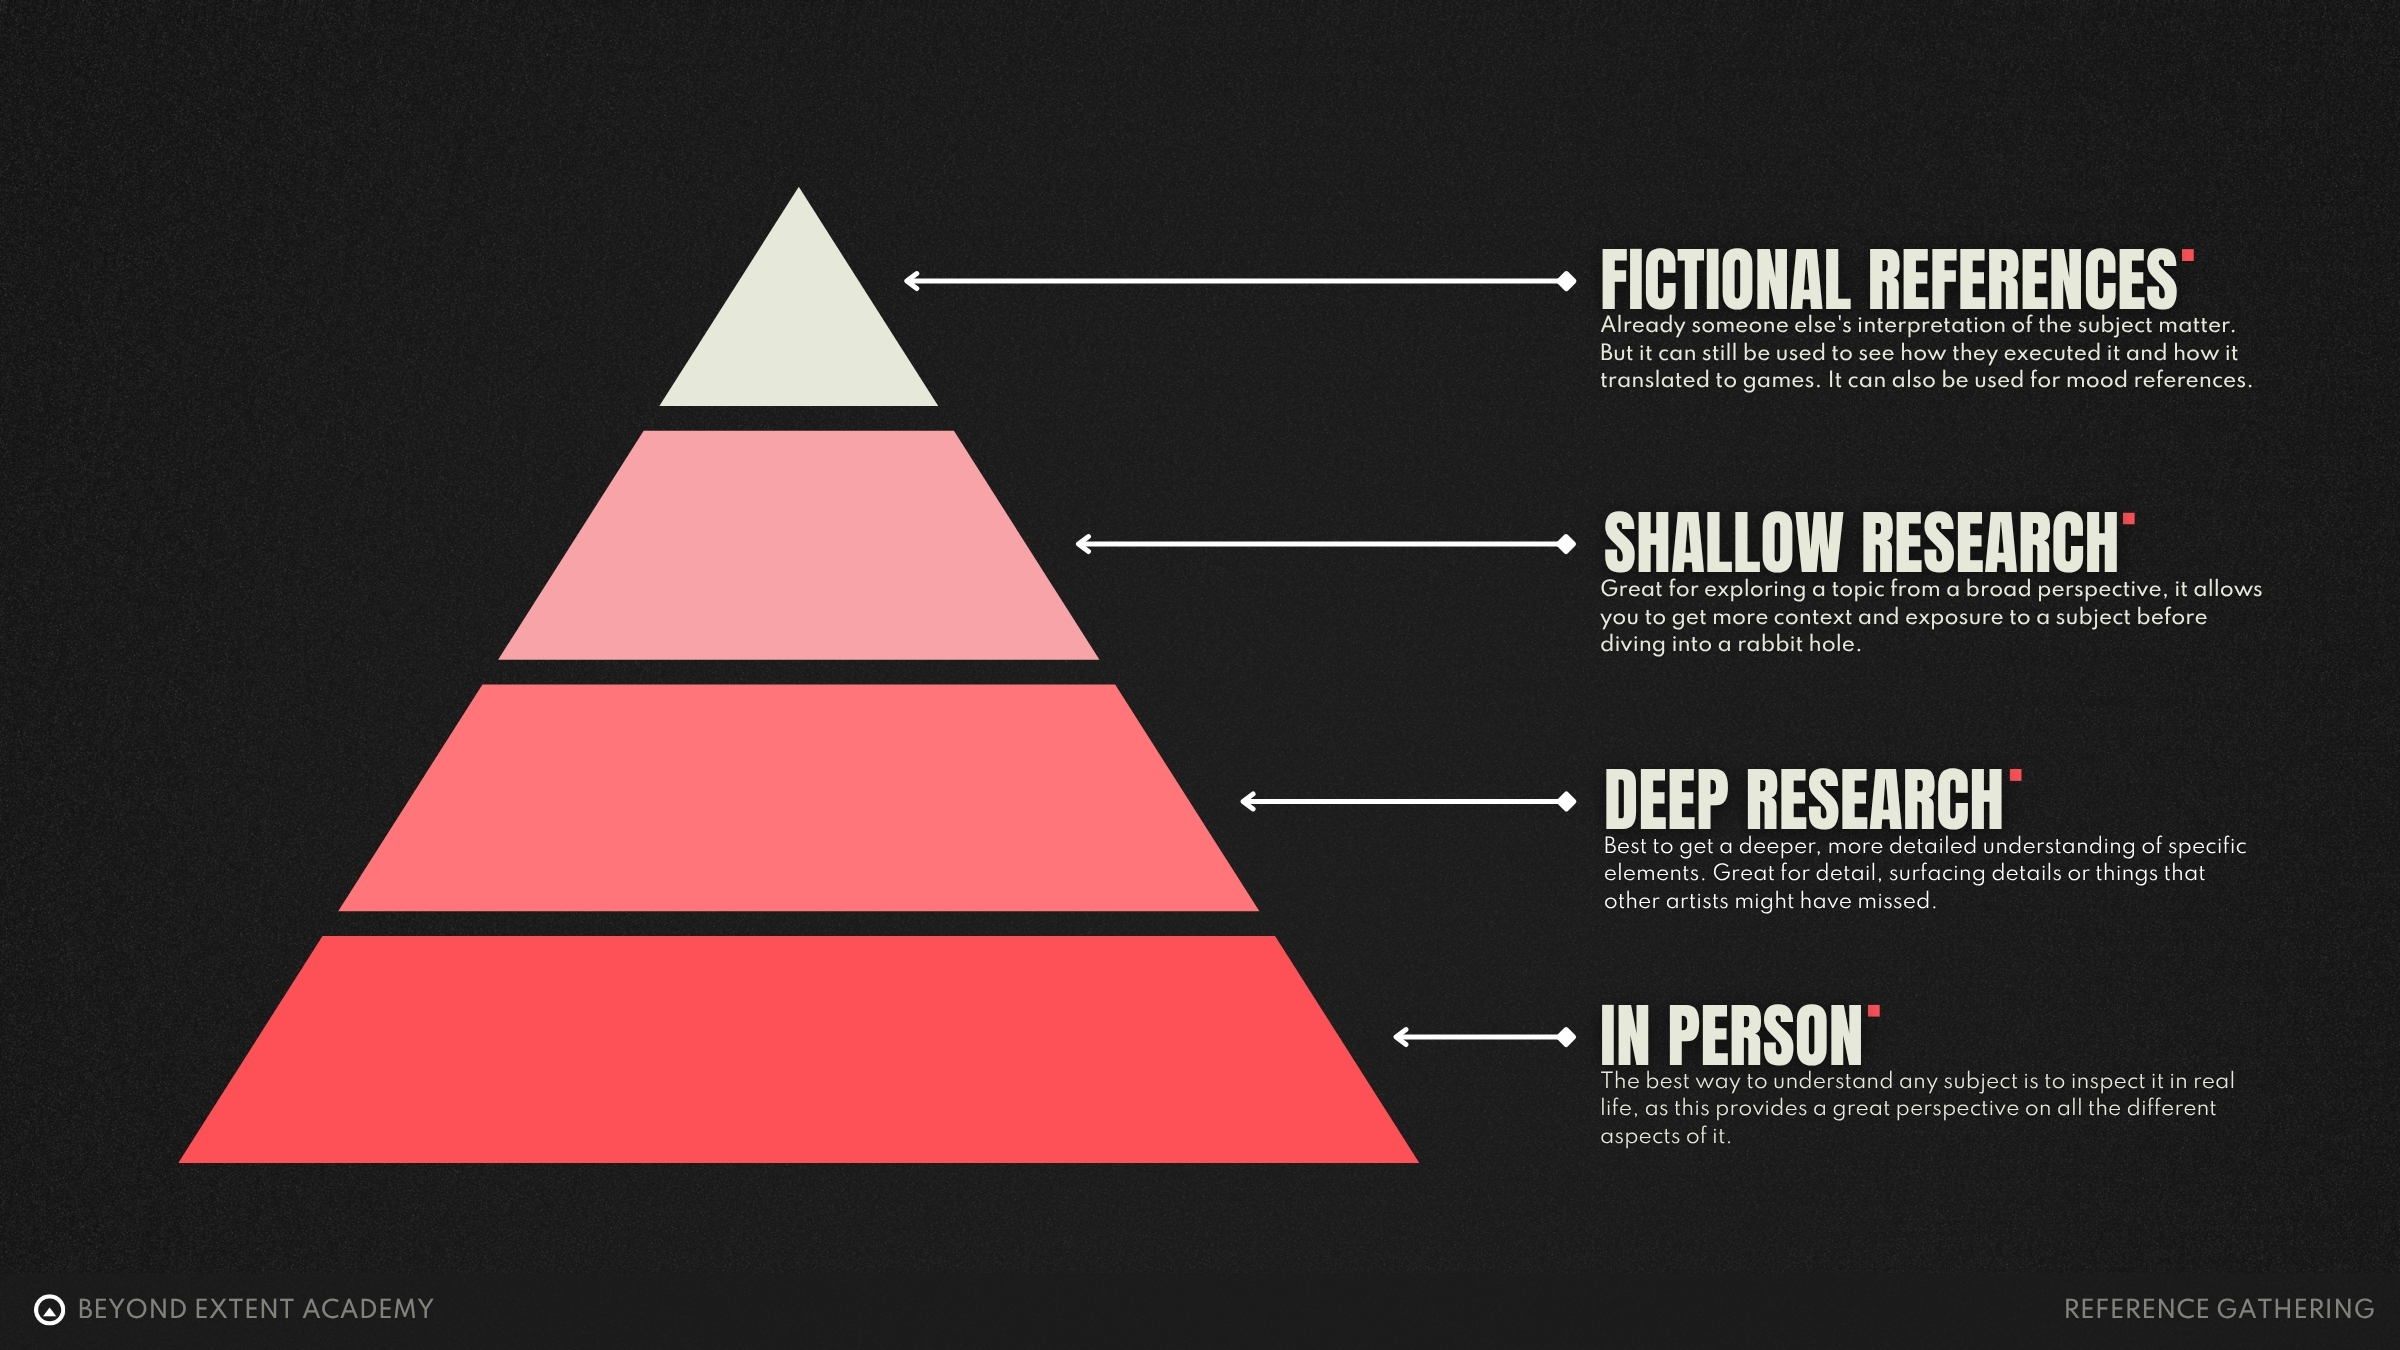
The closer we as artists can get to the source of the item we are trying to create, to more detailed the information and context we need to recreate it becomes. We can then use this information to translate this into functional, believable and immersive items or environments.
REFERENCE GATHERING
Once you have your idea of what you want to create then it’s time for our research, I’ll share the framework in general terms and then dig more into specific examples as we go along.
We always start by researching at a high level and then go more detailed as we go along.
You’re understanding of any topic is never going to be perfect, and that’s fine, we only really need to gather references for what we need to represent our creations in 3D, so we don’t need to become historians on the topic.
Keep thinking about references as a living document, it’s better to do research when needed, compared to doing so much research and spend so much time on it that you might end up wasting a whole bunch of it.
SHALLOW RESEARCH
We start out with online searching to see what comes up when we type in key words for our project. Giving us a good overview of what comes up visually. It’s always good to try different search engines and a variations of keywords to see which ones give you the best results.
USE SPECIFIC KEYWORDS
“1950’s enamel green celling lamp” is going to give you more specific results compared to “Vintage Hanging Lamp” Same goes for ”1400 Medieval Art” compared to “Medieval Art”. Both terms can be useful when needed, but try to get more specific over time.
While we are in this step, pay attention to your sources, if something feels of, or you feel the source is not trustworthy look into it. When dealing with images try to avoid any stock image sites as it’s hard to tell which images are real or generated at this point. A quick click on the image source will help you find out where it comes from, and even if it’s real or not.
CAREFUL ABOUT YOUR SOURCES
Stock images sites like, pixabay, IstockPhoto or sites with lots of recreations like Etsy, etc… are just some examples of what to avoid. But trust your senses, if it doesn’t look/feel real, better to go for another image instead.
As you spend more time researching, you will also find yourself refining your keywords over time as you hone in closer and closer to your targeted reference. This is way easier to do when it comes to individual assets compared to environments. Related images is a really useful tool in the process here. and can give you some good insights into what can path the follow for deeper research.
DEEP RESEARCH
Once we got a good surface level idea, we can then dig in deeper. Keep on the lookout for visually interesting images on your shallow reference hunt and then dig deeper if you spot something interesting. In this step is usually where the collecting of references really begins, since there are usually higher quality and show more specifically what you are looking for.
When conducting in-depth research, you may discover that some essential details are still missing. That’s when firsthand investigation becomes invaluable. While many topics can be explored sufficiently from a from online research, visiting locations or examining materials in person can set your work apart. If you’re aiming for originality and depth, nothing beats the insight gained from direct experience.
With the framework out of the way, let’s explore some specific examples.
SINGLE ASSET EXAMPLE
First we are going to explore what this looks like on a small asset basis. Following the structure we laid out before, we can now start filling in the flow like this.
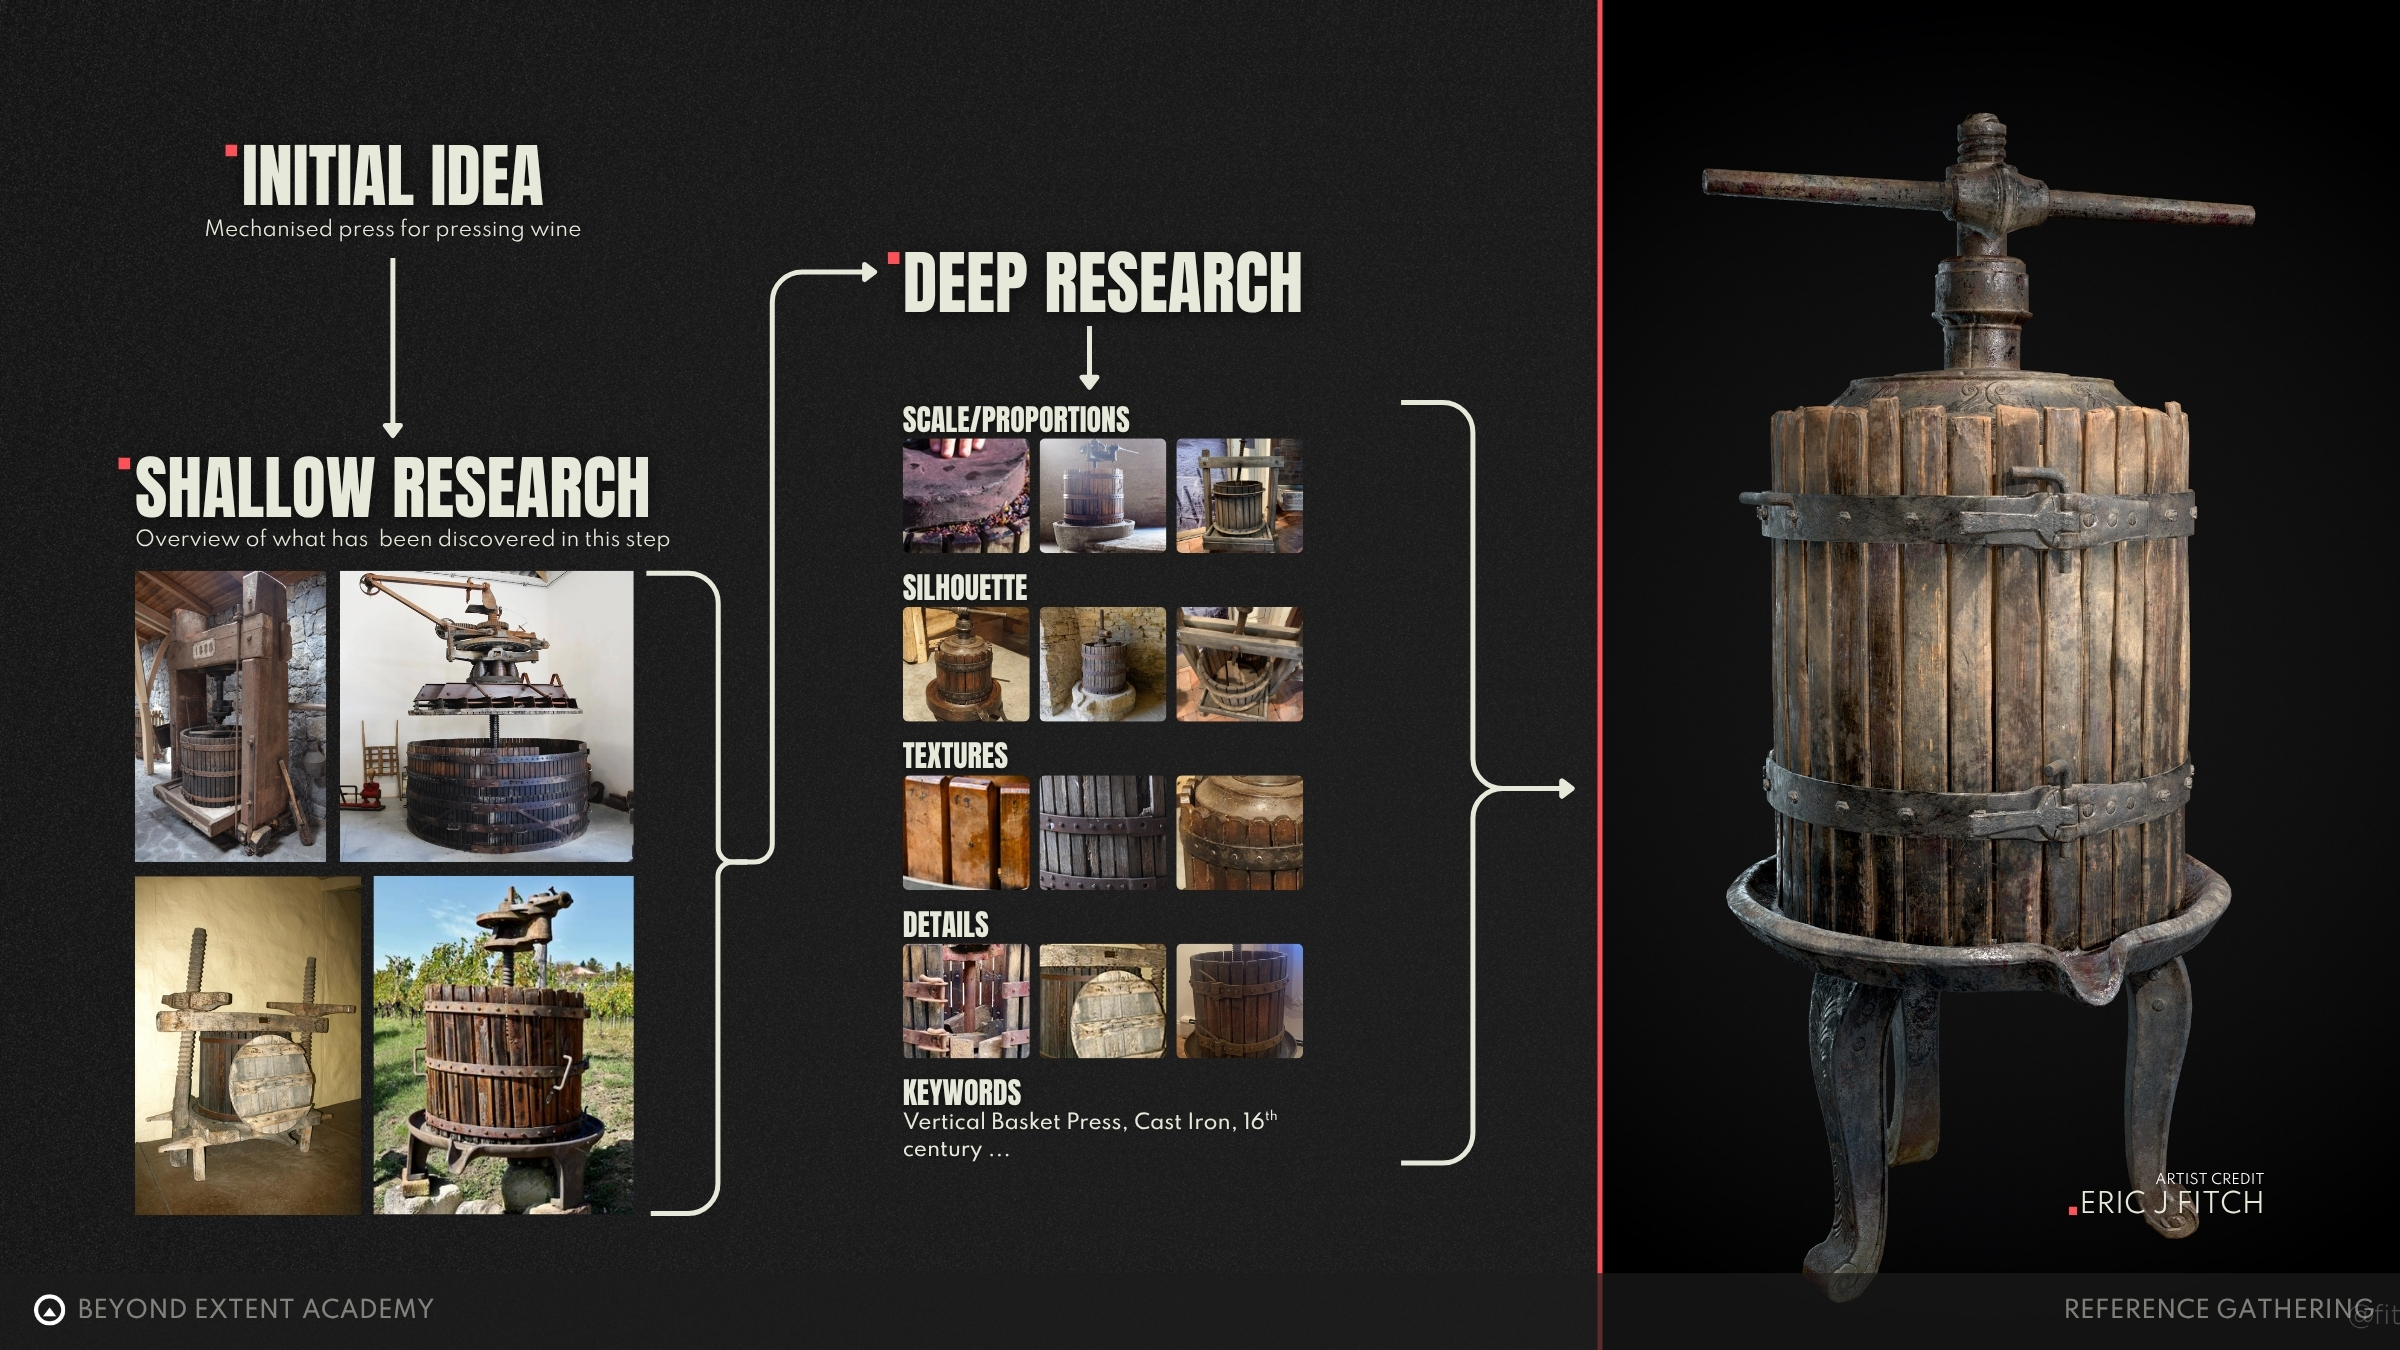
- Scale/Proportions (How it relates to real world scale, or other objects)
- Silhouette (What the shape of the object is, defining features and how it stand out from it’s surroundings)
- Textures (Texturing details, especially handy for when you are at the texturing stage)
- Details (Interesting area’s of the object that can add a unique character or are things that you didn’t notice before)
When looking for references for individual pieces such as props, focus on collecting information about the details, textures, materials, and little extra tidbits, that could make a piece unique and “breathe life into it”. We’re looking for the smaller details.
exercise
Deep research for an asset
goal
Your goal is to use the content provided and do additional research until you get to a spot where you feel comfortable with starting to model the asset.
⚠️
MISSING DOWNLOADABLE CONTENT
⚠️
Missing exercise goal
ENVIRONMENT ART EXAMPLE
Now let’s zoom out to how this works for an environment. We can take the rough outline that we’ve setup for the individual asset and repurpose it for a wider approach. Keep in mind that referencing for a full environment takes up way more time to do and a lot more back and forth when in production.
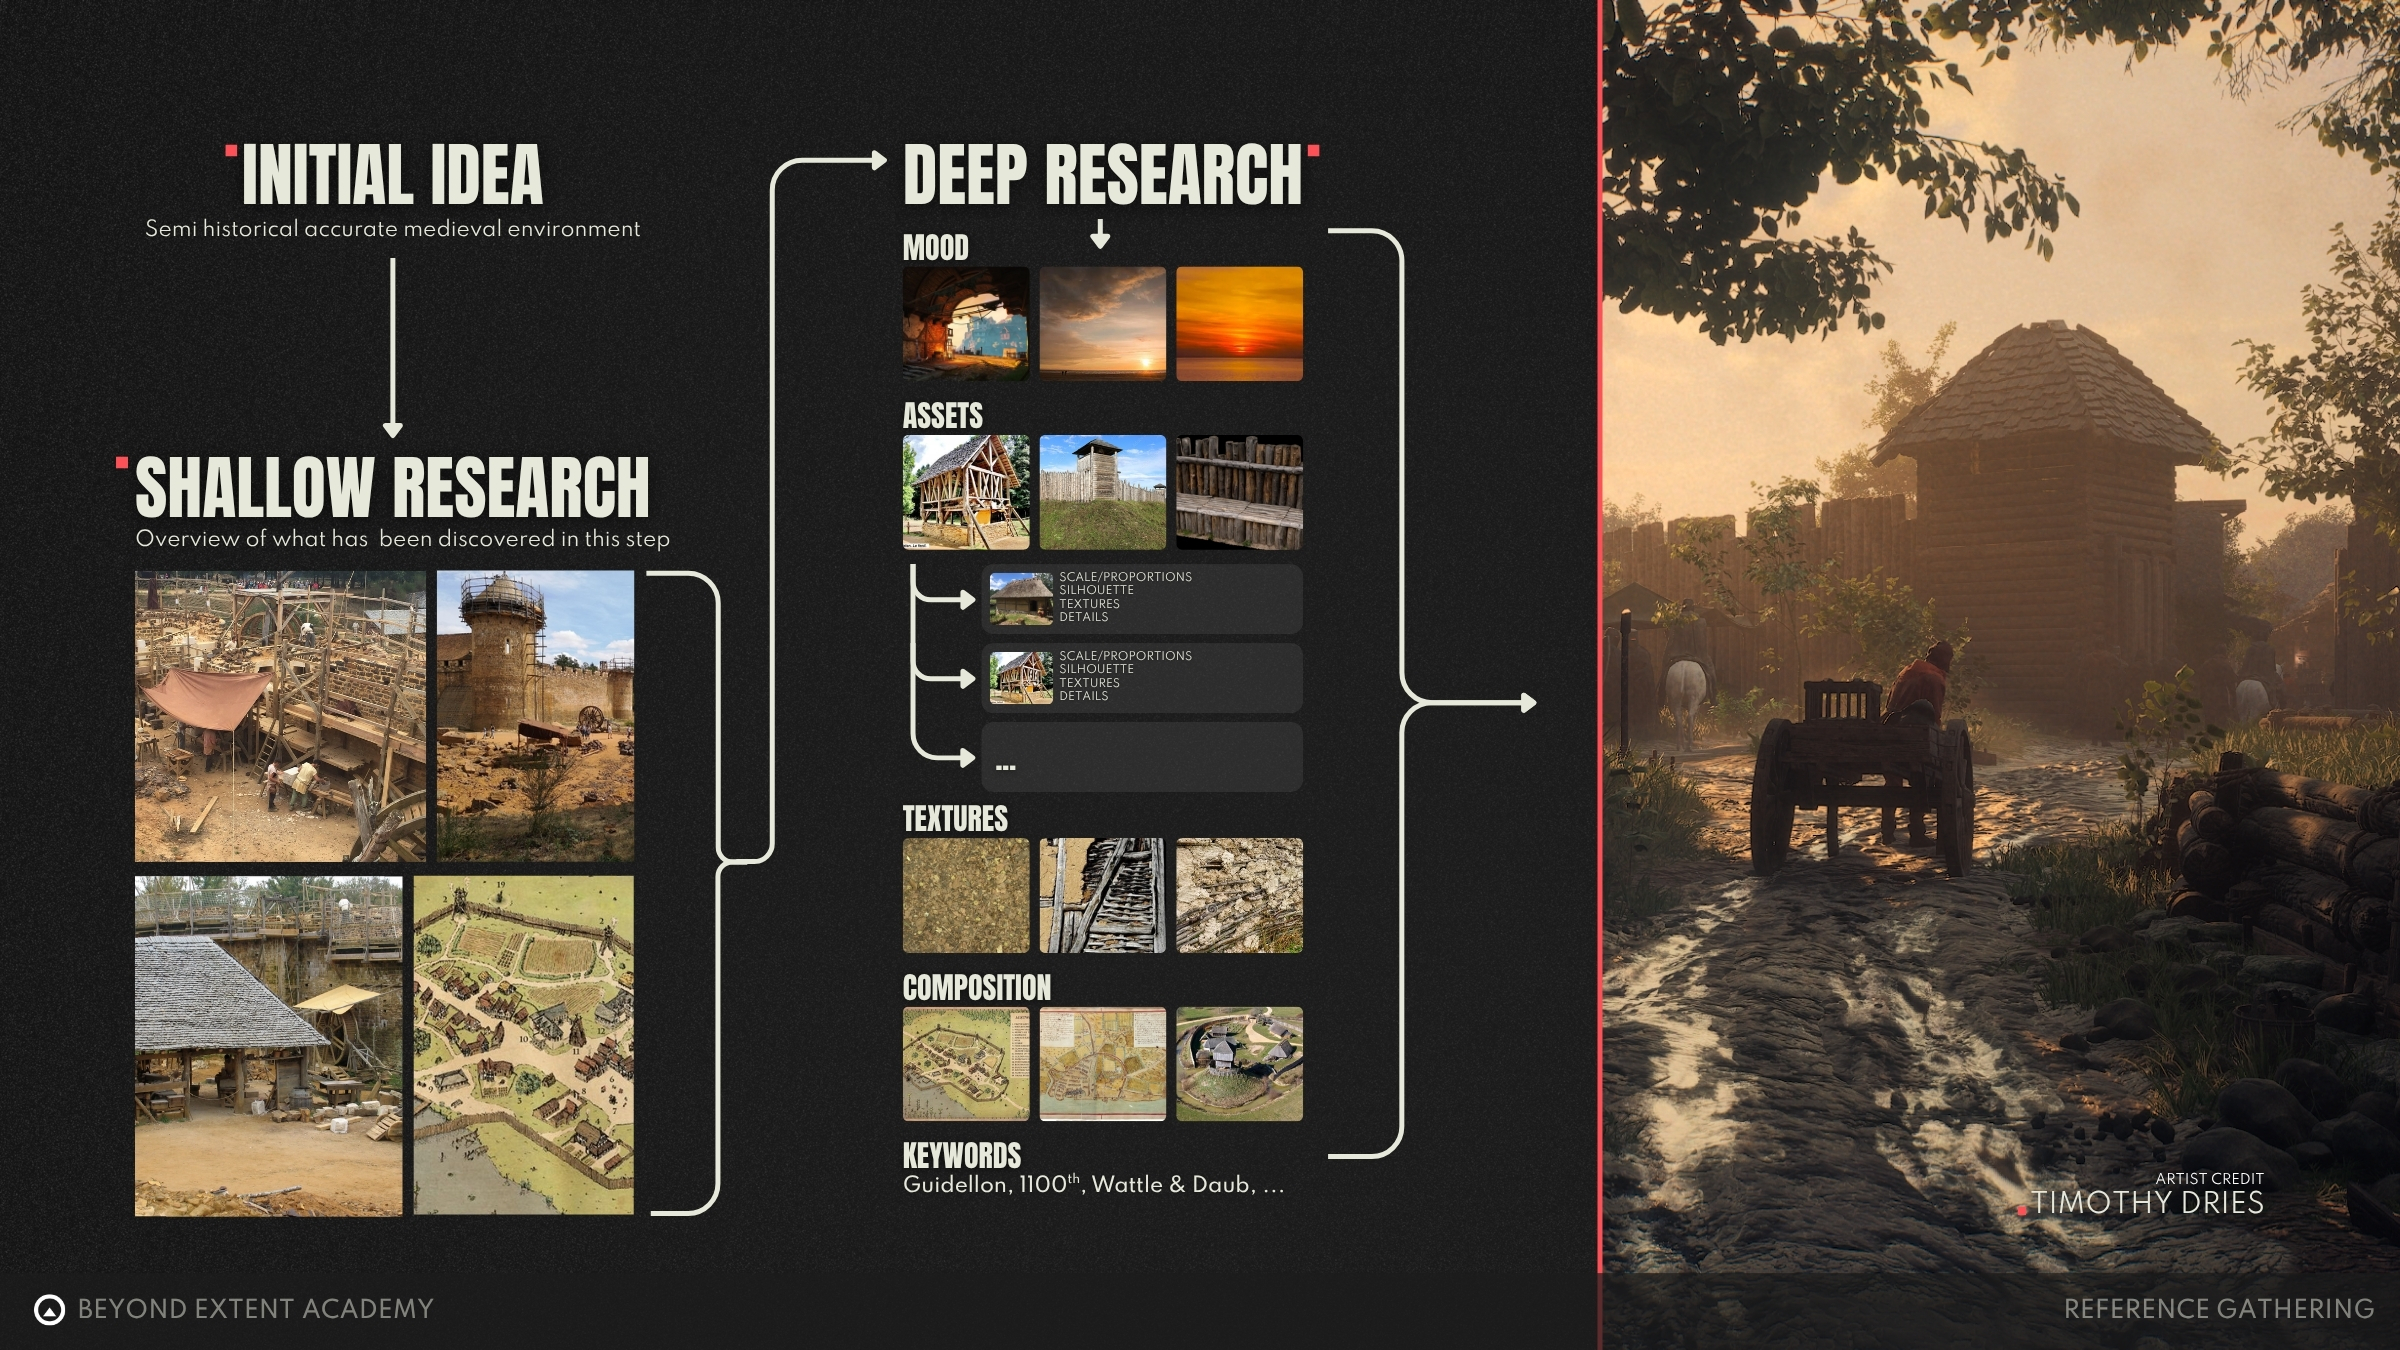
- Mood (This informs lighting, atmospherics and influences the emotions we feel)
- Assets (The objects that are contained by the environment)
- Textures (Texturing details, especially handy for when you are at the texturing stage)
- Composition (How the camera is framed and how is funnels you into the space)
You can also see that under the ”ASSETS” section we include the research for individual assets, so especially when making our hero assets in our scene we also need to do reference gathering on those individual aspects at the same time.
OTHER EXAMPLES
We can adjust all these parameters to the context that is required, so for example when making materials we can change the things we’re looking for to something that is more useful to materials. Something like this:
- Context (It’s surroundings the props are placed in, giving you vital information on how the material relates to the place it’s in)
- Details (Area’s of the material that make it stand out or add details that you are missing)
- Variations (Additional variations, of the same material, dirty, broken, polished, etc…)
- Surface Response (How does the surface respond to light, what is the color like, etc..)
And keep in mind that whenever you are doing your research you need to constantly be aware of what you require or think you’re missing.
LOOK FOR REFERNCES THAT MATCHES WHAT YOU NEED
See your references as more of a living document, that whenever you feel you’re missing something you can go back to referencing and then going back to the project.
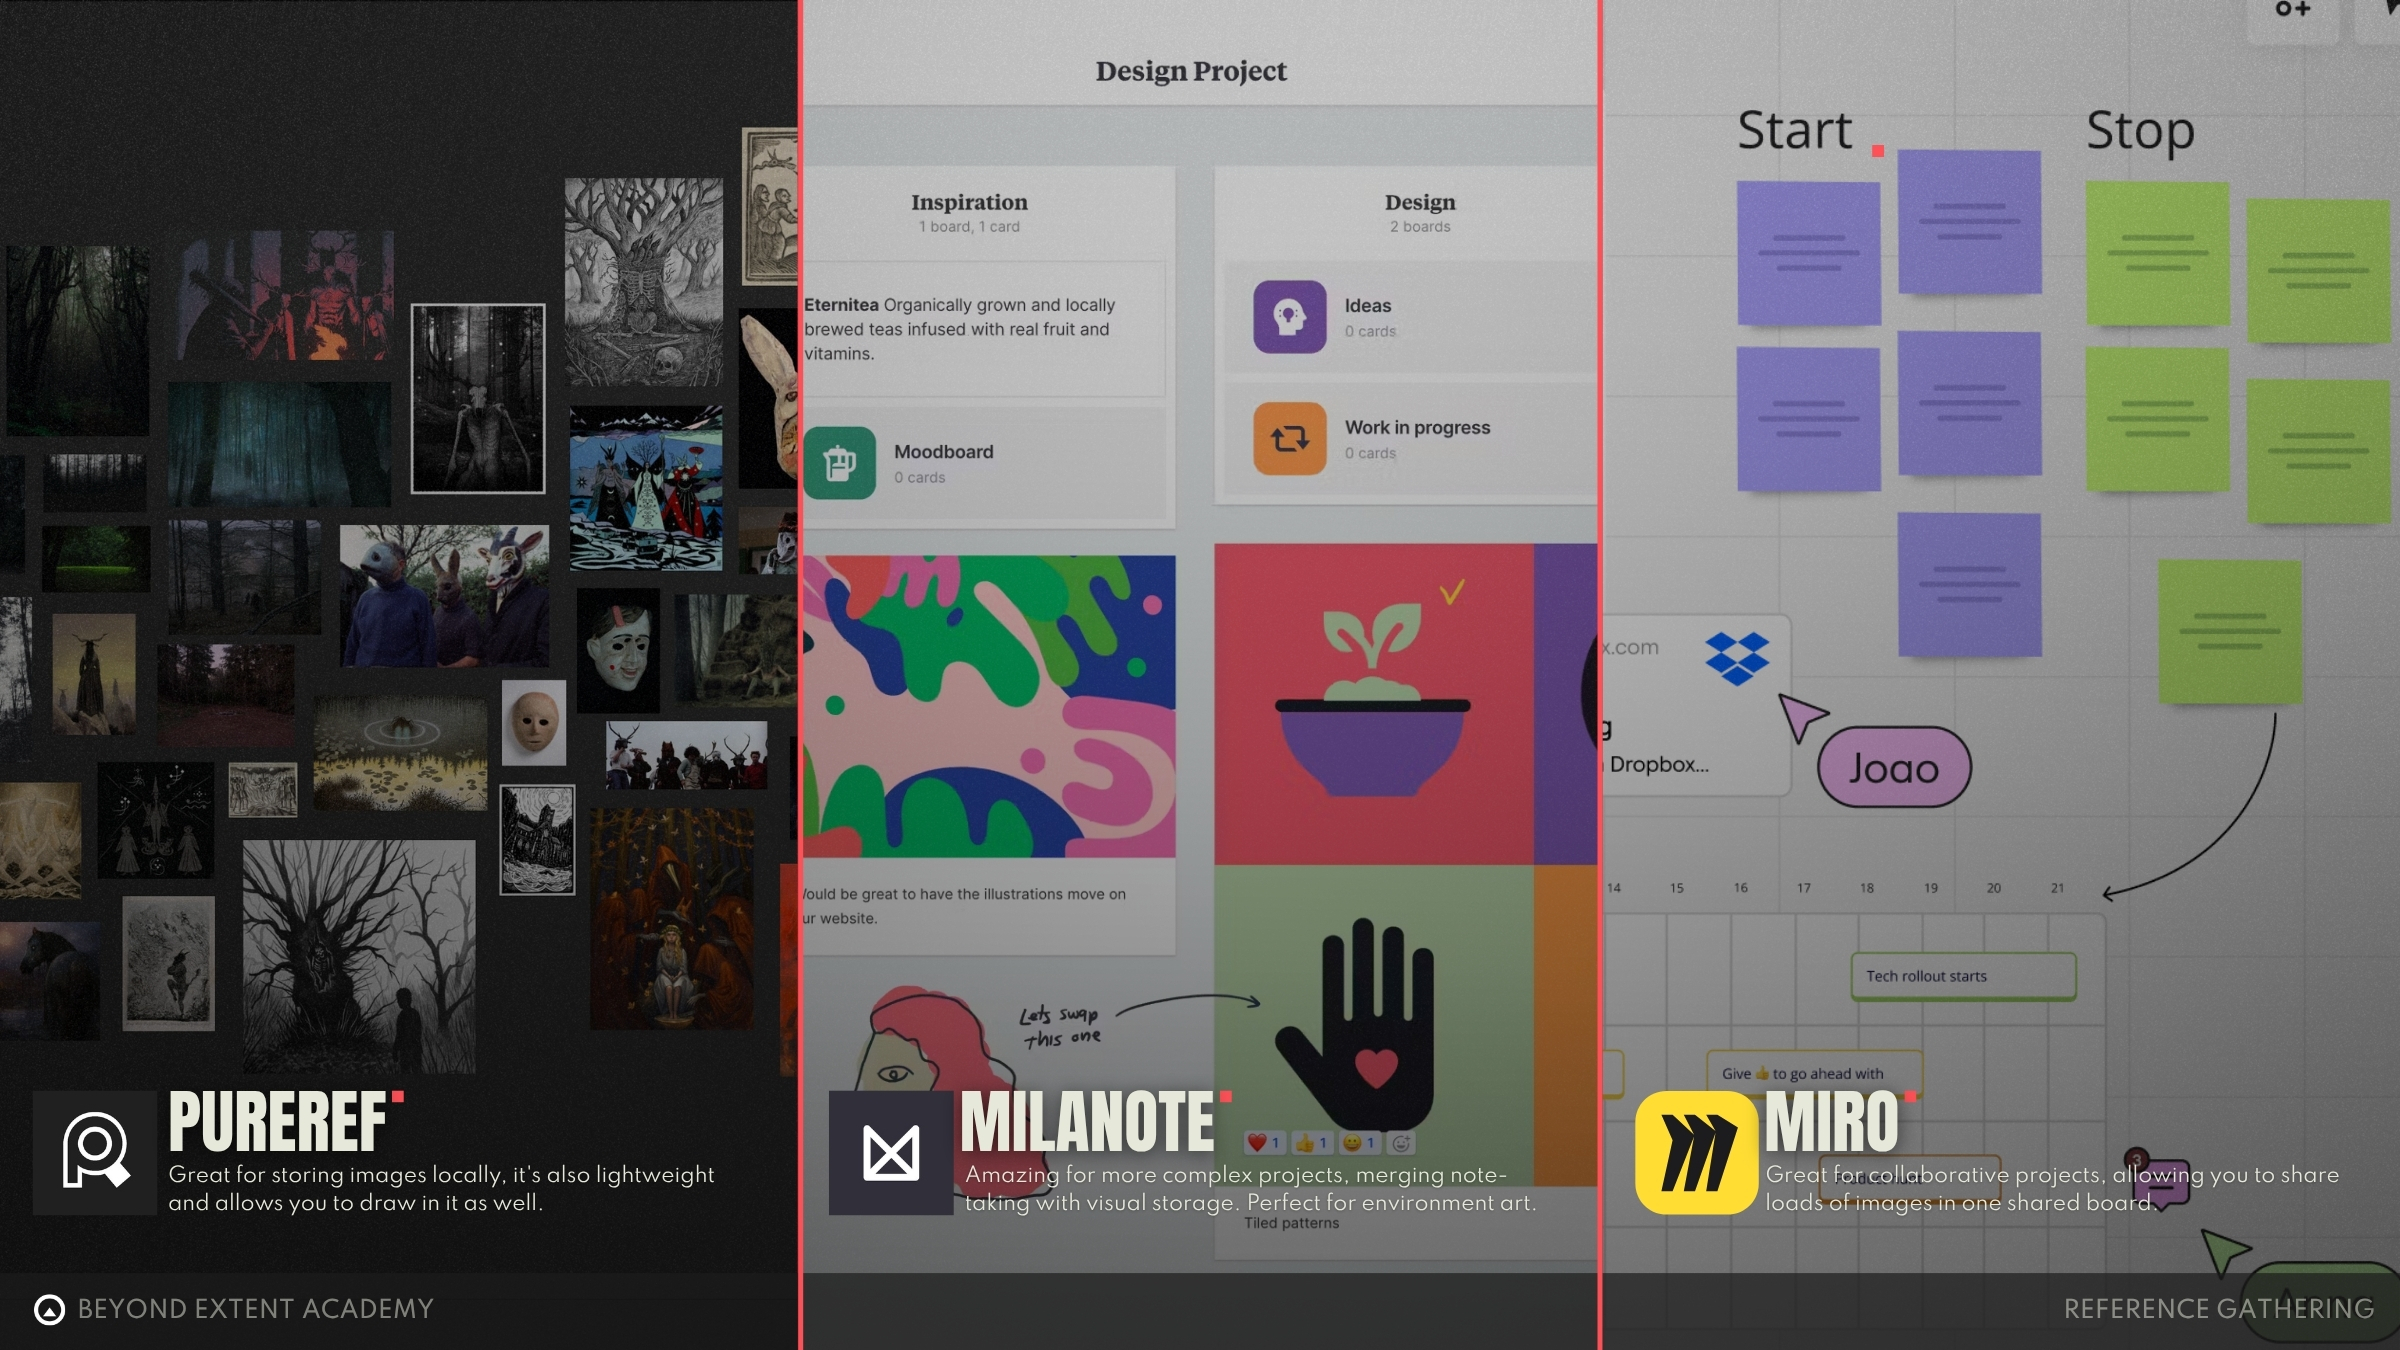
TOOLS USED
For collaborative reference gathering, we recommend MIRO (miro.com)—a flexible, real-time image sharing tool ideal for team projects. For solo work, try PureRef (pureref.com), a free app that lets you easily drag, sort, and pin images from any source. Its always-on-top feature keeps your reference board visible across windows for seamless workflow.
exercise
Building your First Reference Board
goal
Your goal is to use the content provided and do additional research until you get to a spot where you feel comfortable with starting to model the asset. Bonus if the pictures you use are images you’ve made yourself.
⚠️
MISSING DOWNLOADABLE CONTENT
process
Use the provided template to pick on item and then start populating the moodboard yourself. We will provide a couple of “Ideas” to start from.
RECAP
Now you know the where, how, and why of references! Most importantly, you can make use of all these tips and tricks to find what YOU need! Remember, reference boards are what’s referred to as a “living document”, so, whenever you feel lost on an aspect of an art piece, that’s a good reminder to start looking for more references, no matter the stage of a project.
exercise
Concept to real life
goal
Pick a concept from our selection and do real life research to get to the core of the inspirations behind it.
⚠️
MISSING DOWNLOADABLE CONTENT
process
Find additional references for “NAME OBJECT” and fill out the reference board until you’ve got a solid understanding of the item.
RESOURCES
⚠️
MISSING RESOURCES