







to do list (Admin only)
LESSON OVERVIEW
In this lesson, we will learn how to bake a variety of maps using Substance Painter, a 3D texturing application used to generate high-quality texture maps for game engines and rendering software.
We will start by taking a quick look at the software and what it's used for, create our first project and familiarize ourselves with the basic UI layout. Then we'll move on to the main focus of the lesson: baking maps and fixing the most common baking issues. Finally, we've prepared an exercise to help you practice baking on your own.
Let's get started!
⚠️
Missing LESSON OVERVIEW
What is Substance 3D Painter
Substance Painter is the current industry-standard software for creating detailed PBR textures directly on 3D assets. Much like Photoshop, it uses a layer-based workflow that allows artists to build materials by adding detail layer by layer. For example, a material might start with a wood base, followed by a layer of paint, and finished with a glossy varnish on top. If you've worked with other graphics software, you've likely encountered a similar workflow.
Creating textures in Substance Painter typically consists of two stages: baking and texturing. In this lesson, we'll focus on the first stage, baking, and introduce you to the software and its core features.
Preparing mesh for a bake
Before we start baking all those beautiful maps, it's important to double-check a few things to make sure we avoid any easily preventable problems. Here's a quick checklist to go through:
- Naming conventions - Make sure your low-poly mesh is nicely divided into logical pieces using the
_lowsuffix, and that each piece has a corresponding_highversion in the high-poly mesh. We'll use these naming conventions to prevent our bake from bleeding between separate pieces of geometry. - Overlapping UVs - Check that your UV shells don't overlap.
- UV padding - Make sure there's enough padding between UV shells to prevent texture bleeding.
- Straighten UVs - Check that you've straightened any UV shells that can be straightened. A good rule of thumb is that if a shell looks like a bent or wobbly rectangle, it can probably be straightened.
- Hard Edges - The golden rule is: If an edge is marked as a hard edge, it must also be a UV seam. The relationship only works one way: not every UV seam needs to be sharp. If your software uses smoothing groups instead of sharp edges, the borders of each smoothing group should also be UV seams.
- Apply transforms - before exporting and importing your meshes, make sure your high and low poly mesh are overlapping, and apply all transforms. This "locks in" its current transform values without changing its appearance, making sure the mesh exports correctly and reducing the chance of baking errors.
- Material IDs - If different parts of the mesh will use different materials, you can choose to assign them separate Material IDs. This makes it much easier to create masks and work on individual sections of the model in Substance Painter.
We will go over these points in more detail throughout the lesson.
Substance UI
When you first open Substance Painter, you'll notice an empty viewport staring back at you. Let's import a model and fill that empty space with something. To do this, go to File → New...
The New Project window will appear, presenting you with several options for configuring your project.
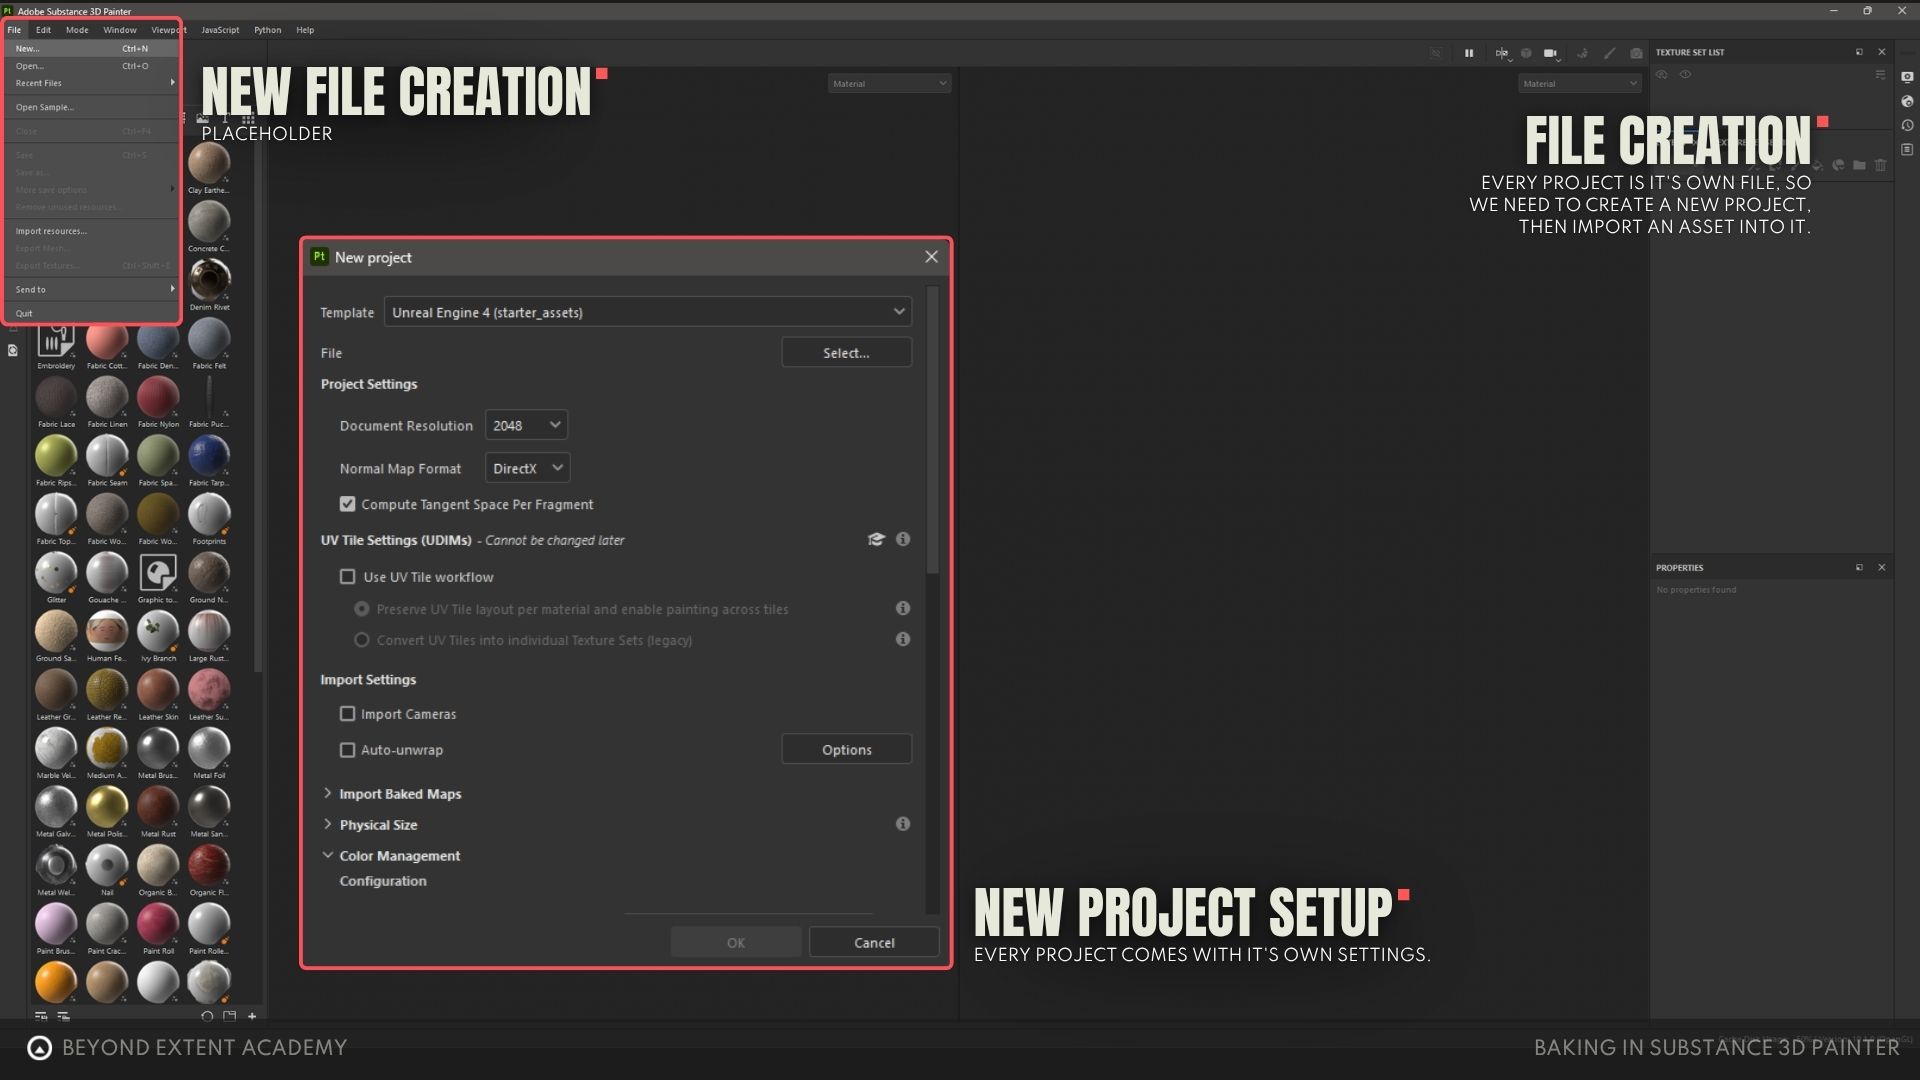
Below is a quick explanation of each setting. However, we'll be using a template for this lesson, so our settings will be pre-configured.
Choose the Unreal Engine 4 (starter_assets) template or equivalent, select your lowpoly model as the File and set Document Resolution to 4096 (or 2048 if you have a less powerful setup).
Once you have the asset loaded you should see it on your screen along with default Substance UI.
New Project Settings
The following sections provide an in-depth explanation of the purpose and functionality of the various settings found in the New Project window.
- Template - Templates automatically configure most of your project settings for you. Simply choose the template that matches your target software or export workflow, and Substance Painter will provide a solid starting point.
- File - This is where you select the asset you want to work on. Choose the low-poly version of your model with properly unwrapped UVs. This is the only setting you'll need to configure manually for each new project, since Substance Painter can't know which model you want to import.
Project settings
- Document Resolution - This determines the resolution of the textures you will be working with. Texture resolutions are usually set to a power of two and are always square. It's recommended to set this as high as possible, preferably 2048 (2K) or 4096 (4K).
- Normal Map Format - This setting determines how Substance Painter exports normal maps. Different software uses different conventions (API) for reading normal map data, so you need to choose the correct format for your target application.
DirectX is commonly used in Epic Games Unreal Engine and 3ds Max, while OpenGL is commonly used in Unity, Blender, and Maya. If you're unsure which format to use, check the documentation for your software.
UV Tile Settings (UDIMs)
This setting allows you to use multiple UV spaces instead of being limited to a single 0–1 UV tile. Most commonly used for film and VFX, this is useful for large or highly detailed assets that require more texture resolution. We will not be using UDIMs in this lesson, but it is good to be aware of the terinolofy.
Import Settings
- Import cameras - This setting imports any cameras included in the file and allows you to access them when viewing your model.
- Auto Unwrap - This option automatically creates UVs for your mesh if none are found. We won't be using this feature, as proper UV unwrapping should be done before bringing the model into Substance Painter.
Import Baked Maps
If you have already baked your asset in another software, such as Marmoset Toolbag, you can import the generated maps into your project here.
Physical Size
These settings allow you to adjust the scale of your imported model by converting its units to centimeters. However, this should already be correctly set up during the modeling process, so you will usually leave this option at its default value.
Color Management
Color Management includes settings that control how colors are displayed, imported, and exported in Substance Painter. These settings help keep your textures looking consistent across different applications. For example, Unreal Engine uses the ACES color management system. You may need to adjust these settings when working with wide-gamut displays or following a specific studio workflow.
RESETTING UI TO DEFAULT
Cool, now we've imported our asset! Your UI should look a little something like this:
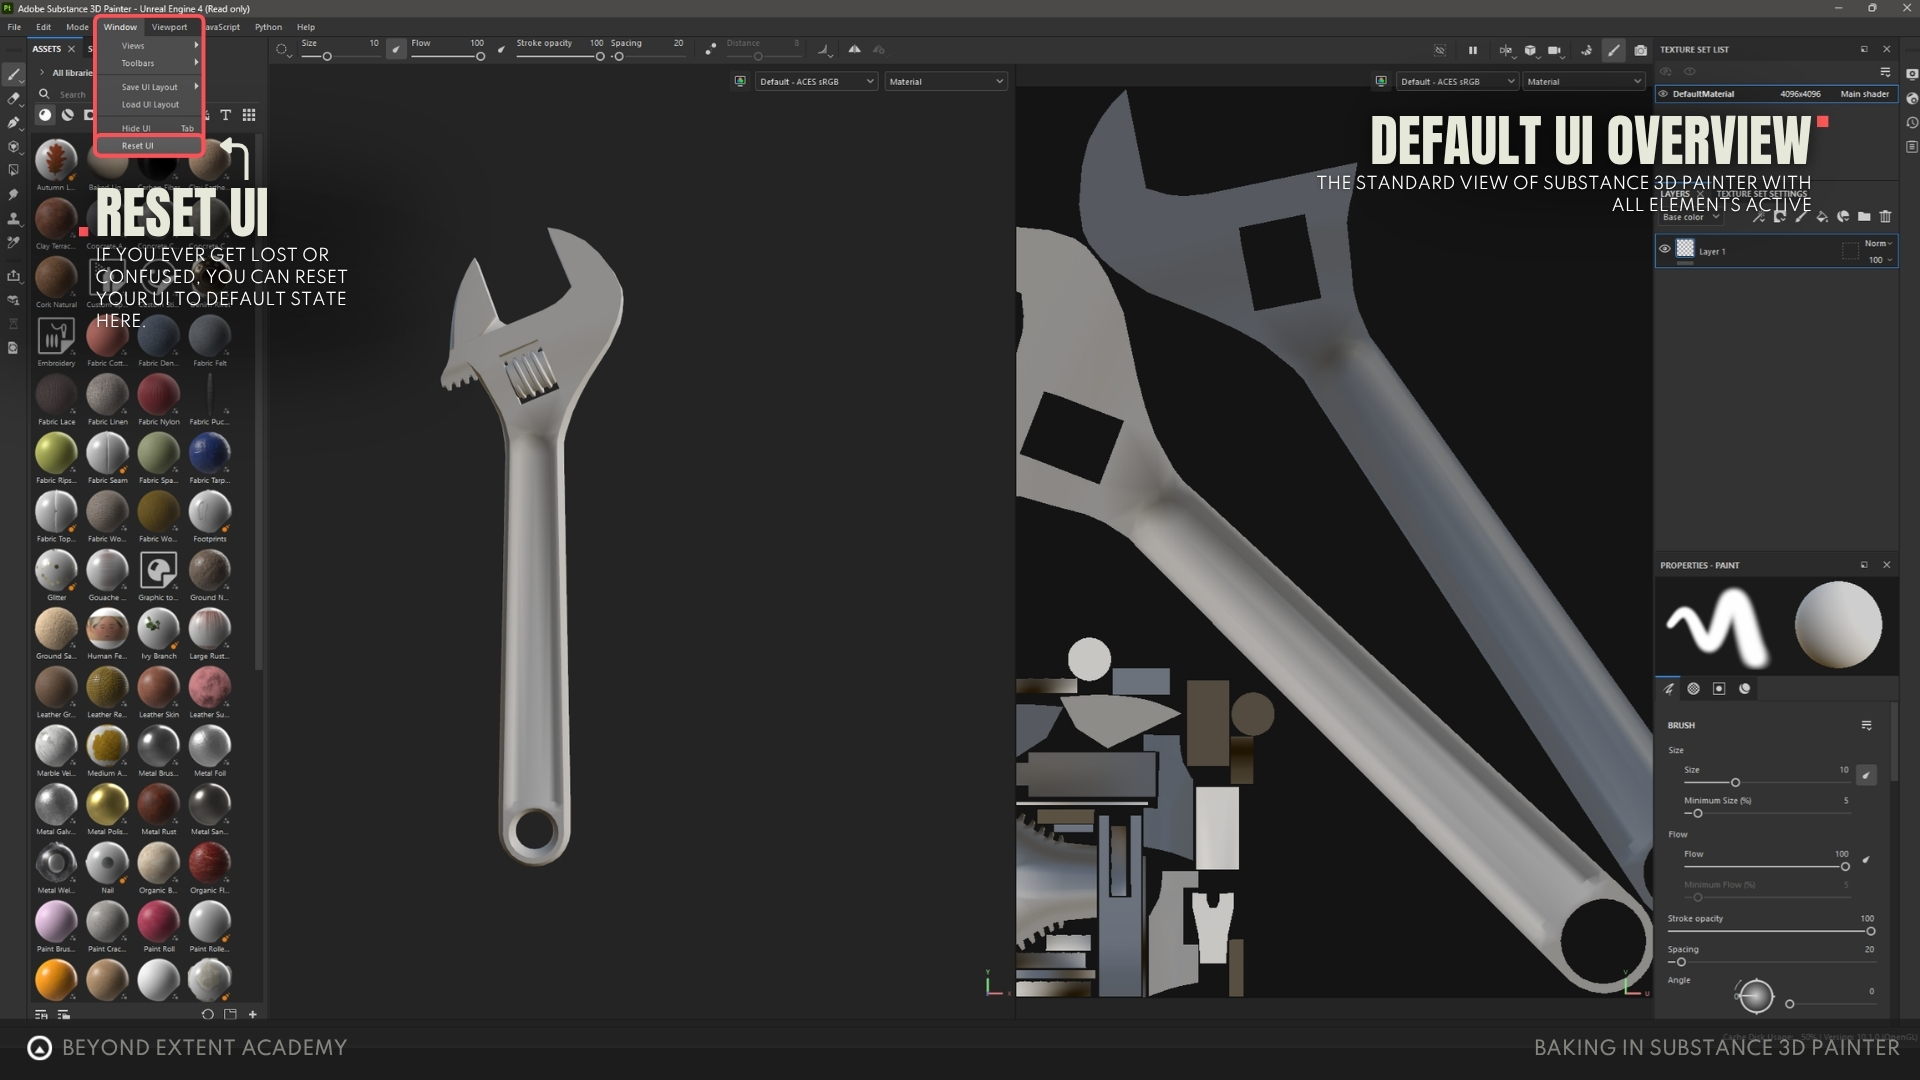
If your interface differs from what you see here, you can reset it to the default layout by going to Window → Reset UI. With the interface standardized, let's explore the different sections of the UI and their purpose.
UI
Let's talk about the UI! The interface is divided into several panels, each providing access to different tools and information needed throughout the texturing process.
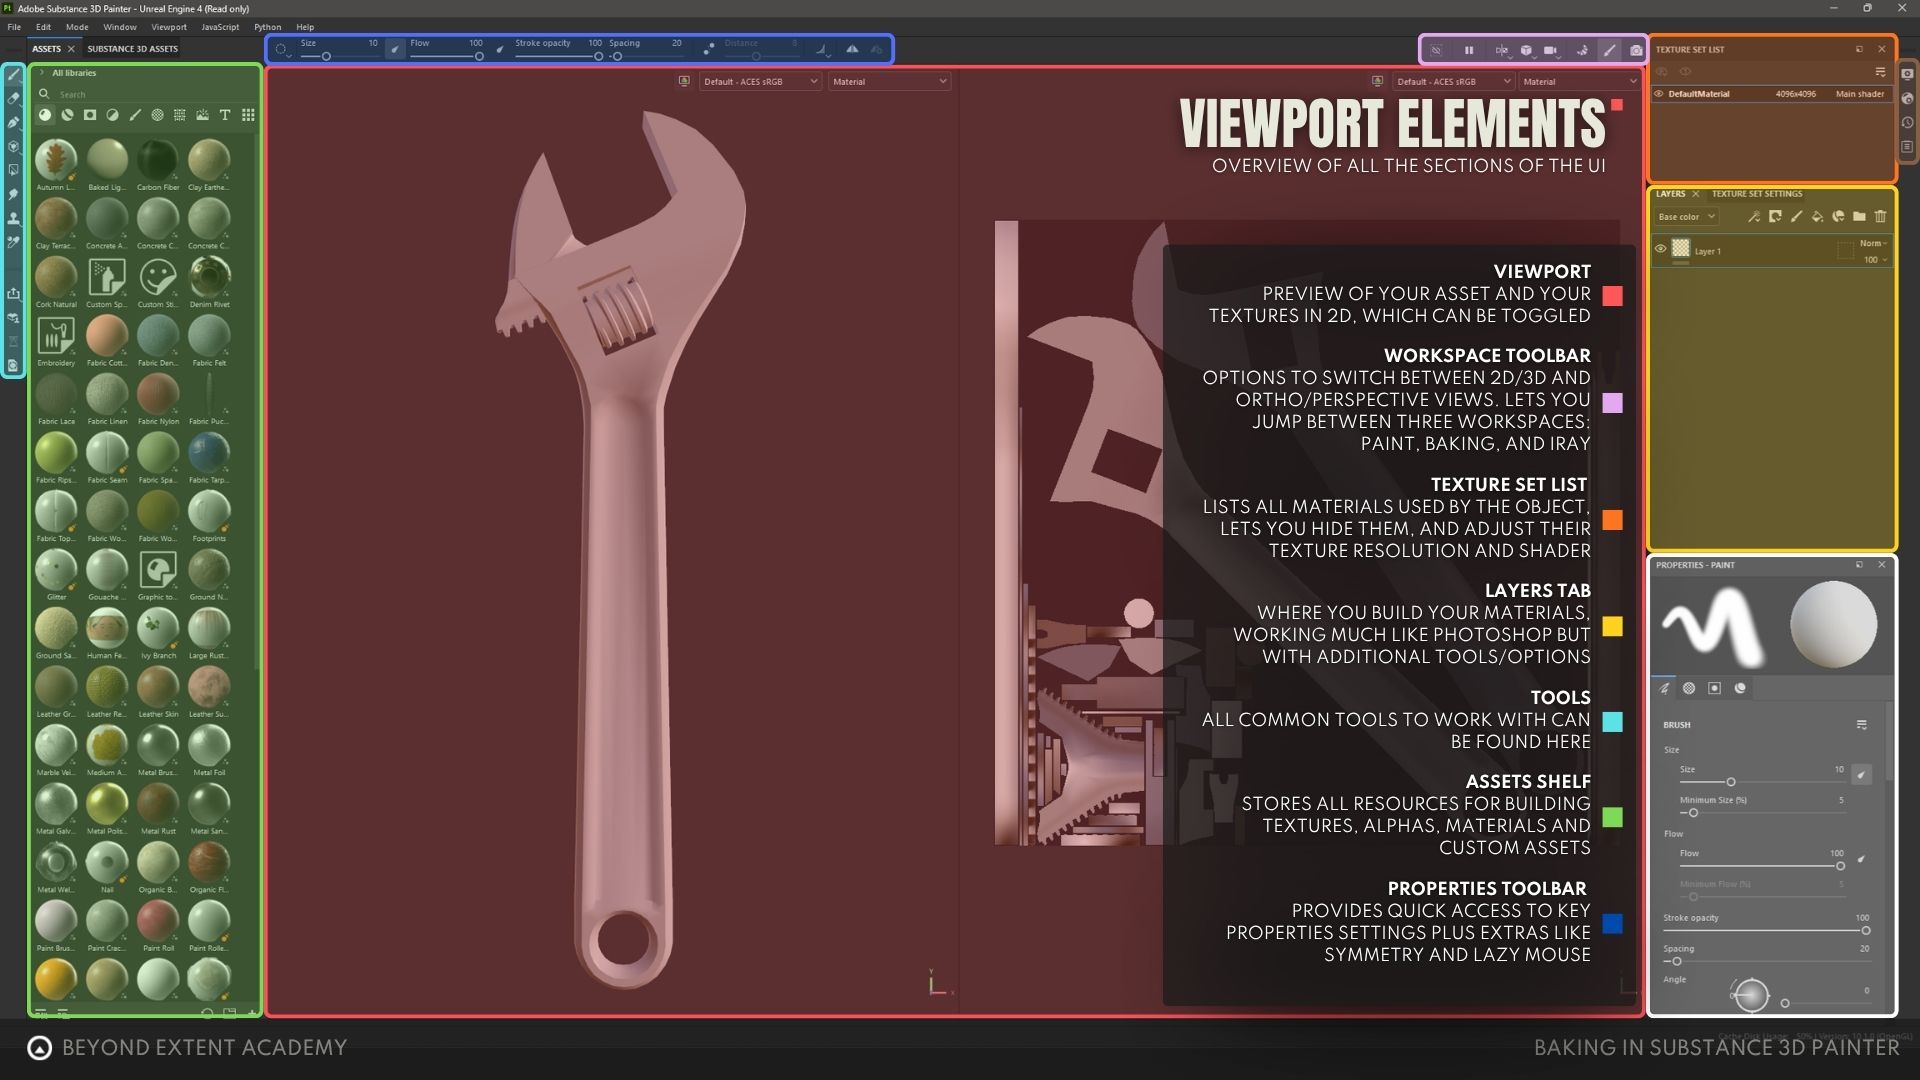
Viewport
The viewport (in red) takes up the largest part of the UI. This is where we paint our textures, adjust layers, and preview how our materials look on the model. It has two views: 3D and 2D. While both are useful, we will spend most of our time in the 3D view.
Workspace Toolbar
This toolbar contains settings related to your workspace. Here you can switch between 3D and 2D views, change between orthographic and perspective cameras, and move between Painter’s main workspaces. Right now, we are in the Paint workspace, but we can also use Iray for high-quality renders or switch to the Baking workspace, which we will use shortly.
Texture Set List
This section displays all the materials used by our object. Here we can hide texture sets, change their resolution, and adjust their shaders. Simple objects might only have one texture set, but larger assets can have many, so having control over them is important.
To the right of the texture set list is a tucked away stack of icons.
Display Settings controls options for your viewport like environment maps, lighting, camera settings, post-processing, anti-aliasing, and more.
Shader Settings control things like specular quality, subsurface scattering, and displacement.
Need transparency? This is where you can switch to a shader that supports it and adjust the related settings.
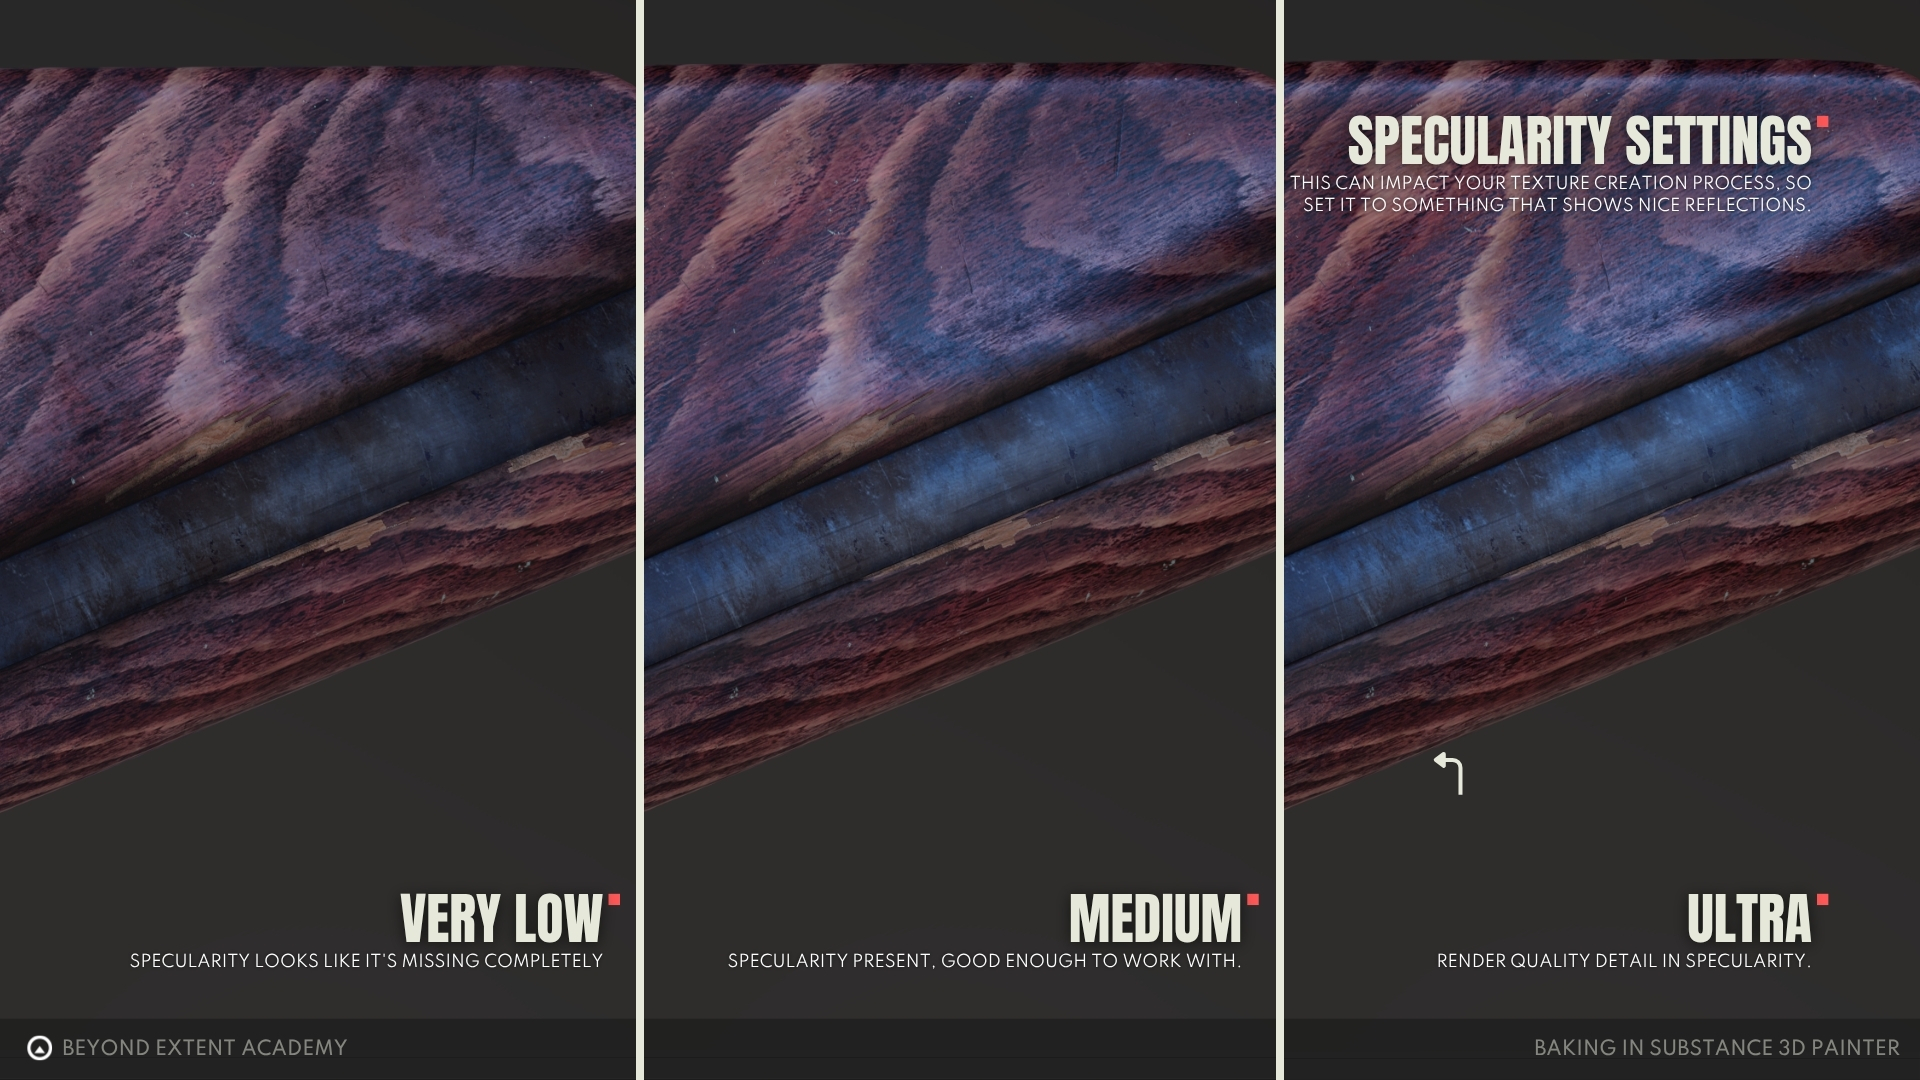
Within Shader Settings, Specular Quality is set to Low (16 spp) by default. If your hardware can handle High (64 spp) or higher, consider increasing it. Otherwise, remember to occasionally check your asset with higher-quality reflections, as this setting can significantly affect the final look of your roughness map.
The two remaining icons are simple: One is a history of edits and the other let’s you see the logs of a current session.
Layers Tab
This is where the magic happens! The layer stack is where we build our materials and textures. If you are familiar with Photoshop, the concept is similar, but Substance Painter takes it further with masks, generators, filters, and tools that let us edit multiple texture channels at once.
Tools
This is your toolbox for painting. It includes everything from brushes and erasers to projection tools, polygon selection, and cloning tools.
Assets Shelf
The Assets tab contains everything we need to create textures, from simple alphas and brushes to complete materials ready to use. Any custom assets we import will appear here as well.
Properties Toolbar
This gives you quick access to the most commonly used settings from the Properties panel, along with extra options like symmetry and Lazy Mouse.
Baking
Now that we are familiar with the Paint workspace, let's switch to the Baking workspace. You can do this by either clicking the croissant icon in the top-right corner or by pressing F8.
It’s time to learn how to prepare our mesh for baking in Substance Painter!
Baking is the process of transferring 3D mesh information into texture maps. It is most commonly used to capture details from a highpoly mesh and apply them to a lowpoly version.
While baking from highpoly to lowpoly is the most common workflow, a highpoly mesh is not always necessary. Maps such as Ambient Occlusion and Curvature can be generated directly from a lowpoly asset (without the use of a highpoly mesh) and used later to control various aspects of the texturing process.
Baking UI
For now let’s change the “Output Size” to 1024, load our high poly mesh and press “Bake selected textures” so we can take a look at the baked maps. After that we will tinker a bit with the settings and clean the bake up.
We wait a bit for the bake to finish so we can take a look at the results. After it’s done lets turn off baking visualization by clicking on the eye icon in the top left part of viewport.
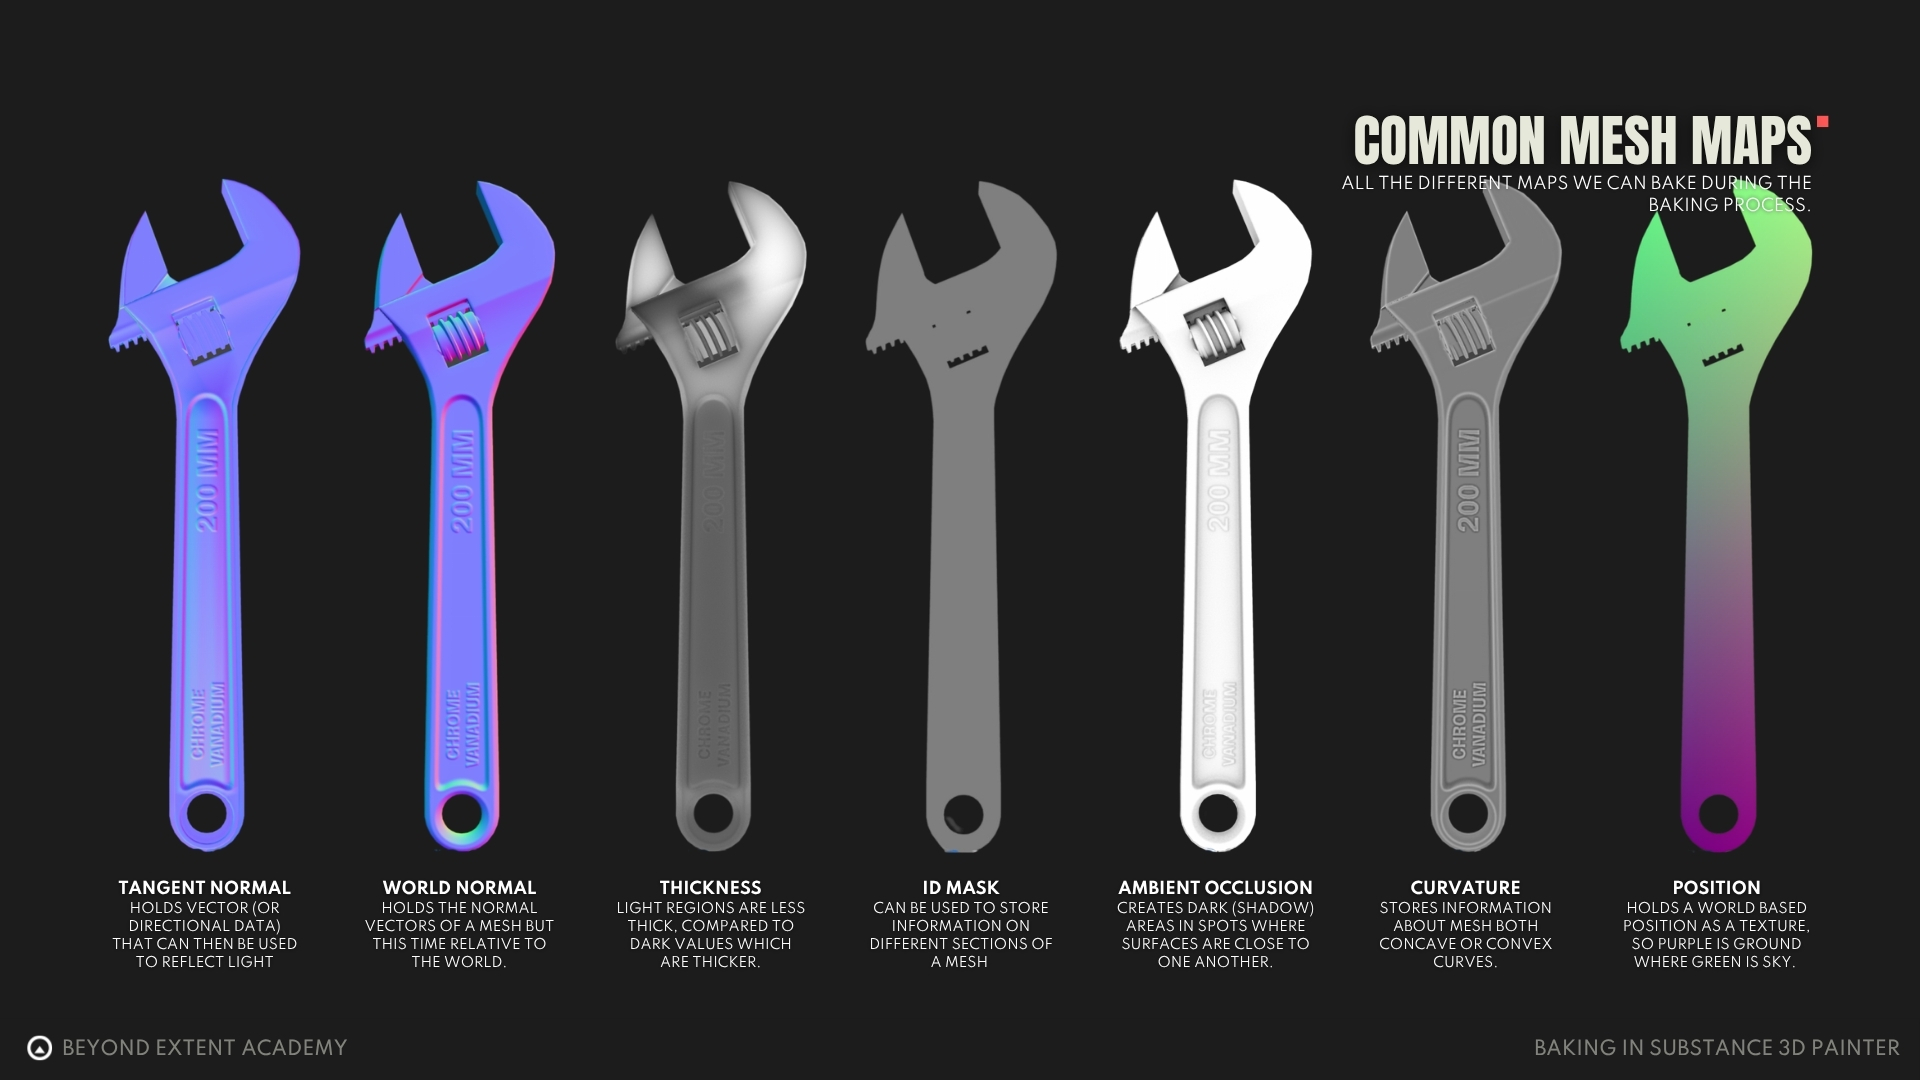
Common Mesh Maps
It’s time to go over all the maps that Substance Painter allows you to bake and familiarize ourselves with what they are and how we would use them. If you want to take a look at the maps in your project you can do it by selecting them from the dropdown menu in the top right part of the viewport.
Normal
Normal map or more precisely Tangent Space Normal map is the main reason we want to tackle baking. Seeing it in action for the first time feels like magic.
Normals or normal vectors are special type of unit vectors that point in the same direction as a face containing them. They are used by the engine when calculating light.
I’ll explain what a normal map is in three ways with increasing precision so you can pick which one resonates with you the most.
- Vague - it remembers the direction of high poly faces and puts them on the low poly mesh.
- Decent - it contains the deviation between the low poly normals and high poly normals.
- Precise - it holds the information about the high poly normal vector in a given point relative to the low poly face normal.
This map is the reason we can see all the detail from the high poly mesh in our “Neutral Material” as if it’s no longer a low poly mesh.
World Space Normal
World Space Normal map also holds the normal vectors of a mesh but this time relative to the world. It let’s you select the regions of a mesh that point certain direction. For example if you wanted to make a dust or snow layer you would use world space normals to determine which parts of a mesh face up as that is where most of it would accumulate.
Thickness
As per name it let’s us know what is the thickness of a mesh in a given point. The darker the value the thicker the mesh. Typically used for SSS. The settings we get for it already appeared in AO except for the Normalization which defines how it gets normalized.
ID
ID map takes the id information from the mesh and stores it as a color so you can later select parts of a mesh by their IDs. It needs a bit of forethought when exporting.
Example use would be a situation where we have model of a gun with wooden stock and a grip. It would be nice to have the ability to easily separate wooden and metal parts. Before exporting we would give them different IDs, bake those onto the low poly mesh and then use them as a mask when texturing.
How you pass the ID map is completely up to you and the software you used for export. Substance has setting where you select between Vertex Color, Material Color, File ID and Mesh ID/Polygroup. If your choice of passing IDs does not contain color, Substance will also ask you to pick the way you want to convert the IDs into colors from Random, Hue shift or Grayscale.
Ambient Occlusion
Ambient Occlusion or AO is a way for game engines to simulate the behavior of light in crevices.
To calculate AO Substance Painter will ray trace from a low poly mesh towards the high poly one. Whenever a ray hits a surface it will darken the place it was traced from.
What it does is create dark zones in spots where surfaces are close to one another. In Substance it’s baked down to a map and used to generate things like dirt.
It has couple of settings so let’s take a look at what they are and what they do.
- Secondary rays - controls amount of rays used to calculate AO, the more the better quality but it increases baking time.
- Min/Max Occluder Distance - controls the minimum and maximum distance that the rays can travel to influence the AO.
- Relative to Bounding Box - if it’s selected the distance will be mapped to a bounding box of a mesh where 1 would be it’s size.
- Spread Angle - controls the angle range the rays are shoot at. Higher angle usually means more occlusion.
- Distribution - controls the distribution of the rays cosine meaning more get sent along the normals and linear meaning they get sent equally in all the directions. It’s recommended to use Cosine as it’s the most realistic. However, if your AO starts looking washed out in the sharp angles or has light leaks, changing it to linear might help fix those issues.
- Ignore Backface - this setting let’s you choose if you want the rays to bounce off of backfaces of mesh. Your high poly mesh should not have any holes so no backfaces will be exposed but for low poly only baking it’s good to take a look at this setting and it’s influence on AO.
- Self Occlusion - defines if mesh different parts of meshes should occlude themselves. Always is usually recommended but there are situations where it’s not desirable like baking floaters or when texturing multiple independent meshes at the same time.
- Attenuation - controls how AO is attenuated with distance.
- Ground Plane - If checked the ground plane will be added to AO calculations creating occlusion at the contact points.
Curvature
Curvature as the name suggests has the information about the way mesh curves. Flat spaces have perfectly gray value (0.5), pointy areas get lighter (0.5-1.0) and concave areas get darker (0.0-0.5). It’s used to generate edge ware or dirt. It’s probably the second most useful map after the normal map.
Substance gives us couple of settings to control it.
- Method - it’s the method used to generate the curvature. It used to be generated from a normal map but now it’s done by raytracing from low to a high poly mesh and it’s recommended to keep it that way.
- Secondary Rays - the amount of rays to trace. More means better quality but longer baking times.
- Sampling Radius - defines the distance the ray can travel to still have the influence.
- Relative to Bounding Box - if it’s selected the distance will be mapped to a bounding box of a mesh where 1 would be it’s size.
- Self Intersection - let’s you choose if you want to use all the objects for calculations or only the corresponding one (Only Same Mesh Name).
- Auto Tonemapping (per UV Tile) - automatically maps the values of the curvatures per keep it checked for the most time. If you want to map it yourself you can use sliders for Min and Max to do so.
Position
This map holds the position of each parts of the mesh. One example of use would be creating a gradient mask at the bottom of a car where the mud and dirt would gather and gradually get stronger the lower to the ground you get.
We have couple of settings for adjustment here so let’s take a look.
- Mode - allows us to select which axis we want to create the position gradient for. We can pick between one or all.
- Normalization Type - defines how the values will be normalized and we can pick between bounding box, bounding sphere or no normalization.
- Normalization Scale - defines bounds of normalization. If we want to have the position gradient for every material then we can pick to do so. Most of the time we will use Full Scene.
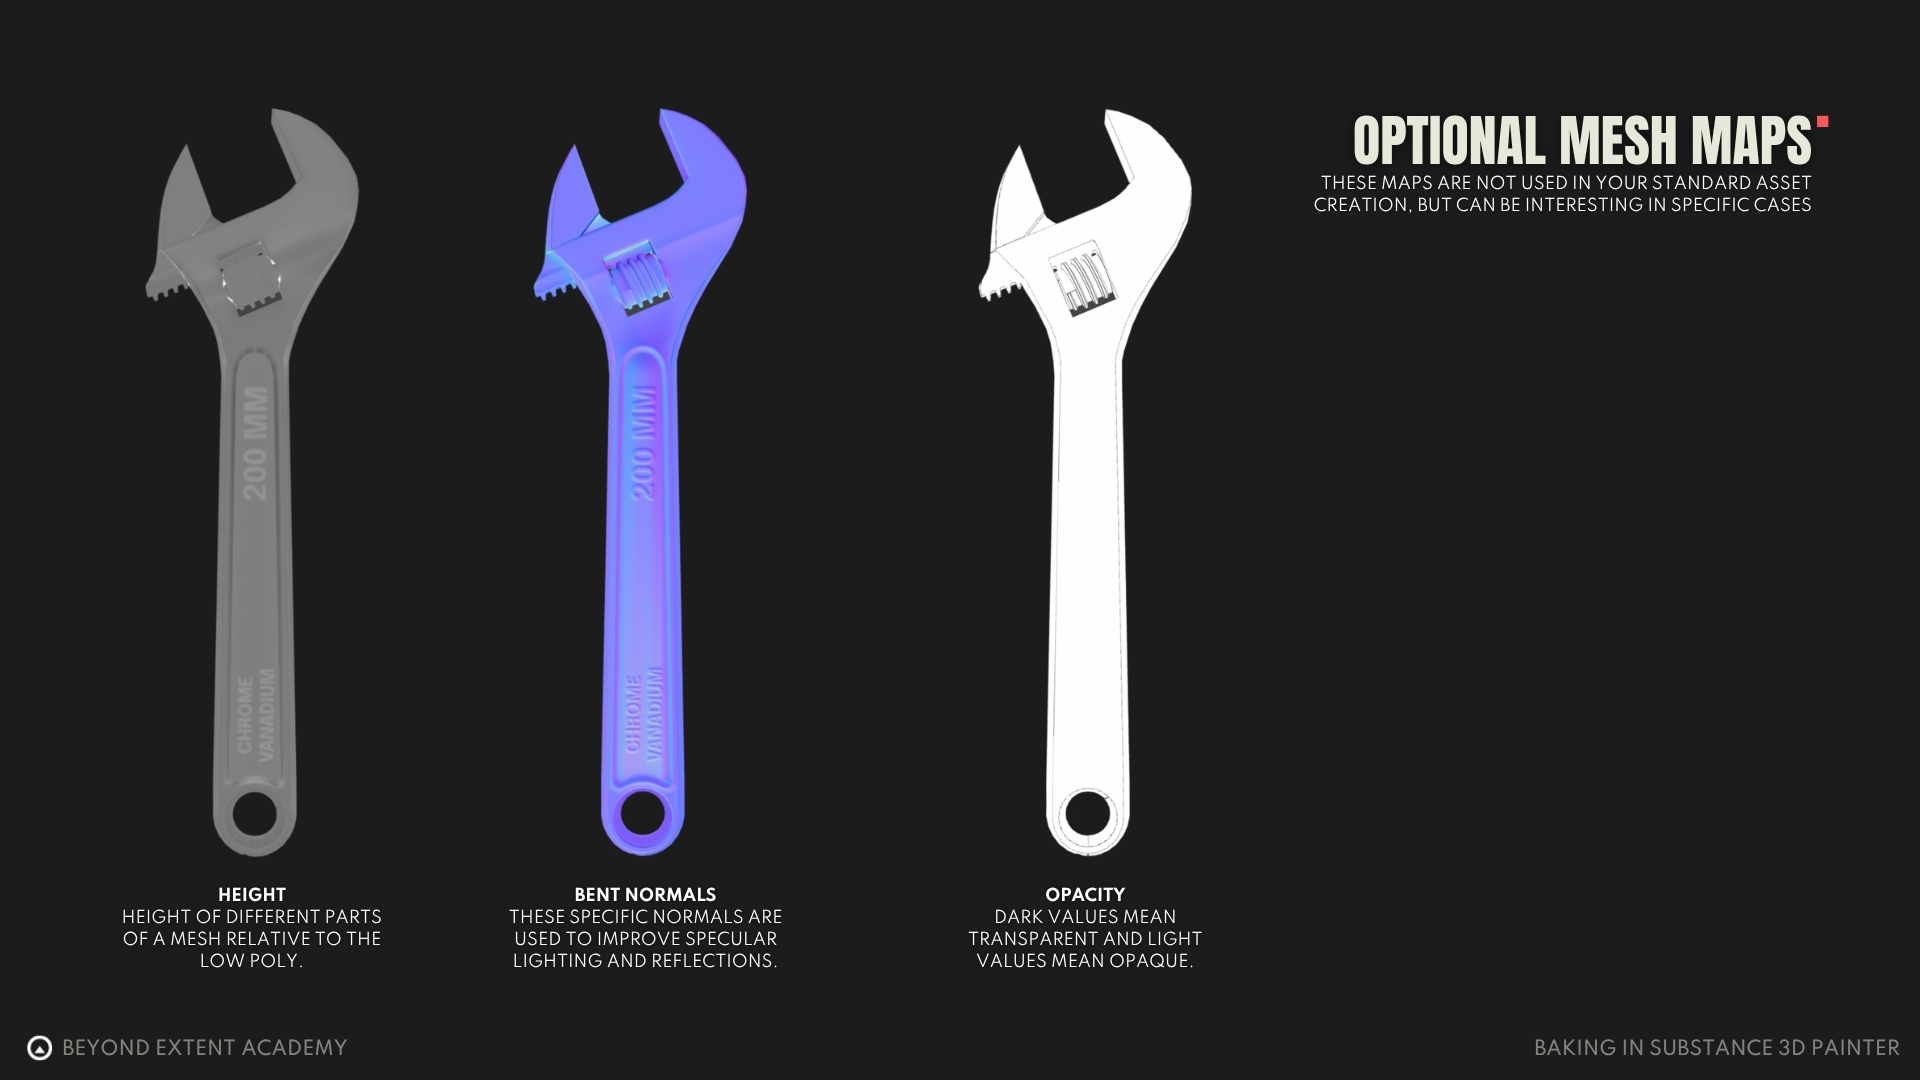
Optional mesh maps
Baking settings
Final step before baking is setting up the most important baking settings. We’re gonna need to turn the Baking visualization back on for that. We should see something like this. Let’s go over the Common settings for the bake and what they’re used for.
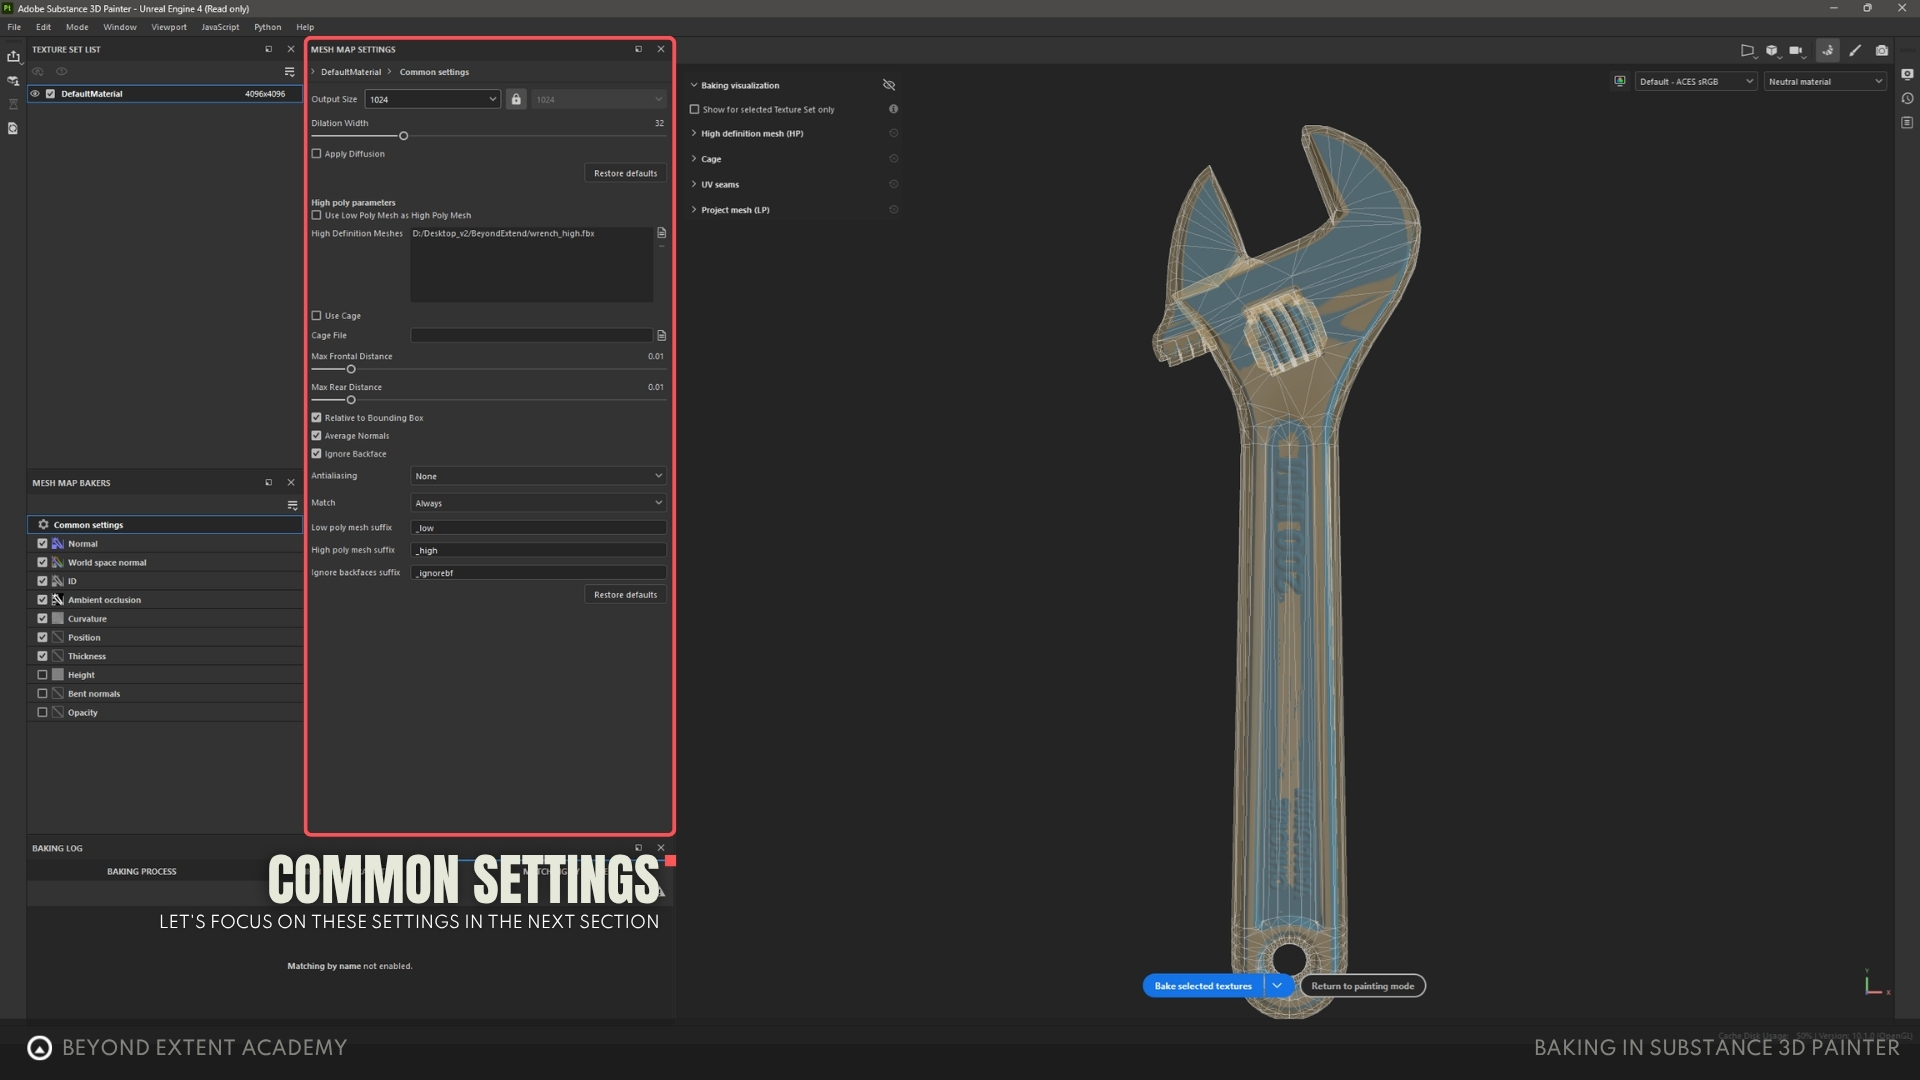
Common settings
- Output size - Here is where you pick the size of the baked maps. You can technically opt to unlock (press the lock icon) the dimensions of the texture to make it rectangular. Even though it’s a rare practice it can potentially help you optimize texture space for situations where you texture long objects like swords or rifles that on square texture would require cutting up into smaller pieces.Another situation that could use non square texture would be a trim sheet creation. Sometimes it’s better to keep the texture narrow instead of adding redundant information to a texture that is going to be tiling anyway.
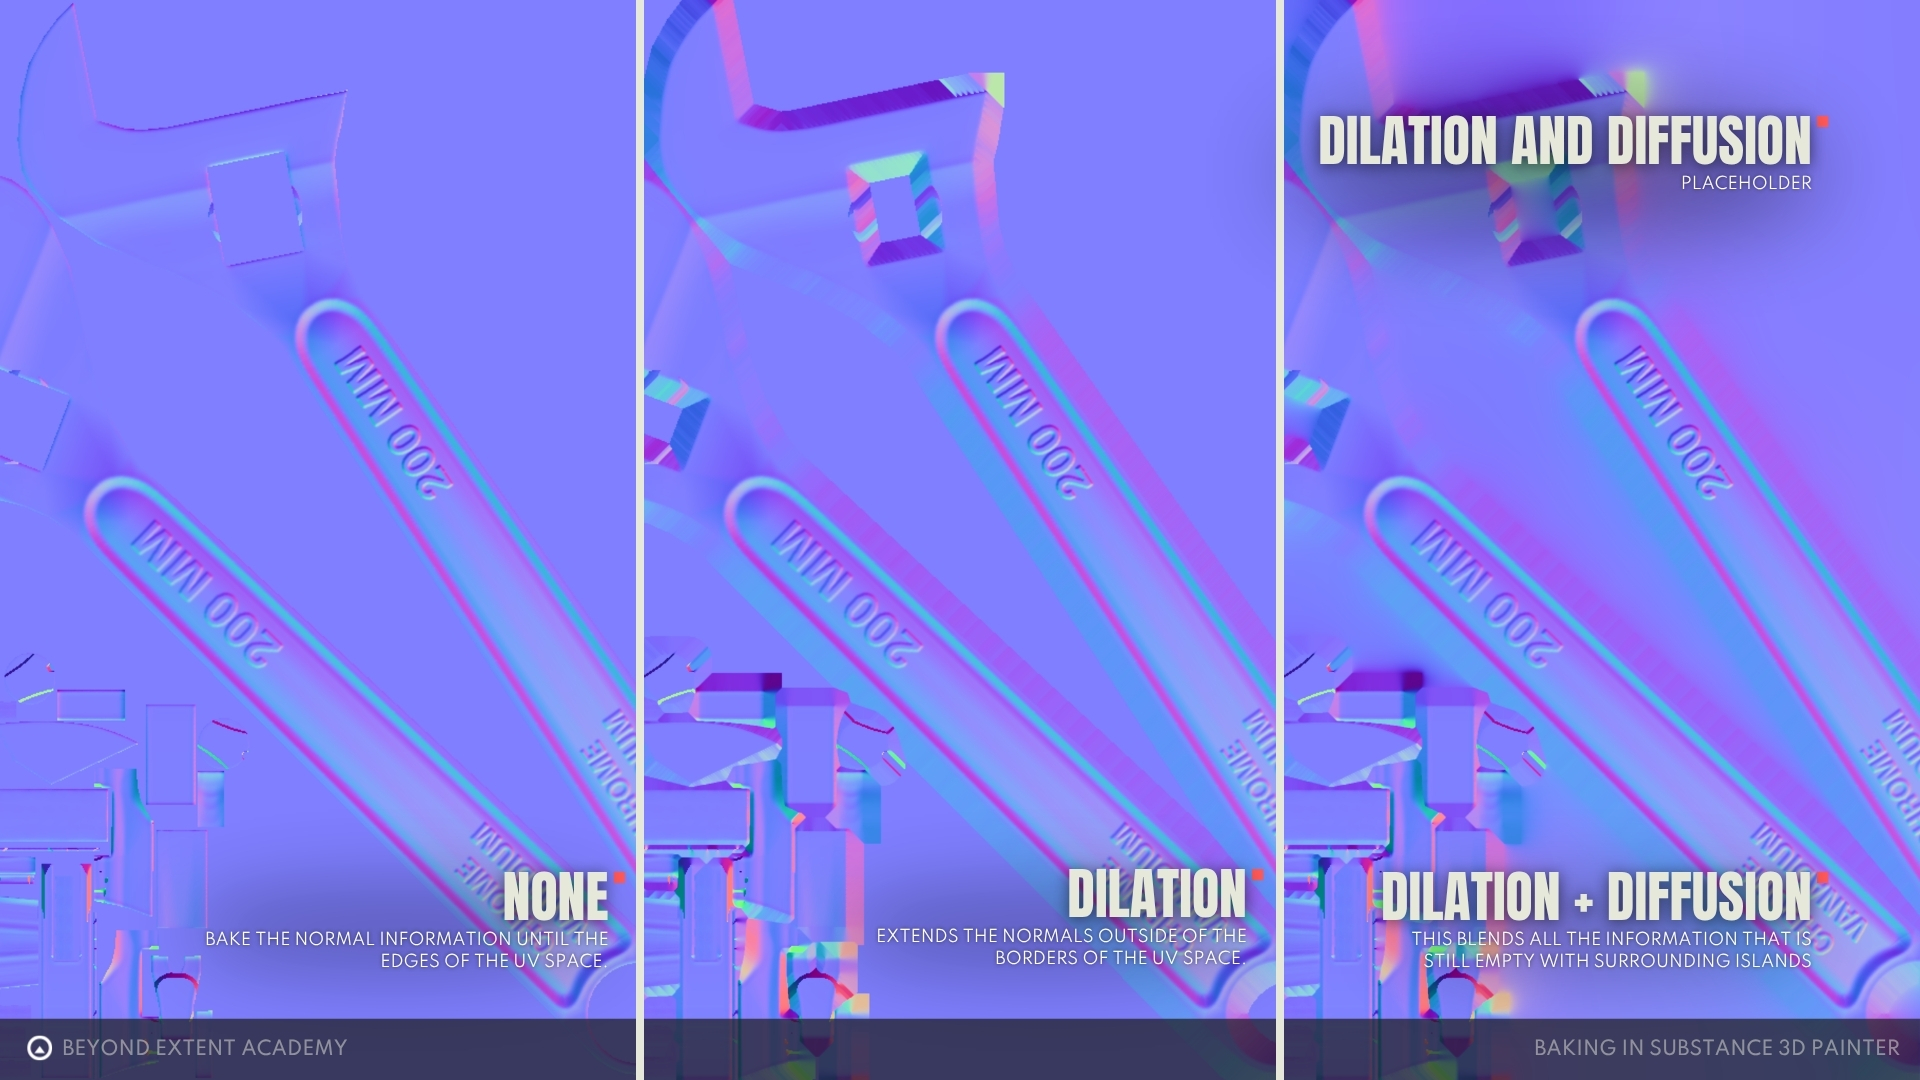
- Dilation Width - this setting let’s us artificially expand the maps outside of the UV shells to prevent bleeding at the shell edges. It also helps with generating lower resolution versions of textures when we import them in the game engine. It’s recommended to keep this value above 16.
- Apply Diffusion - if checked will diffuse the edges of the maps. If dilation width is not 0 it will diffuse the edge of the dilated map.
- Use low poly mesh as high poly mesh - This setting lets you bake maps using the low poly mesh as the source. It's primarily used when you don't need a normal map but still want to generate maps such as Curvature, Thickness, and Ambient Occlusion. This is very common when working with mid-poly assets.
- High Definition meshes - This is where you import your high poly mesh to use as the baking source.
- Use Cage - Enable this option if you want to use a custom cage mesh. It's especially useful when baking complex objects where the low poly mesh alone cannot capture all the details without introducing baking artifacts.
- Cage File - This is where you would import your custom cage mesh. A cage allows you to define custom baking distances based on the mesh you provide.
- Max Frontal/Rear Distance - Value that determines how far would the vertices be inflated/deflated when creating the automatic cage for your mesh. You can see the cage change in the preview when tweaking those values.
- Relative to bounding box - when checked will make sure that the size of the cage is relative to bounding box where 1 would be it’s size.
- Average normals - tells the baker to average the normals when creating cage. It makes sure that cage stays connected. We discussed the average and split normals in previous lesson lets bring back the graphic to refresh our memory.
- Ignore backface - this option will make sure that we don’t bake the backfaces of our mesh
- Antialiasing - smoothes aliased artifacts of the baked maps. Increasing the value will increase quality but also bake time.
- Match - this is where we choose how to match low and high poly counterparts of the asset for the bake. If you went through the trouble of naming your assets with suffixes _low and _high. This option should be set to “By Mesh Name”. We use this option to make sure that Substance will think of each mesh as a separate baking pass, this in turn allows it to avoid problems with different parts of the mesh baking onto each other.
- Before “By Mesh Name” was available in Substance people used to explode their mesh (moving each part of the mesh away from each other for baking) to avoid baking artifacts.
- Suffixes - here you can change the naming convention for high, low and backface ignored meshes.
Cage setup
We now know everything there is to know about the settings of our bake now it’s time to prepare our cage for a nice bake.
As previously mentioned the main settings manipulating your cage are going to be Max frontal/rear distance we want to set those as small as possible where there is still no clipping visible. Fortunately it’s easy to see max frontal distance as all the clipped parts of geo will turn red in the viewport. When it comes to the rear one it’s more problematic as it is inside the mesh. A good rule of thumb is to keep it default and if you see any baking issues lower it slowly.
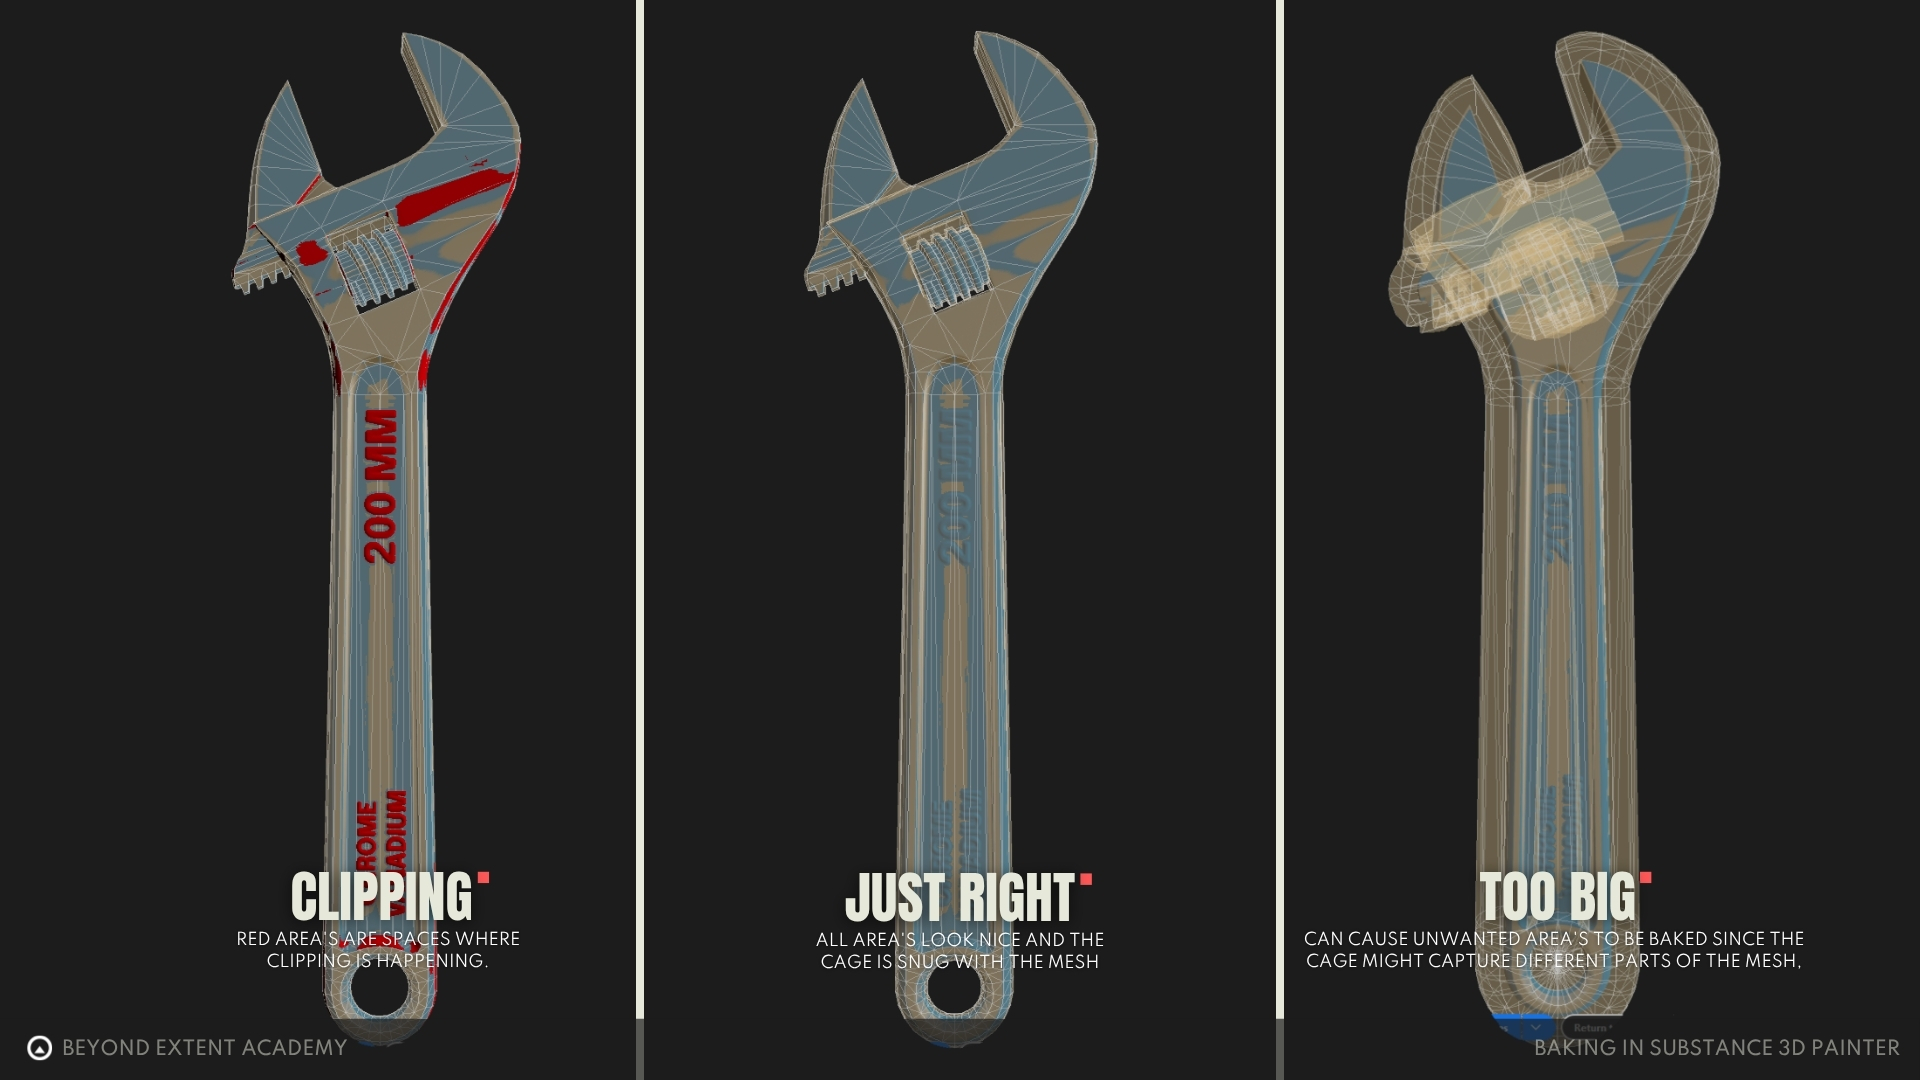
General baking setup
Here is the list of the things to look out for when setting up your bakes.
- Match “By Mesh Name” if you divided your mesh into parts. Also think about setting Self Intersections for Curvature to “Only Same Mesh Name”. Same thing for Self Occlusion in AO, Thickness and Bent normals (it’s better to have Self Occlusion set to Always but changing it can fix some of the baking issues).
- Use “Average Normals” unless you intentionally set up the bake not to use it.
- It’s easiest to adjust settings with “Relative to Bounding Box” on.
- Make sure you don’t see obvious errors in bake viewport.
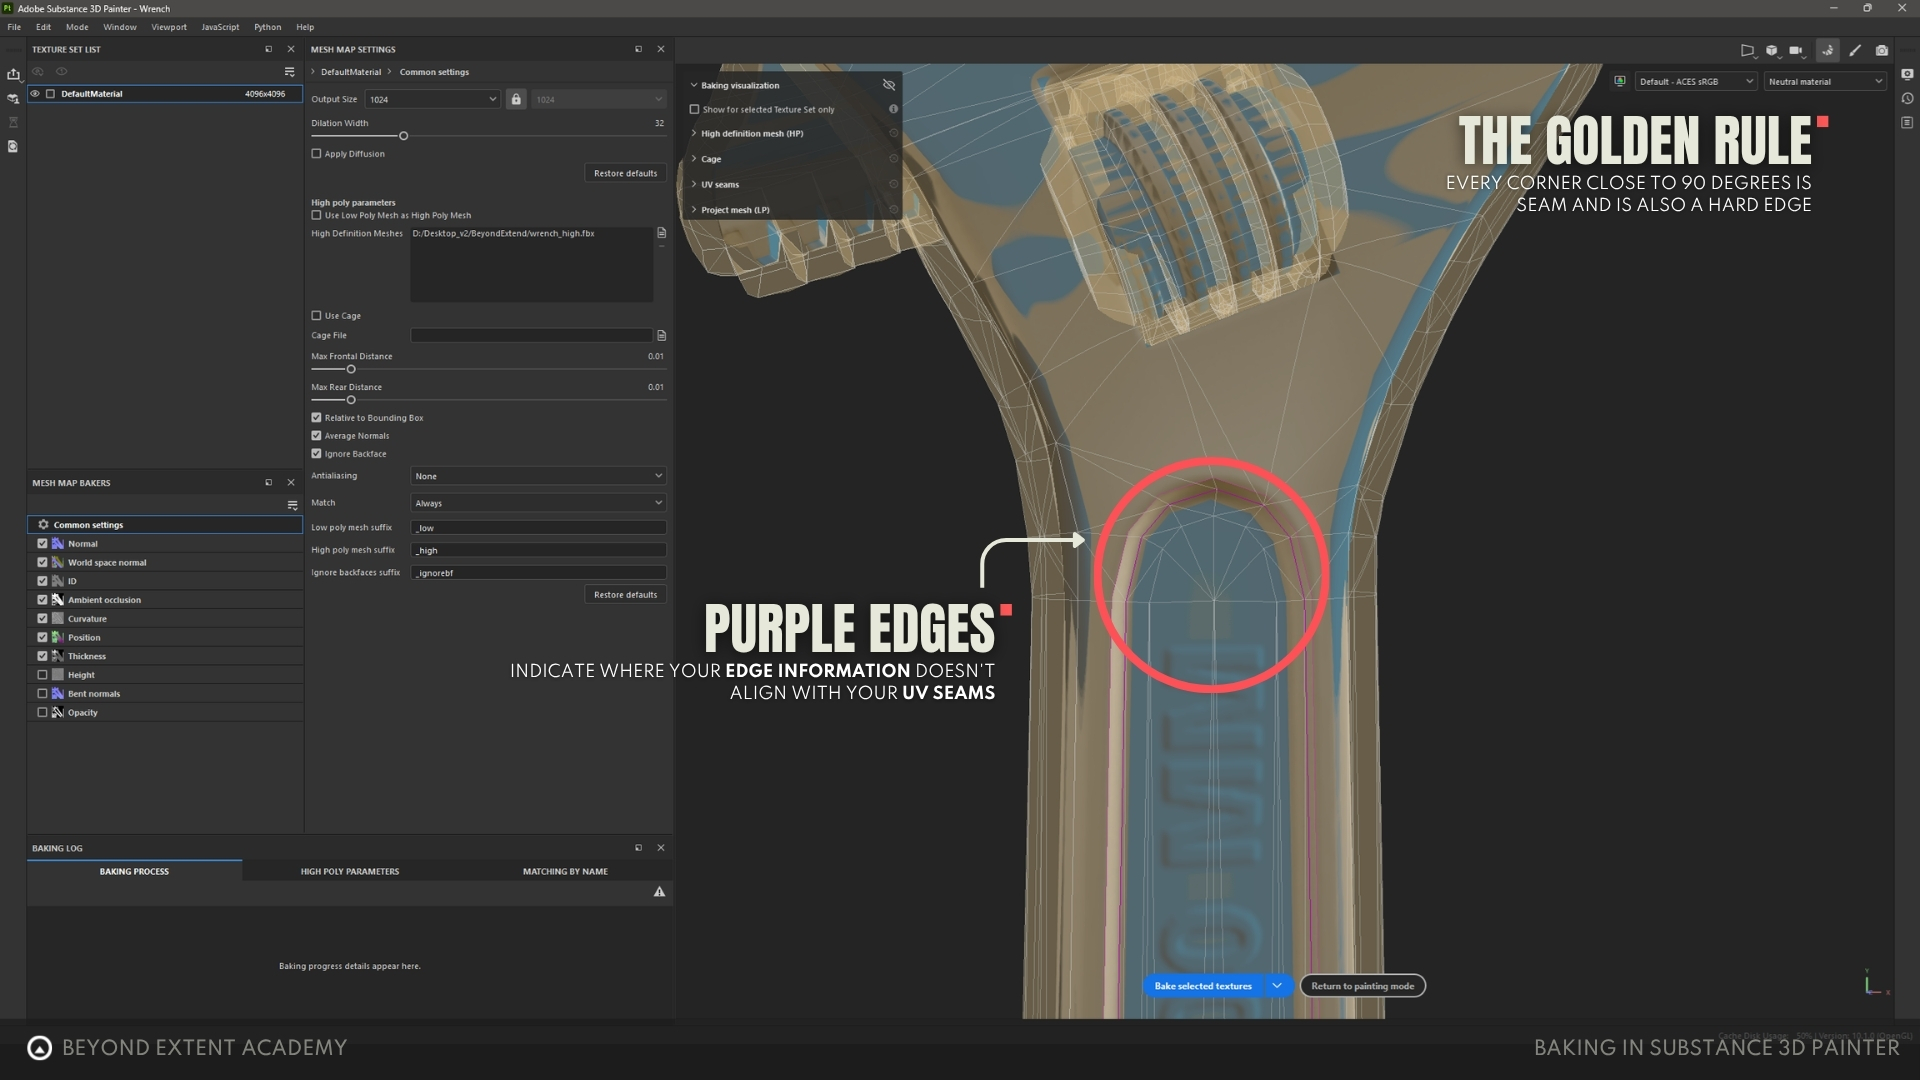
If you forgot about The Golden Rule and your sharp edges do not have a seam it will be displayed as a purple edge in the baking viewport.
exercise
Iterative Test Baking
goal
Follow along as we move towards a polished bake.
Downloadable content
Get into it instantly by downloading the starter content for this lesson
download lesson contentprocess
Download the files provided to follow along with the video as Piotr explains the different aspects of doing test bakes.
We did a quick preliminary bake in the beginning to showcase what maps can be generated, but now that we’ve gone through the necessary settings and terminology, we can turn our focus towards optimizing our bake with some quick and rapid experimentation. The last thing we need is perfect bake with artifacts.
For that purpose we will be setting up a test bake where we lower the quality and increase the speed of map generation. That will allow us to rapidly change meshes and fix any problems we encounter along the way.
Settings that will have the most impact would be:
- Output size - the larger map we want to generate the longer we will have to wait. That’s why it’s good to set this value low. Around 1k should be good, unless your PC can handle 2k but anything more is just a waste of time.
- Antialiasing - this setting will not help us fix any problems with generation that’s why we turn it off completely for the test bakes. It’s especially time draining as it uses SSAA for antialiasing which renders your maps in a higher resolution and then lowers it to reduce aliased edges.
- Secondary rays - reducing this value for AO, Curvature, Thickness and Bent normals can drastically increase the bake speed. Around 16 should be enough to catch all the problems with not too much of a performance strain.
Final Bake
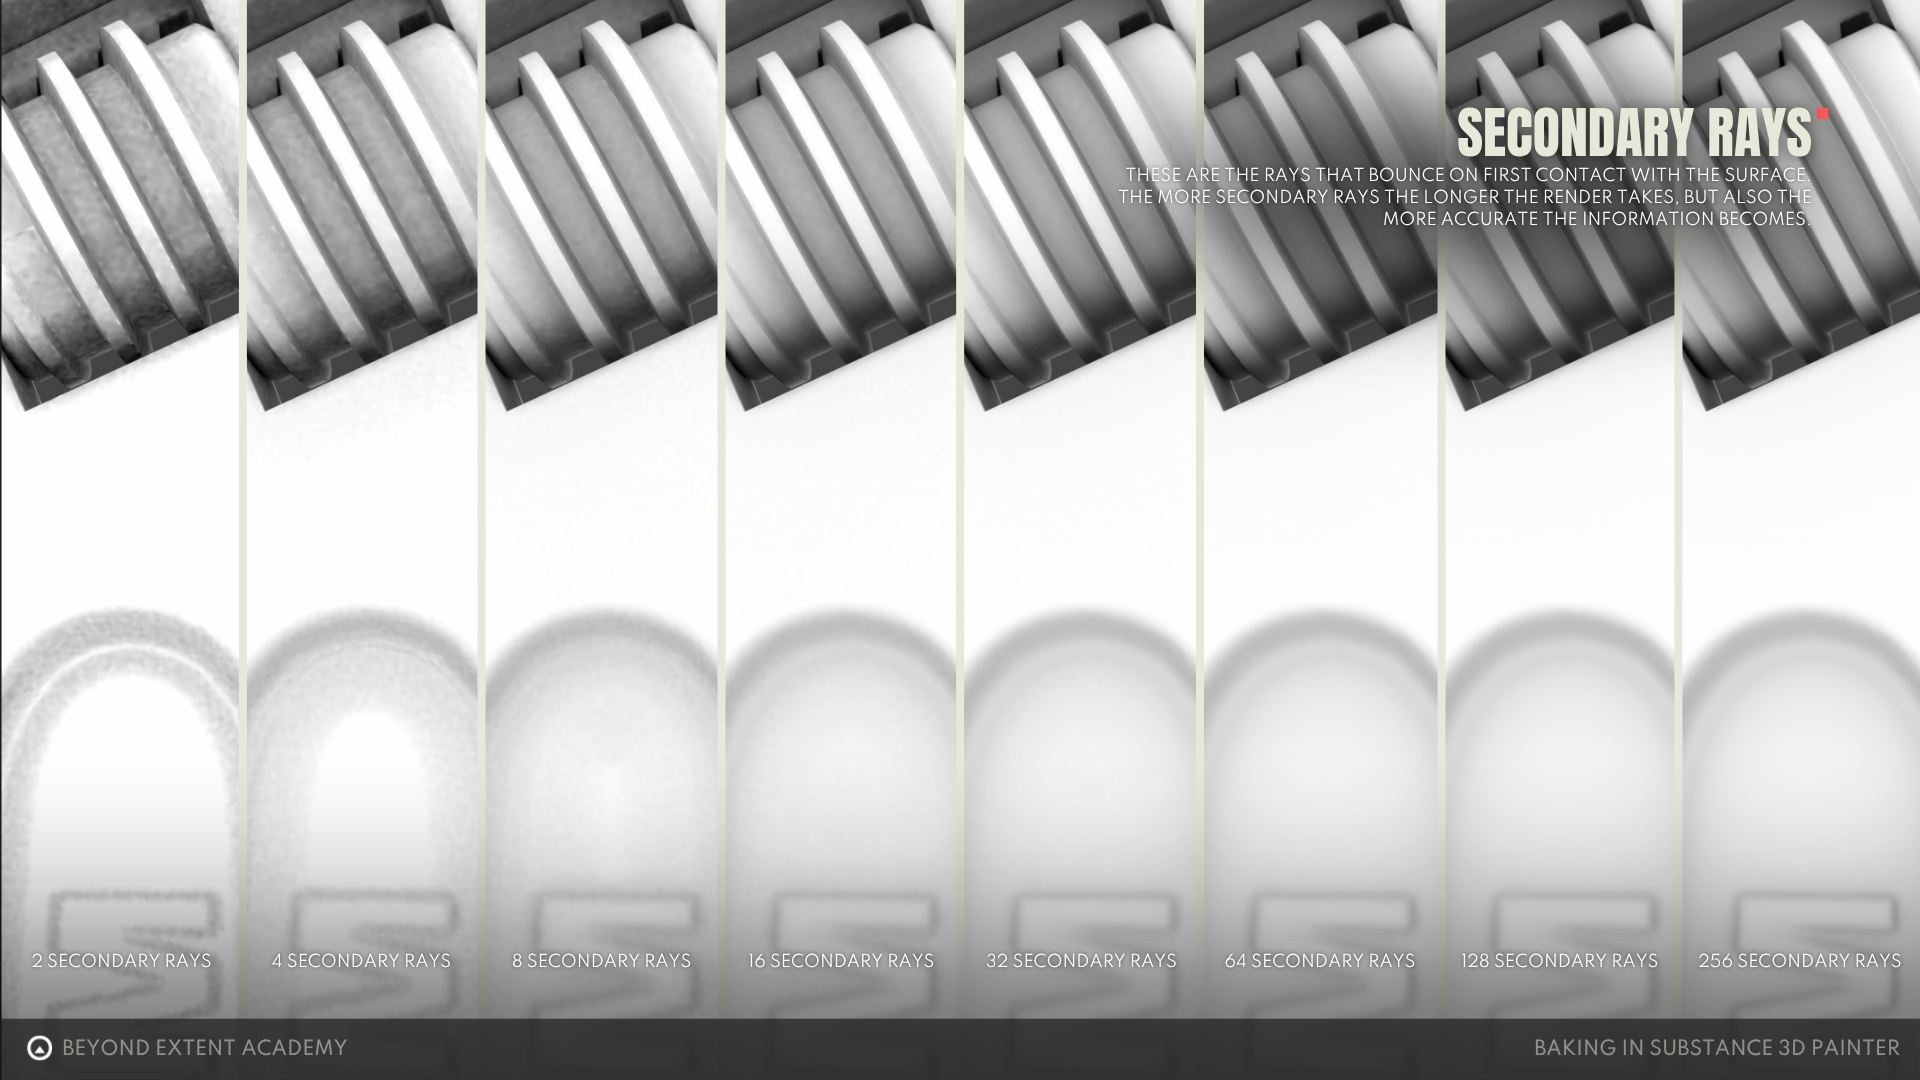
After you tweak all the problematic parts and you’re left with low quality but a clean bake you can start thinking of bringing that quality back up. Crank up all the values mentioned before up keeping in mind that Output Size is the most important one, if you can make it 4k you should. Even basic 4x Supersampling Antialiasing should be enough although you might want to increase it if you have resources for it. Secondary rays should be kept relatively high to avoid grainy maps. Below you can see the comparison between the output and ray count. Generally it’s recommended to not use anything below 64 samples for final bake as even with these samples results can appear grainy depending on your final texture resolution.
Below you can see what the forementioned grain looks like. We want to make sure that there is no grain visible when we’re done with our final bake. The value of Secondary Rays that produces quality results can change depending on multiple factors like map size or mesh so make sure to check every time if it’s set right. Don’t just rely on whatever value worked last time.
exercise
Fixing common baking issues
goal
Fix all the issues with the given asset we provide
Downloadable content
Get into it instantly by downloading the starter content for this lesson
download lesson contentprocess
Get started by downloading the FBX file and importing that into your 3D modelling program of choice. Fix all the issues that you encounter by doing tests bakes and reimporting to quickly test changes done to your mesh. The goal is to get a bake that has no issues, as seen in the lesson.
Now that we know how to bake we’ll get hit with mountain of issues that can appear while baking. Let’s try to take a look and fix them.
So for the default wrench model there wasn’t that many problems so let’s open up the more messed up version of it and fix it step by step.
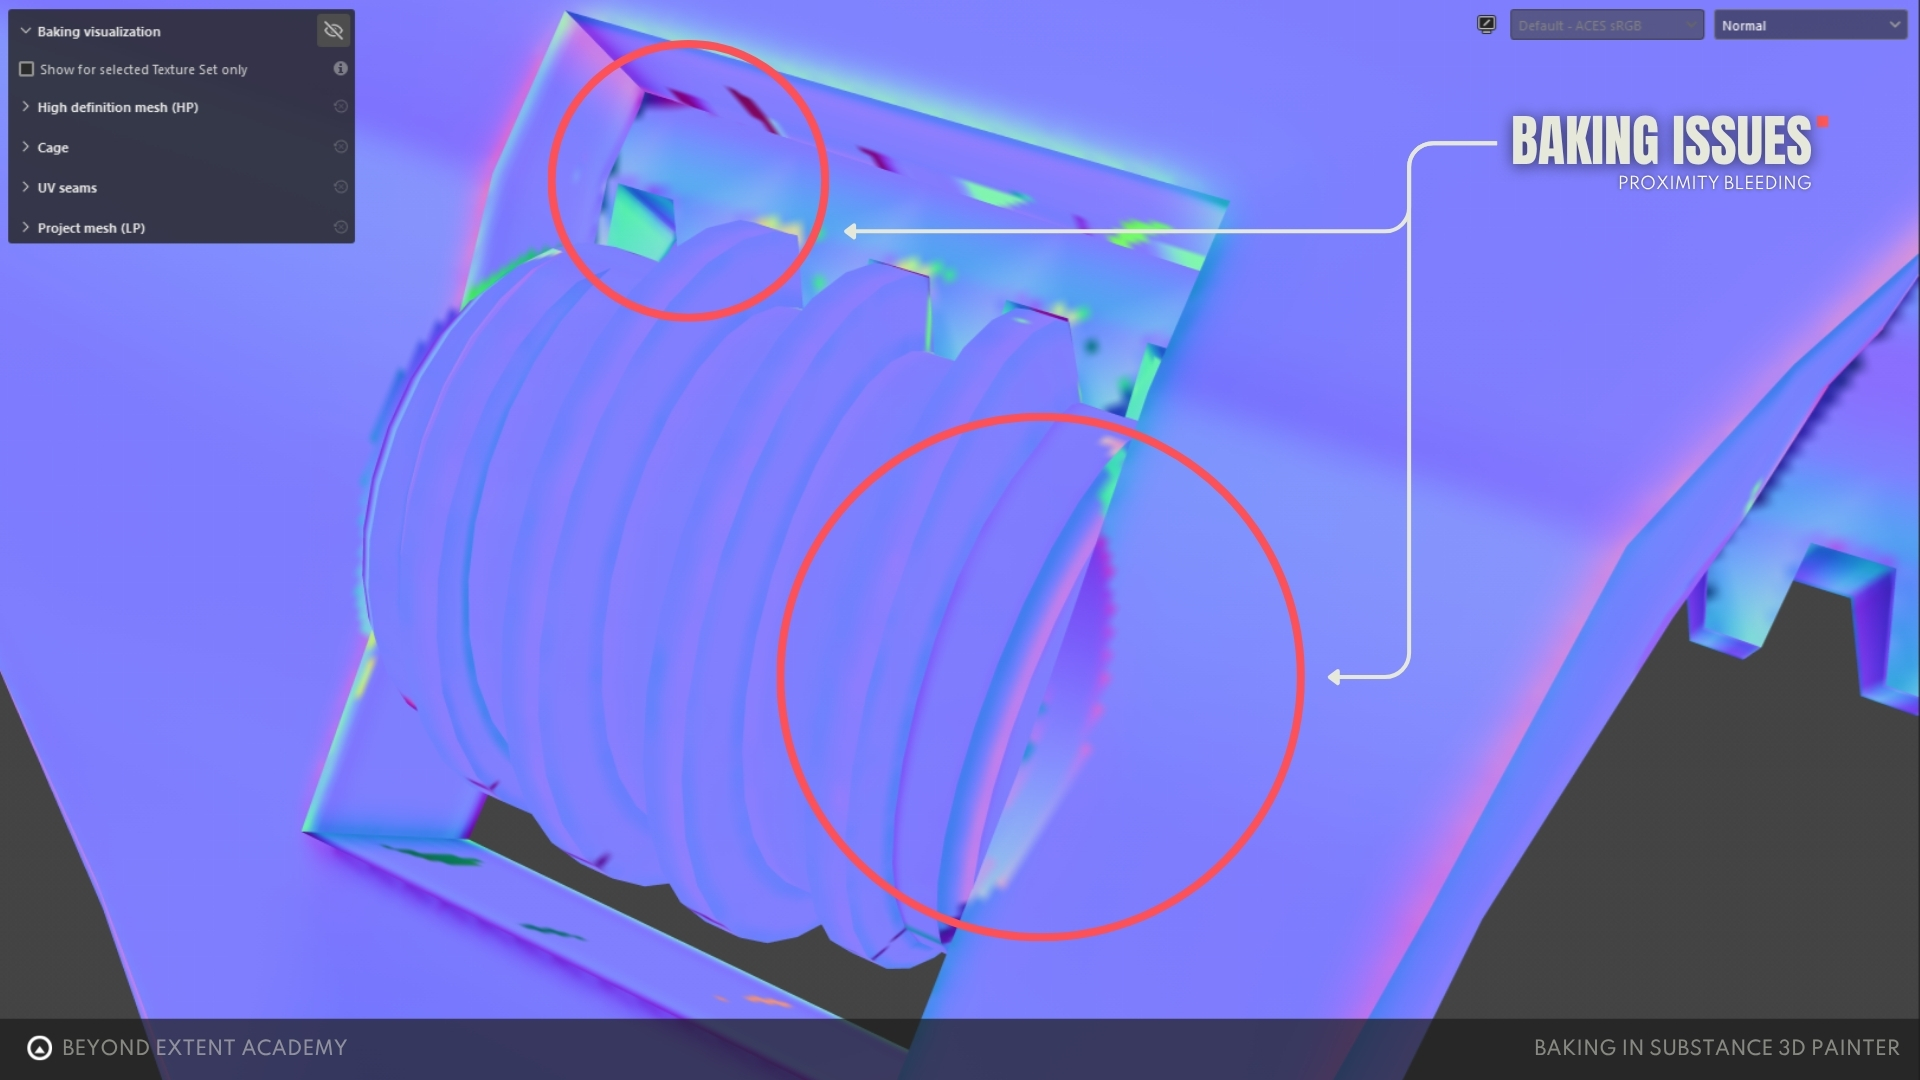
Proximity bleed
This is the most common issue. If there are multiple objects close to each other (in the wrench we have the threaded middle part and the main body of the wrench), the baker would bake the “Shadow” of one geo onto another.
Fix: Make sure to Match “By Mesh Name” or use outdated method of exploding your mesh, which means moving individual parts away from each other.
Wavy or Skewed details
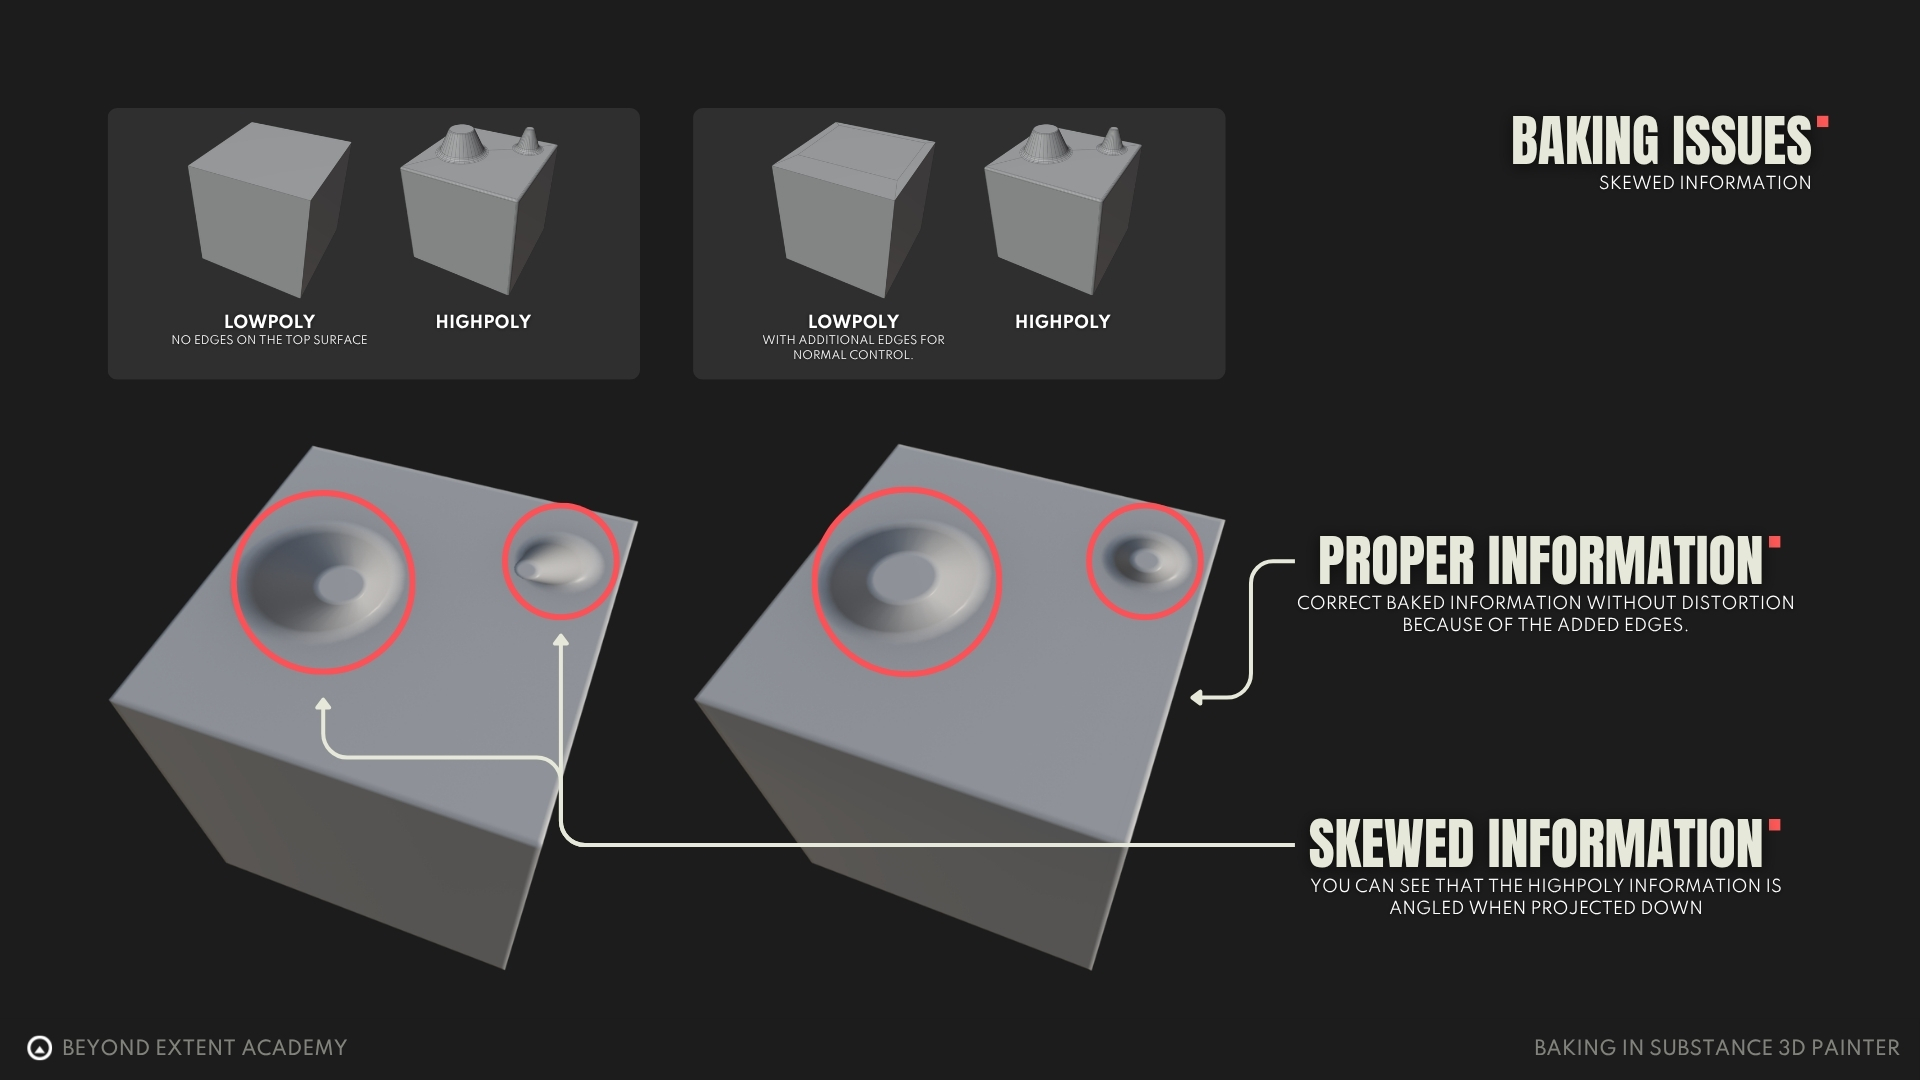
Sometimes averaged normals can cause the details of your bake to be skewed aka. averaged along normals.
Fix: The easiest way to fix that is to not use averaged normals. Unfortunately,most of the times that will make the bake look bad so we won’t be using that.
The second way is to add edges to a low poly around the skewed detail and you might even be able to remove them after the bake. The third way and the one that always works is to create a custom cage for your mesh. It will use up the most of your time out of the three but it will work 100%. Below are the results of the second method.
Broken Golden Rule
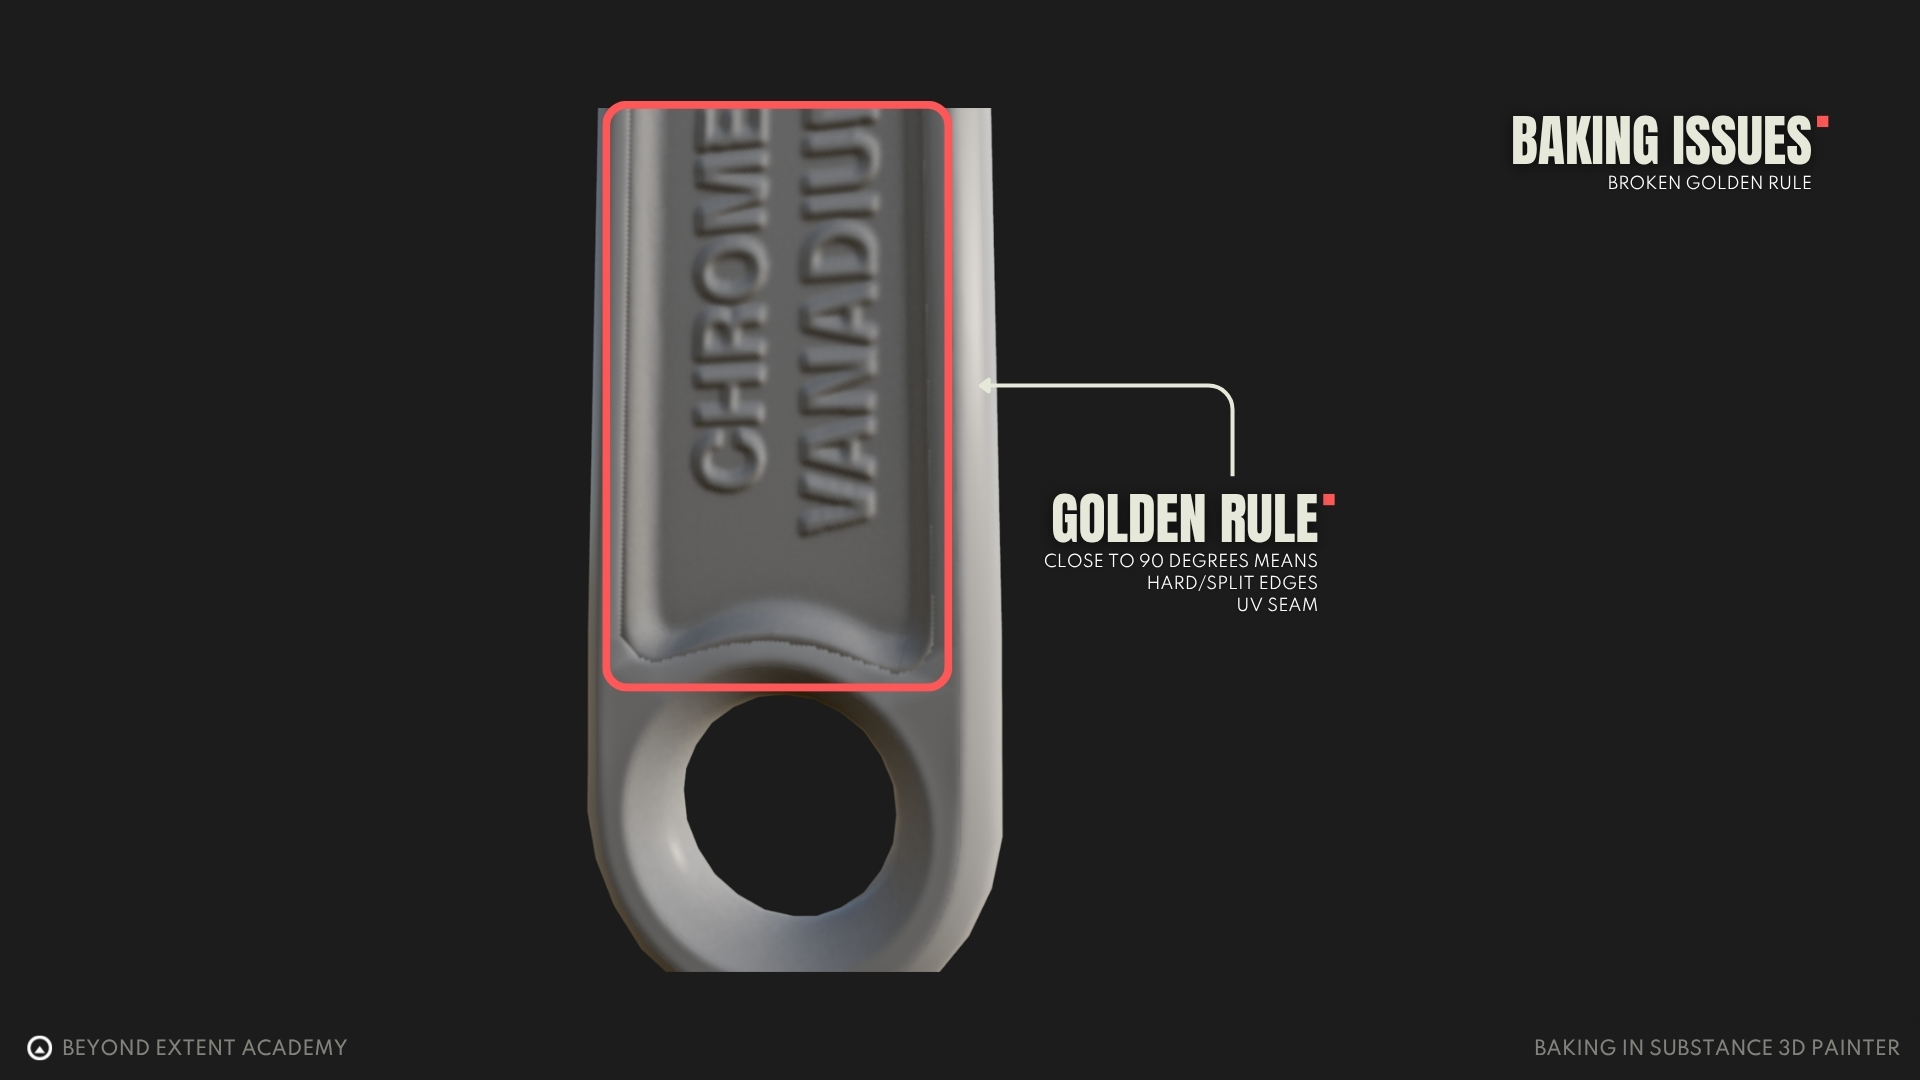
If you break the golden rule and miss the purple edge (sharp edge with no seam) in the bake viewport you will see a dark line at the culprit edge artifacts.
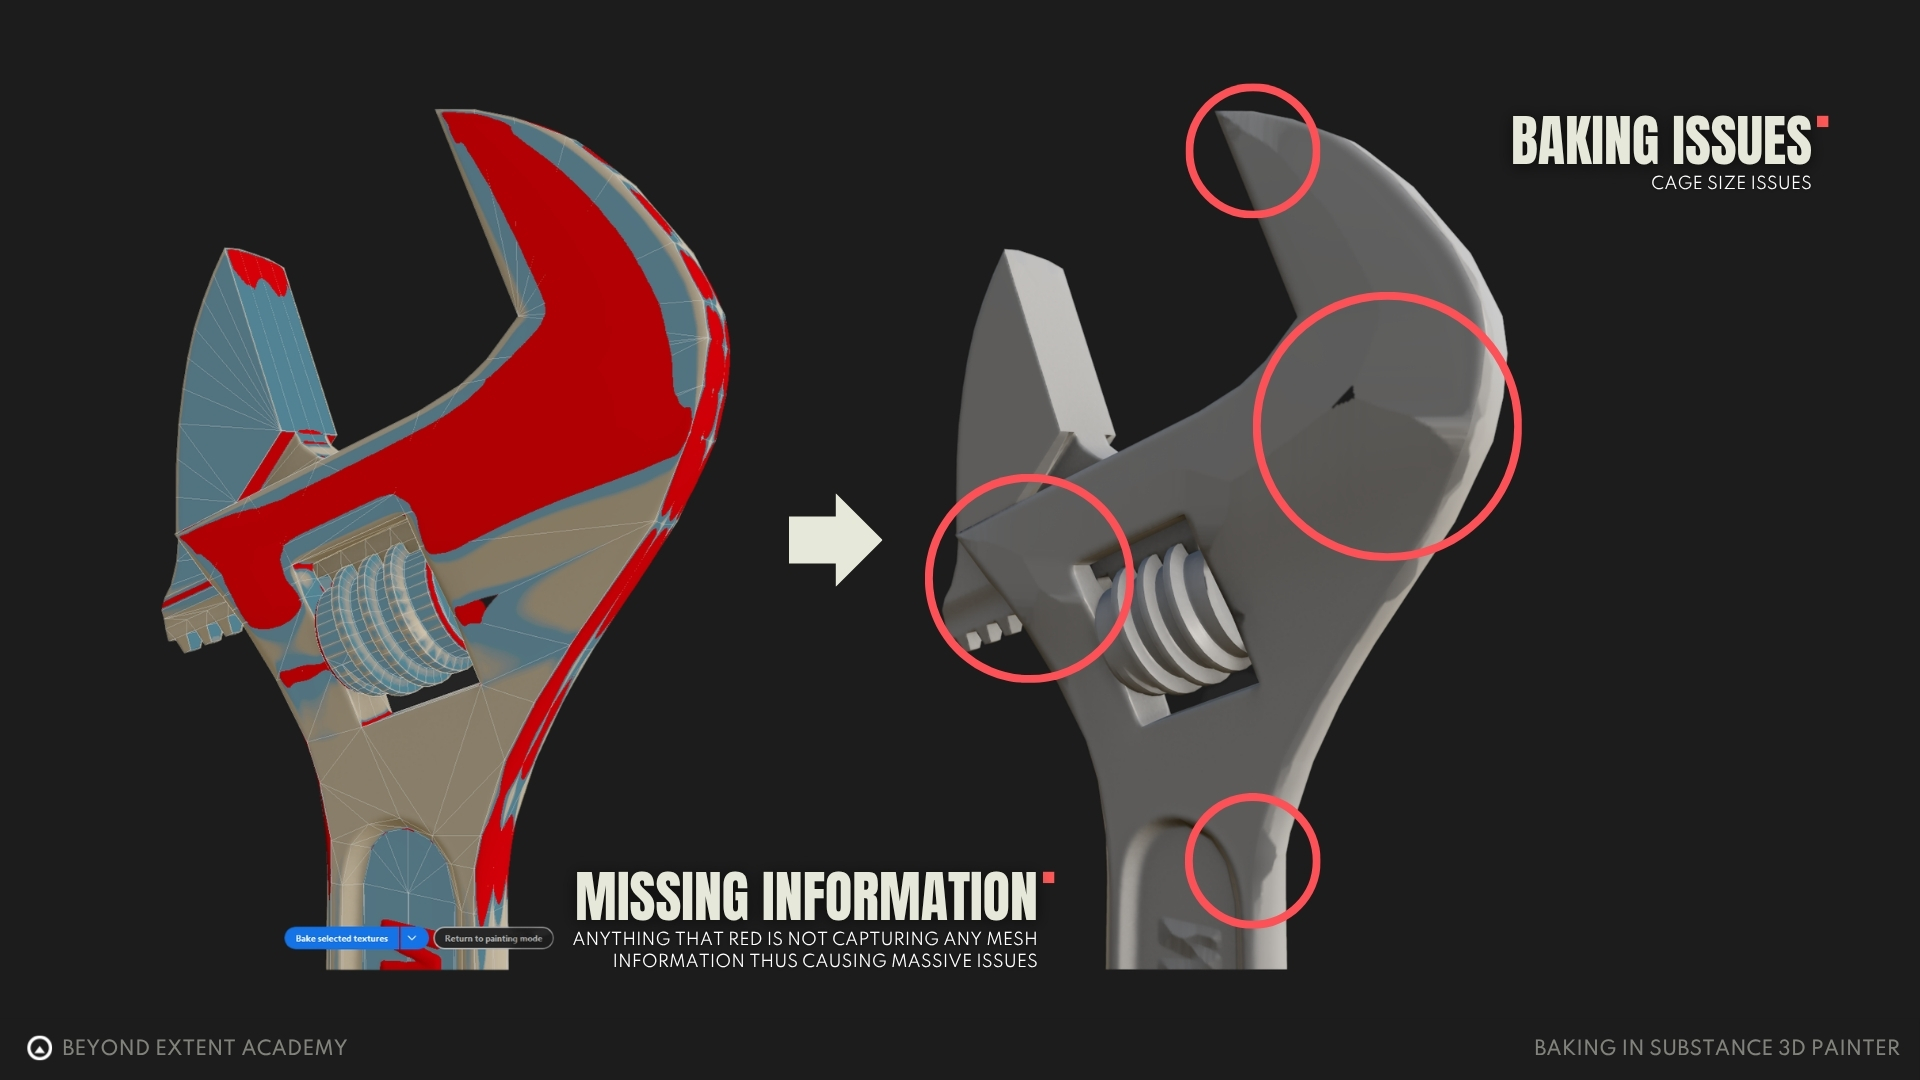
Cage size issue
If you make your cage too small it can create weird normals (those are the dilated parts of texture) and even black spots where the bake didn’t happen.
Fix: Adjust your cage size. If you cant make the artifacts disappear with generated cage it’s time to invest some time into creating a custom cage mesh.
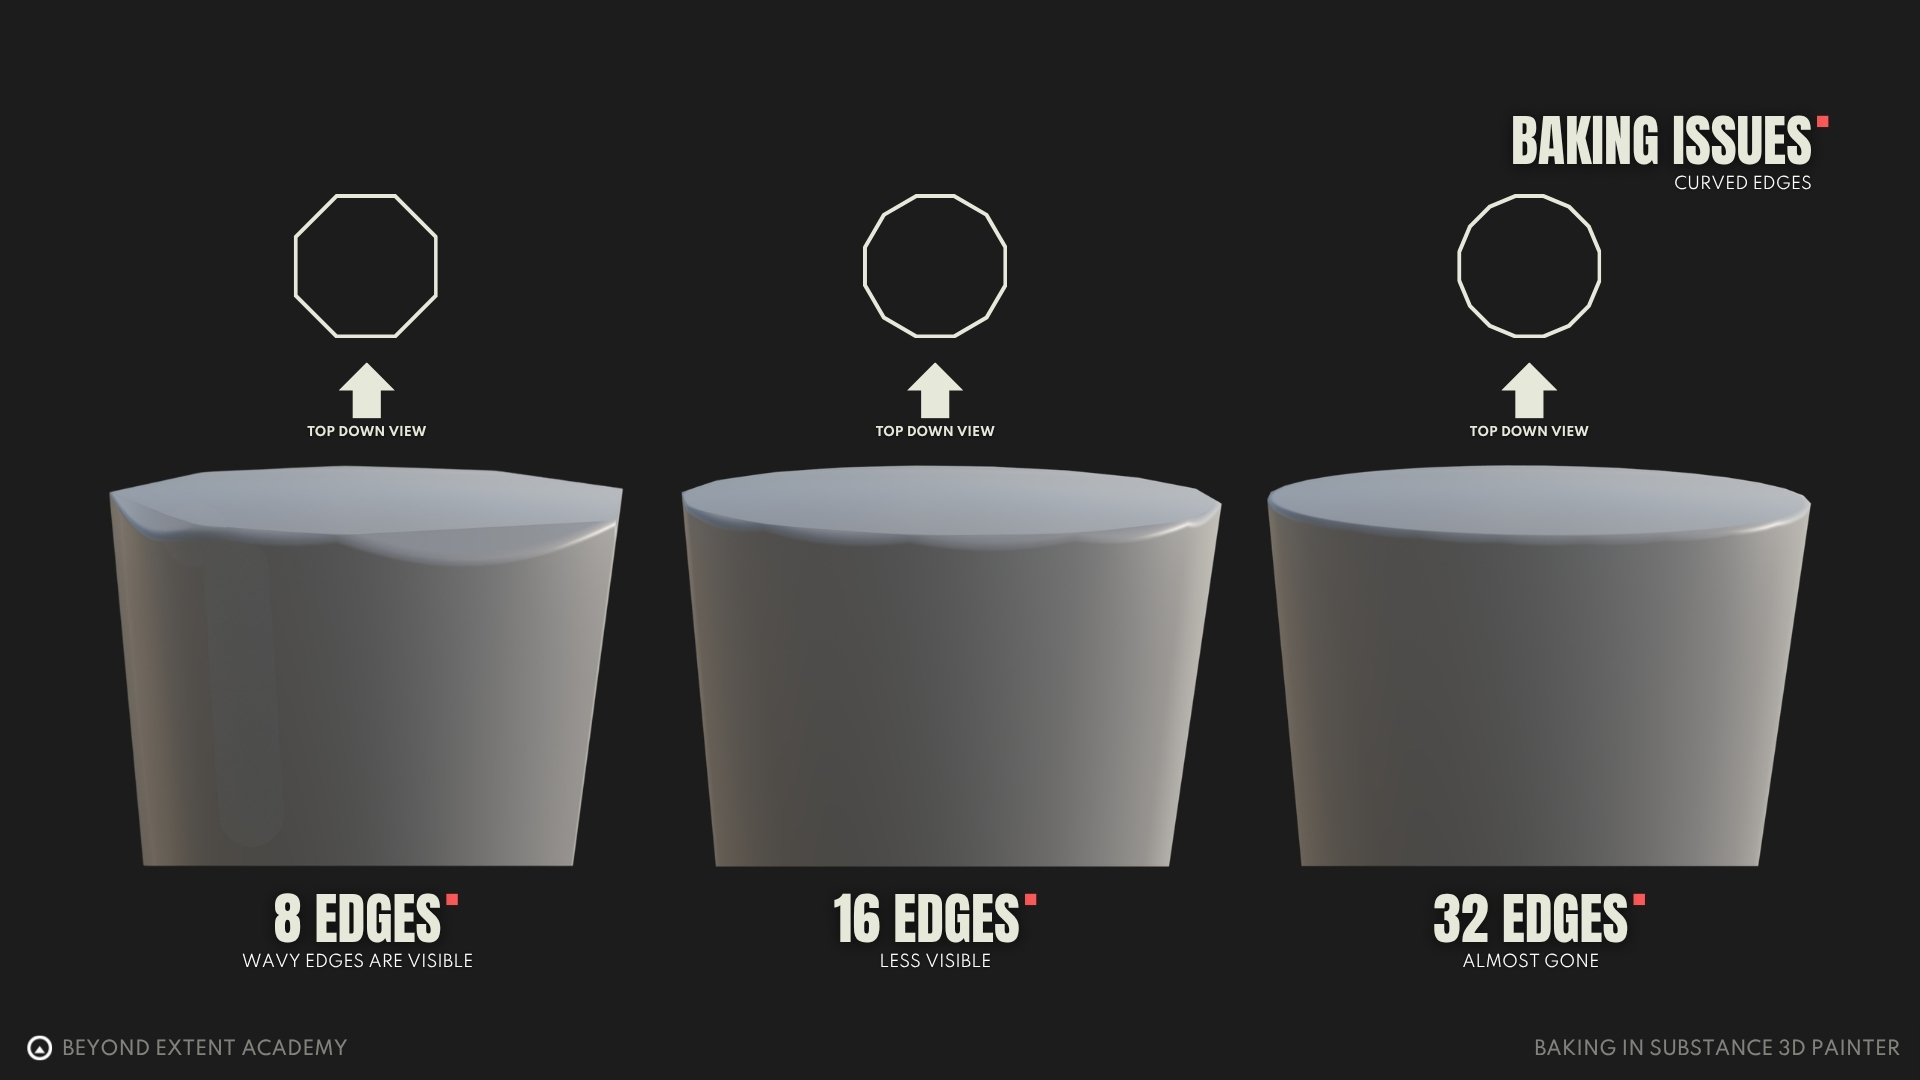
Curved edges
If you don’t have enough geometry at the edge of curved surface you can see jagged or wavy patterns. Fix: Increase the geometry to follow the curve more closely.
Conclusion
Here is the final setup of the wrench bake and it’s results! Except from what you can see on the screenshot, all the secondary rays were cranked up to 128 and the Curvature Self Intersections were set to Only Same Mesh Name.
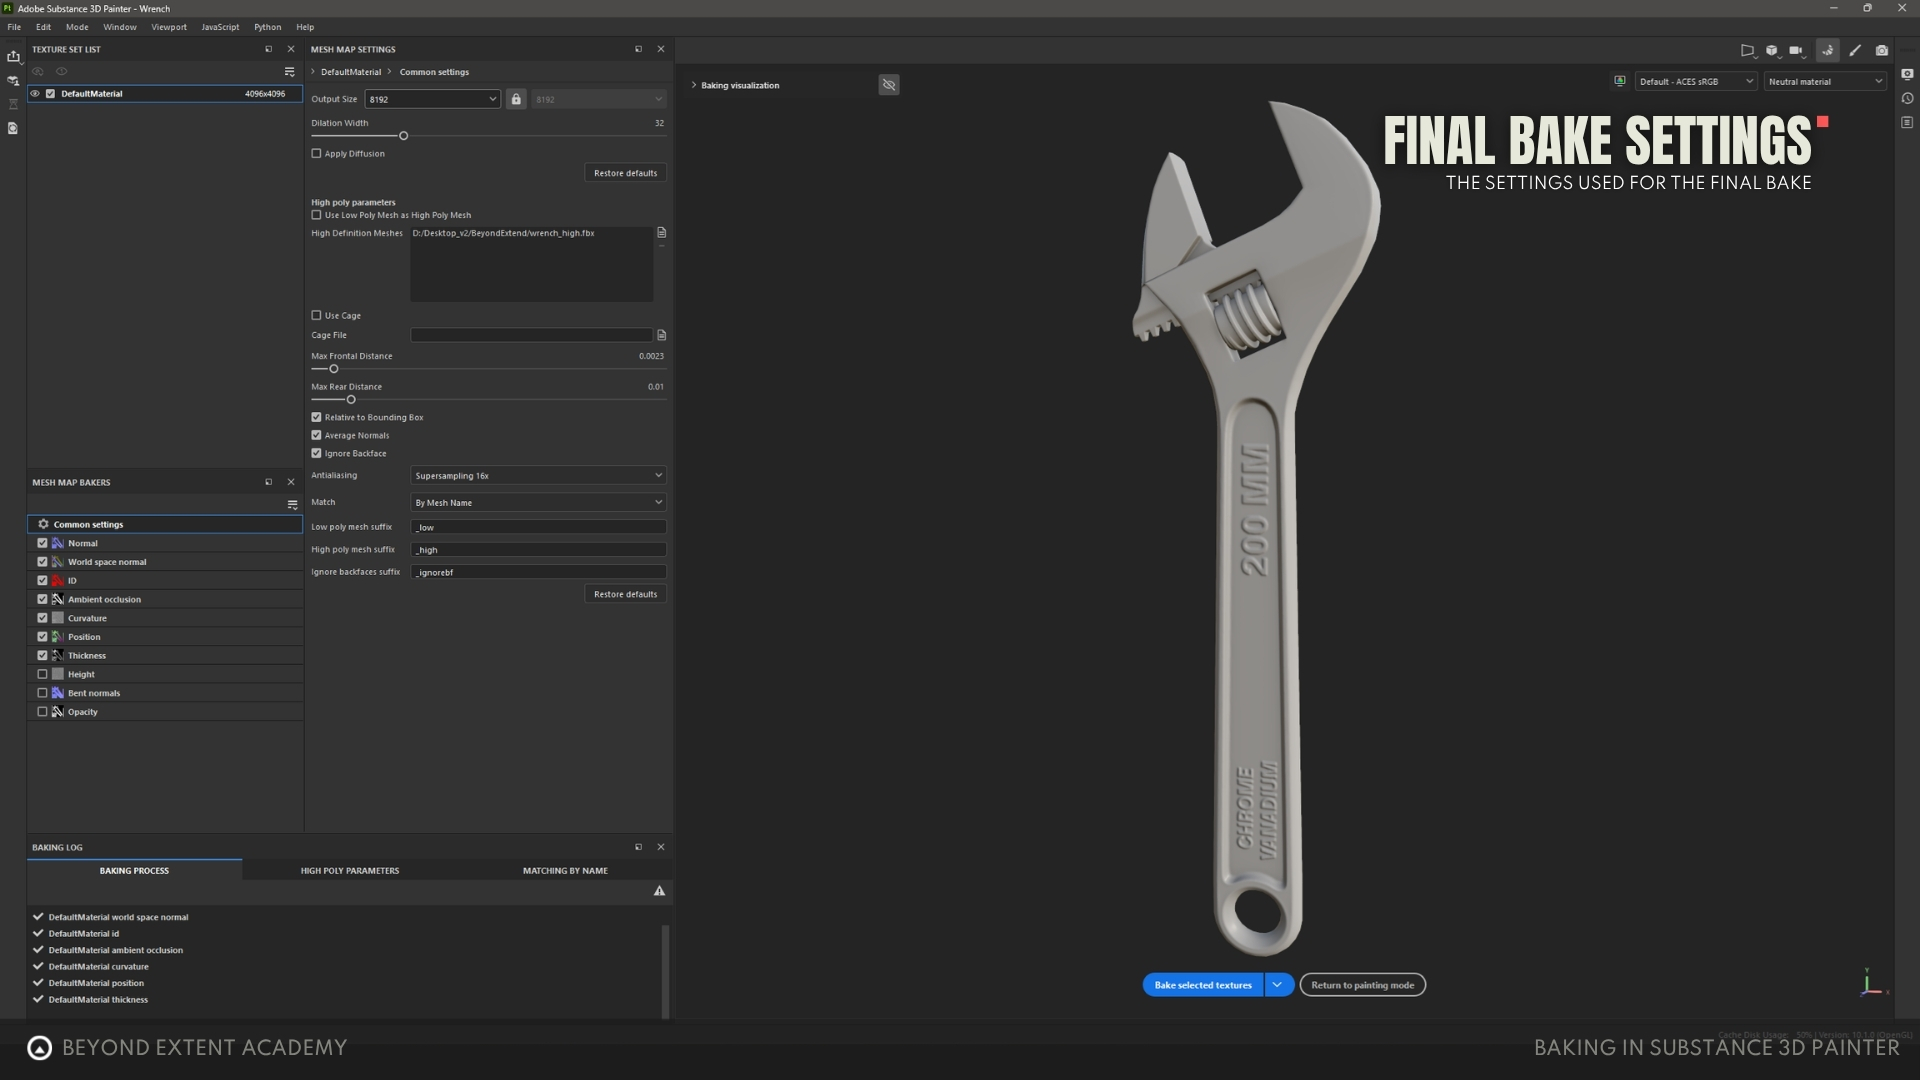
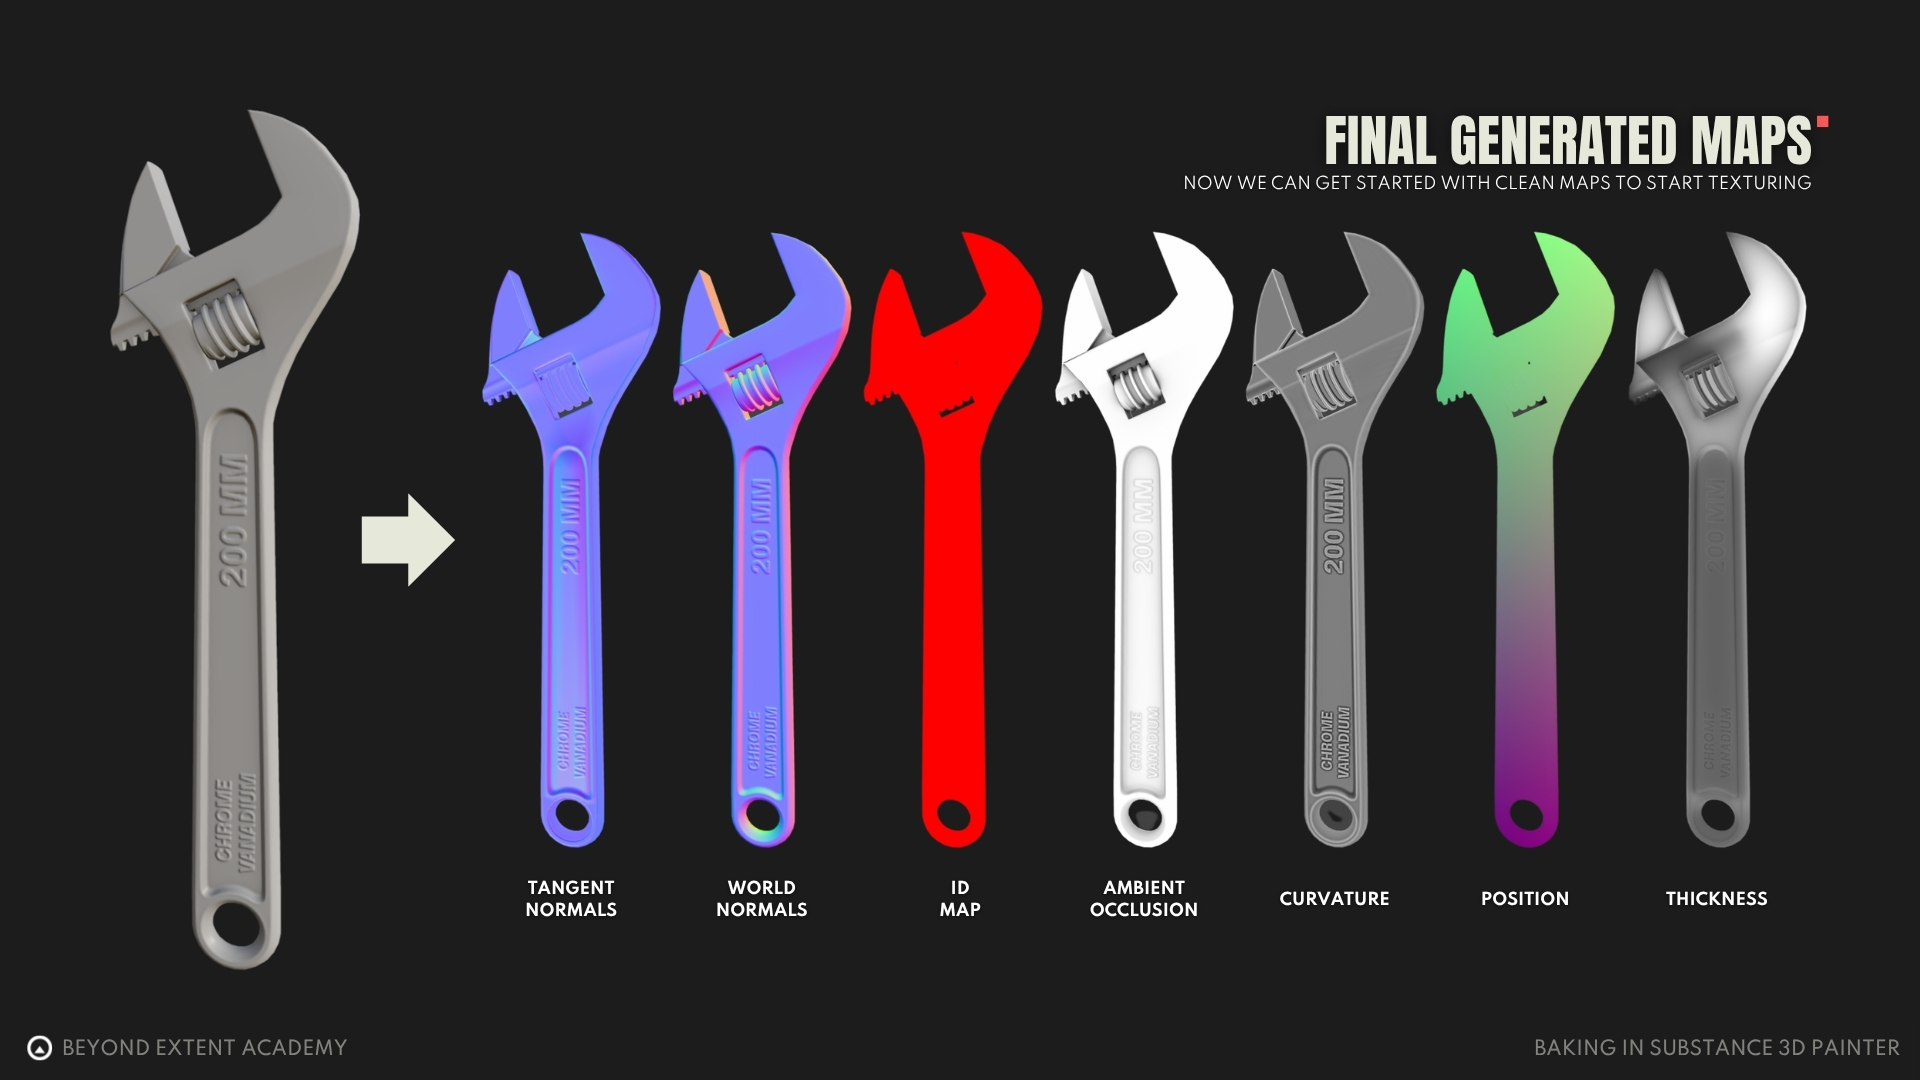
Having gone through the key steps for baking in Substance Painter, you're now able to bake any mesh you want with nice and crisp values. You should also be a little more familiar with Substance Painter and its UI. We went through all the maps that can be baked in Painter and understood their purpose and how to manipulate their generation. Now we can move on to the next step: texturing your asset!
RESOURCES
⚠️
MISSING RESOURCES